7001575 -
UC Door Lock Kit Instructions
7014581 / Rev B / August, 2011
4.
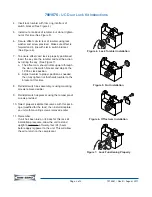
Insert lock tumbler with trim ring into front of
switch bracket (See Figure 4).
5.
Install nut onto back of tumbler, but do not tighten
nut at this time (See Figure 5).
6.
Secure offset cam to rear of tumbler using lock
washer and screw provided. Make sure offset is
forward and in line with slot in switch bracket.
(See Figure 6).
7.
To ensure offset cam/ lock is properly positioned,
insert the key into the tumbler and test the action
by turning the key (See Figure 7):
a.
The offset cam should rotate upward through
the slot in the switch bracket and stop at the
12:00 o’clock position.
b
Adjust tumbler to proper position as needed,
then fully tighten nut that holds tumbler to the
bracket at this time.
8.
Reinstall switch box assembly, reusing mounting
screws removed earlier.
9.
Reinstall switch depressor using the tamper proof
screws provided.
10. Select proper kickplate that comes with this pack-
age (modified for the lock), then install kickplate
on unit with mounting screws removed earlier.
11. Remember:
If unit has been laid on its back for this lock kit
installation procedure, allow the unit to stand
upright a minimum of twenty-four (24) hours
before applynig power to the unit. This will allow
the oil to return to the compressor.
Page 2 of 2
Figure 4. Lock Tumbler Installation
Figure 7. Lock Functioning Properly
Figure 5. Nut Installation
Figure 6. Offsetcam Installation


