


ASSEMBLY INSTRUCTIONS
Note: Instructions show right-side installation. Reverse for left-side installation. Instructions include
parts that are packed with Frameless Door (Item #095412, 0954410, sold separately).
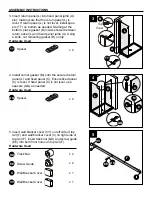
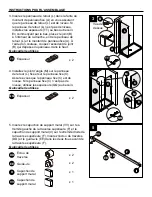
1
A
2a
1.
Set fixed panel jamb (A) on shower base
threshold. Use a level to ensure panel jamb (A)
is level. Using a pencil (not included), mark the
four pre-drilled hole locations. Remove panel
jamb (A). Using a drill (not included), drill holes
approximately 1-1/2 in. deep into each marking.
NOTE:
If installing into tile, use 1/4 in. masonry
bit (not included) and proceed to step 2a. If
installing into an acrylic or fiberglass shower
enclosure, use 1/8 in. drill bit (not included) and
proceed to step 2b.
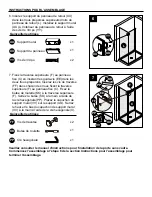
BB
CC
A
2a.
Tile installation:
Insert wall anchors (CC) into
each drilled hole using rubber mallet (not
included). Place fixed panel jamb (A) back into
place. Tighten 1-9/16 in. screws (BB) with
Phillips screwdriver (not included) into each
wall anchor (CC).
Hardware Used
Wall Anchor
1-9/16 in. Screw
CC
BB
x 4
x 4
2b
BB
A
2b.
Acrylic and fiberglass installation:
Place
fixed panel jamb (A) back into place. Tighten
1-9/16 in. screws (BB) with Phillips screwdriver
into each drilled hole.
Hardware Used
1-9/16 in. Screw
BB
x 4
Содержание 0954409
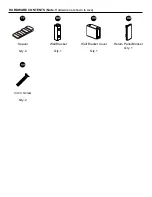
Страница 2: ...PART DESCRIPTION QUANTITY L Return Panel 1 M Corner Gasket 1 PACKAGE CONTENTS L M...
Страница 10: ...PI CE DESCRIPTION QUANTIT L Panneau de retour 1 M Joint d angle 1 L M CONTENU DE L EMBALLAGE...
Страница 18: ...PIEZA DESCRIPCI N CANTIDAD L Panel de retorno 1 M Empaquetadura de esquina 1 L M CONTENIDO DEL PAQUETE...


