Style selections 0954409 Скачать руководство пользователя страница 20

INFORMACIÓN DE SEGURIDAD

Lea y comprenda completamente este manual antes de intentar ensamblar, usar o instalar el 

producto.

ADVERTENCIA

Use gafas de seguridad en todo momento durante la instalación.

PRECAUCIÓN

Se necesitan dos personas para levantar el panel de vidrio durante la instalación. Es pesado y se 

romperá si se deja caer.

PREPARACIÓN

Antes de comenzar a ensamblar el producto, asegúrese de tener todas las piezas. Compare las 

piezas con la lista del contenido del paquete y la lista de aditamentos. No intente ensamblar el pro-

ducto si falta alguna pieza o si estas están dañadas. 

Tiempo estimado de ensamblaje: 

90 minutos

Herramientas necesarias para el ensamblaje (no se incluyen): masilla para calafateo de silicona, 

pistola para calafateo, taladro, broca para taladro de 1/4 de pulg., broca para taladro de 1/8 de pulg., 

cinta métrica, cuchillo para uso general, nivel, lápiz, destornillador Phillips, sierra de mano y gafas 

de seguridad.

Содержание 0954409

Страница 1: ...nel follow all of the instructions contained within this instruction manual FIRST then proceed to Step 6 of the Assembly Instructions section in the instruction manual for the Frameless Door in order...

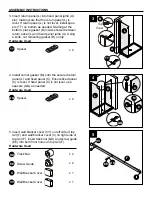
Страница 2: ...PART DESCRIPTION QUANTITY L Return Panel 1 M Corner Gasket 1 PACKAGE CONTENTS L M...

Страница 3: ...HARDWARE CONTENTS Note Hardware not shown to size Spacer Qty 2 TT Wall Bracket Qty 1 UU Wall Bracket Cover Qty 1 VV Return Panel Bracket Qty 1 XX 3 4 in Screw Qty 2 YY...

Страница 4: ...y and will break if dropped PREPARATION Before beginning assembly of product make sure all parts are present Compare parts with package contents list and hardware contents list If any part is missing...

Страница 5: ...lling into tile use 1 4 in masonry bit not included and proceed to step 2a If installing into an acrylic or fiberglass shower enclosure use 1 8 in drill bit not included and proceed to step 2b BB CC A...

Страница 6: ...acket cover VV on left side of top rail F and wall bracket cover II on right side of top rail F Insert track nut DD and screw guide EE into both front holes on top rail F F A II EE DD VV ASSEMBLY INST...

Страница 7: ...KK on top of rail F Hand tighten bumper KK with hex key PP Place brack et cover VV over bracket UU Hand tighten bracket cover VV into place using hex key II on both top and bottom F ASSEMBLY INSTRUCTI...

Страница 8: ...ages including but not limited to damage to or loss of use of the building or its contents arising out of any defect in the fixture nor shall the distributor be liable for any amount in excess of the...

Страница 9: ...u de retour suivez D ABORD toutes les instructions du pr sent manuel d instructions puis passez l tape 6 des instructions pour l assemblage du manuel d instructions de la porte sans cadre pour termine...

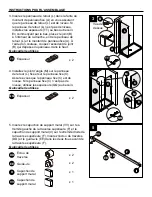
Страница 10: ...PI CE DESCRIPTION QUANTIT L Panneau de retour 1 M Joint d angle 1 L M CONTENU DE L EMBALLAGE...

Страница 11: ...Qt 2 TT Support mural Qt 1 UU Capuchon de support mural Qt 1 VV Support du panneau de retour Qt 1 XX Vis de 3 4 po Qt 2 YY QUINCAILLERIE INCLUSE Remarque La quincaillerie n est pas illustr e la grande...

Страница 12: ...impact PR PARATION Avant de commencer l assemblage du produit assurez vous d avoir toutes les pi ces Comparez le contenu de l emballage avec la liste des pi ces et celle de la quincaillerie incluse S...

Страница 13: ...uche en carrelage utilisez un foret de ma onnerie de 1 4 po non inclus et passez l tape 2a Si vous installez l article dans une cabine de douche en acrylique ou en fibre de verre utilisez un foret de...

Страница 14: ...r mit gauche de la traverse sup rieure F et le capuchon de support mural II sur l extr mit droite de la traverse sup rieure F Ins rez l crou de traverse DD et le guide vis EE dans les deux trous avant...

Страница 15: ...e sup rieure F Serrez la but e KK la main l aide de la cl hexagonale PP Placez le capuchon de support mural VV sur le support UU Serrez le haut et le bas du capuchon de support mural VV la main l aide...

Страница 16: ...sans toutefois s y limiter les dommages ou les pertes de jouissance d un b timent ou de son contenu qui d coulent d un d faut de l article ou de tout co t s ajoutant au prix d achat original de l arti...

Страница 17: ...todas las instrucciones que aparecen en este manual de instrucciones PRIMERO luego proceda con el paso 6 de la secci n Instrucciones de ensamblaje de este manual de instrucciones para la puerta sin m...

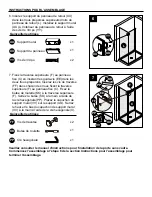
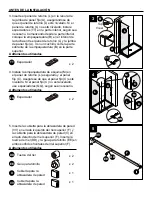
Страница 18: ...PIEZA DESCRIPCI N CANTIDAD L Panel de retorno 1 M Empaquetadura de esquina 1 L M CONTENIDO DEL PAQUETE...

Страница 19: ...TT Abrazadera de pared Cant 1 UU Cubierta para la abrazadera de pared Cant 1 VV Abrazadera del panel de retorno Cant 1 XX Tornillo de 3 4 pulg Cant 2 YY ADITAMENTOS Nota los aditamentos no se muestra...

Страница 20: ...mblar el producto aseg rese de tener todas las piezas Compare las piezas con la lista del contenido del paquete y la lista de aditamentos No intente ensamblar el pro ducto si falta alguna pieza o si e...

Страница 21: ...poster a de 1 4 pulg no se incluye y proceda al paso 2a Si realiza la instalaci n en un cerramiento para ducha de fibra de vidrio o de acr lico utilice una broca para taladro de 1 8 pulg no se incluye...

Страница 22: ...lado izquierdo del riel superior F y la cubierta para la abrazadera de pared II en el lado derecho del riel superior F Inserte la tuerca del riel DD y la gu a para tornillo EE en ambos orificios front...

Страница 23: ...te el protector KK a mano con la llave hexagonal PP Colo que la cubierta de la abrazadera VV sobre la abrazadera UU Apriete a mano la cubierta de la abrazadera VV en su lugar con la llave hexagonal II...

Страница 24: ...que surjan de cualquier defecto en el ensamble el distribuidor tampoco se har responsable por pagar un monto que supere el precio de la compra original del ensamble El distribuidor se reserva el derec...

Отзывы: