background image

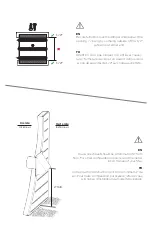
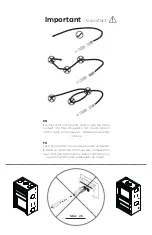
1/2''

1/2''

EN

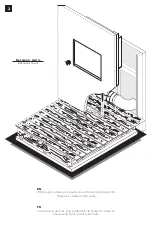
Be careful not to block the damper and obstruct the  
opening / closing by camping outside of the 1/2” 

safe zone at either end.


FR

Attention à ne pas bloquer ni à entraver l'ouver-
ture / fermeture du clapet en vissant dehors de la 

«zone de sécurité» de 1/2" sur chaque extrémité.

EN

Your wall exhaust should be a minimum of 2’ from 

floor. For other configuration options, read the instal-

lation manual of your Stûv.


FR

Votre bouchon d’extraction doit être à minimum 2’ du 

sol. Pour toute configuration particulière, referez-vous 

à la notice d’installation du model Stûv installé.  

2' min

Inside 

Intérieur

Outside 

Extérieur

Содержание Air damper

Страница 1: ...The essential fire Air damper Clapet d air...

Страница 2: ...Use Mode d emploi...

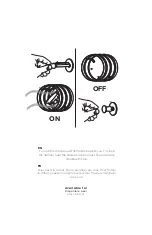
Страница 3: ...the damper push the handle back towards the wall Always handle with care FR Pour ouvrir le clapet tirer la poign e vers vous Pour fermer le clapet pousser la poign e vers le mur Toujours manipuler av...

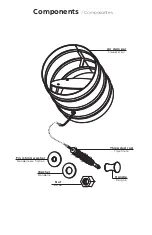
Страница 4: ...Components Composantes Threaded rod Tige filet Handle Poign Finishing washer Rondelle de finition Washer Rondelle Nut crou Air damper Clapet d air...

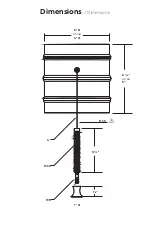
Страница 5: ...Dimensions Dimensions P 15 6 1 4 or ou 5 3 1 2 7 8 4 M5 M10 6 or ou 4 1...

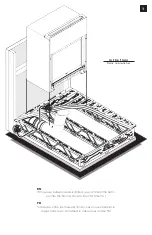
Страница 6: ...is limited you can install the dam per into the floor as shown Ideal for St v 30 FR Si l espace entre les murs est limit vous pouvez installer le clapet dans le sol tel qu illustr Id al pour le St v 3...

Страница 7: ...ls Entre les murs EN Where space allows it is best to leave the damper below the fireplace or between the walls FR Si l espace le permet il est pr f rable de laisser le clapet en dessous du foyer ou e...

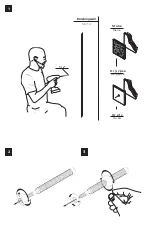
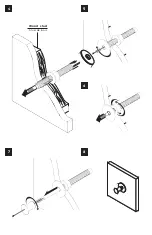
Страница 8: ...he rod to meet the nut FR 1 Percer le mur ou le sol l o la poign e sera situ e 2 Ins rer l crou le long de la tige filet e jusqu mi chemin 3 Faites glisser la rondelle sur la tige D poser contre l cro...

Страница 9: ...2 1 3 Finishing wall Mur fini Stone Pierre Or gypse Ou gypse 7 16 Or etc Ou etc...

Страница 10: ...the unthreaded shank and thread the handle on 8 Test the assembly for proper operation FR 4 Ins rez la tige filet e dans le trou perc l tape 1 As surez vous qu il y a un cadrage de bois en place derri...

Страница 11: ...Wood stud Stud de bois 4 5 6 7 8...

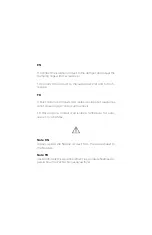
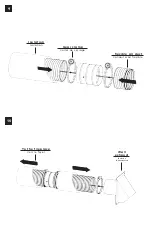
Страница 12: ...ccorder les conduits d air isol s au clapet et ajuster les collet de serrage l aide d un tournevis 10 Raccorder le conduit d air isol e l entr e de l air ext rieur et votre St v Note EN Always isolate...

Страница 13: ...9 10 flexible air duct Conduit d air flexible Isolation Isolation Gear clamp Collet de serrage To the fireplace Vers le foyer Wall exhaust Bouche d extraction...

Страница 14: ...t en vissant dehors de la zone de s curit de 1 2 sur chaque extr mit EN Your wall exhaust should be a minimum of 2 from floor For other configuration options read the instal lation manual of your St v...

Страница 15: ...onfiguration can create tension on the cable and cause an inadequate opening closing FR Il est important de ne pas plier torsioner ou tourner le c ble sur lui m me Une mauvaise configuration peut cr e...

Страница 16: ...nd the thermal benefits To do this St v is committed to creativity design the qua lity of the products developed and their ability to live up to consumers expectations as well as placing real impor ta...

Отзывы: