background image

- 14 -

ENGLISH

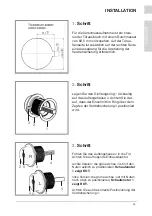
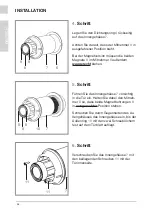
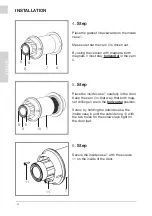
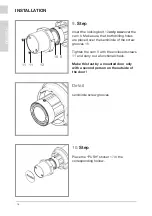
4. 

Step

Place the gasket 

backwards on the inside 

case 

7

Make sure that the cam


8

 is driven out.

By using the version with magnets, both 
magnets 

9

 must stay 

horizontal in the cam 

8

.

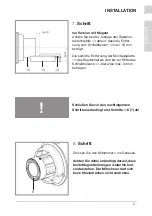
5. 

Step

Place the inside case 

carefully in the door. 

Keep the cam 

8

 in that way, that both mag-

net drillings 

9

 are in the 

horizontal position. 

Screw, by holding the outside case, the 
inside case in until the outside ring 

10

 with 

the two holes for the screws lays tight on 
the door leaf.

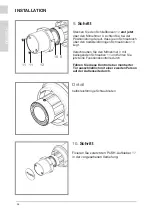
6. 

Step

Secure the inside case 

7

 with the screws  

11

 on the inside of the door.

INSTALLATION

6

7

9

9

8

7

10

9

9

8

7

11

11

Содержание 37105001

Страница 1: ...BOLZENSCHLIESSUNG F R K HLRAUMSCHIEBET REN Montageanleitung LOCKING BOLT FOR COLD ROOM SLIDING DOORS Installation Instruction...

Страница 2: ...den Wertstoffbeh lter Installation Falls Sie Unterst tzung bei der Installation des Produktes ben tigen wenden Sie sich bitte an die Steinbach Vollmann GmbH Co KG Die Kontaktdaten finden Sie auf der R...

Страница 3: ...DEUTSCH LIEFERUMFANG Bitte pr fen Sie vor Montagebeginn zun chst den Lieferumfang 1 Au engeh use 1 Innengeh use 2 Dichtungen 1 Schlie bolzen 1 PUSH Aufkleber 4 Schrauben 1 Reedkontakt nur Magnetversi...

Страница 4: ...links einsetzen hat eine integrierte Not ffnung und kann optional mit Magneten zur elektronischen Verschlusszustandsanzeige aus ger stet werden Die Bolzenschlie ung wird komplett mit eingebautem Prof...

Страница 5: ...eitig auf das Au engeh use 2 Achten Sie dar auf dass der Einschnitt im Ring ber dem Zapfen der Verdrehsicherung 3 positioniert wird 3 Schritt F hren Sie das Au engeh use 2 in die T r Achten Sie auf fo...

Страница 6: ...ritt F hren Sie das Innengeh use 7 vorsichtig in die T r ein Halten Sie dabei den Mitneh mer 8 so dass beide Magnetbohrungen 9 in waagerechter Position stehen Schrauben Sie durch Gegenhalten des Au en...

Страница 7: ...geplatte 14 des Reedschalters darf bis zur Mitte des Schlie bolzens 12 ber alles max 34 mm betragen 8 Schritt Dr cken Sie den Mitnehmer 8 ins Geh use Achten Sie dabei unbedingt darauf dass beide Magne...

Страница 8: ...in Schraubloch ber den halbkreisf rmigen Schraubnuten 16 liegt Verschrauben Sie den Mitnehmer 8 mit beiliegenden Schrauben 11 und f hren Sie jetzt eine Funktionskontrolle durch F hren Sie diese Kontro...

Страница 9: ...09 DEUTSCH INSTALLATION...

Страница 10: ...the packaging in the appropriate recycling container Installation If you need any assistance during the installation of the product please contact Steinbach Vollmann GmbH Co KG Contact details can be...

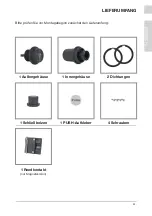
Страница 11: ...LISH ITEM CHECK LIST Prior to assembling check the scope of delivery first please 1 Outside case 1 Inside case 2 Gaskets 1 Cam 1 PUSH Sticker 4 Screws 1 Reed contact switch for locking bolt with magne...

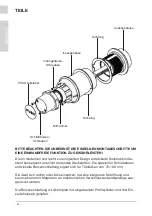
Страница 12: ...can be installed either on the right or left hand side In addition it has an inte grated emergency opening and it can optionally be equipped with magnets that display electronically the status of the...

Страница 13: ...he groove in the gasket is placed correctly onto the square 3 of the twisting device 1 2 3 R L 4 4 3 3 2 2 5 5 3 Step Place the outside housing 2 in the door Fol low the instructions below Right hand...

Страница 14: ...p Place the inside case 7 carefully in the door Keep the cam 8 in that way that both mag net drillings 9 are in the horizontal position Screw by holding the outside case the inside case in until the o...

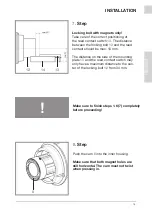
Страница 15: ...x 10 mm The distance on the side of the mounting plate 13 and the reed contact switch may only have a maximum distance to the cen ter of the locking bolt 12 from 34 mm 8 Step Push the cam 8 into the i...

Страница 16: ...e that both drilling holes are placed over the semicircle of the screw grooves 16 Tighten the cam 8 with the enclosed screws 11 and carry out a functional check Make this test by a mounted door only w...

Страница 17: ...17 ENGLISH NOTES...

Страница 18: ...erungen zur Anpassung an den neuesten Stand der Technik und Produktion bleiben ausdr cklich vorbehalten Copyright 2018 Steinbach Vollmann Dieses Handbuch darf weder als Ganzes noch in Ausz gen ohne sc...

Отзывы: