43
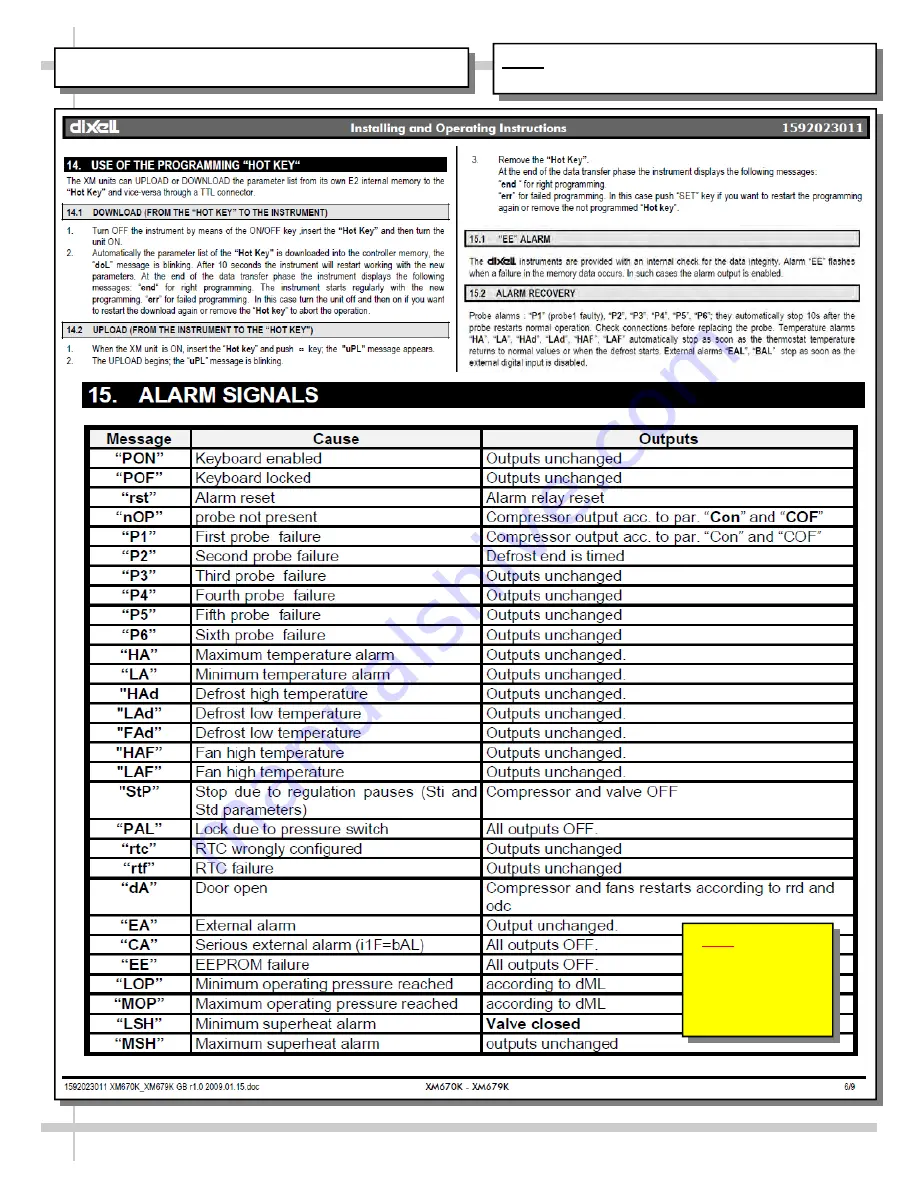
DIXELL® XM67(X)K CONTROLLER - PAGE 3 of 3
NOTE: THIS PAGE MAY NOT LIST EVERY SETTING
OR PARAMETER ON YOUR CONTROLLER
Note: Units With
These Temperature
Controllers Have
Been Hot-Keyed
At Factory For
General Operation.
Страница 1: ...traight Base Full Ends PLEASE NOTE THE FOLLOWING 1 YOUR SPECIFIC MODEL NUMBER IS ON THE SERIAL LABEL ON CASE REAR NEAR MAIN POWER SWITCH 2 ILLUSTRATIONS SHOWN BELOW LIST L TO REFLECT VARYING CASE LENG...
Страница 2: ...TS HV48RSS 5536 Etc MAINTENANCE FUNDAMENTALS HOT GAS LOOP CONDENS UNITS HV3674RSS 5954 Etc MAINTENANCE FUNDAMENTALS REAR DOORS REAR PLENUM MAGNETIC AIR FILTER MAINTENANCE FUNDAMENTALS MEDEX STORAGE UN...
Страница 3: ...S 4922 HV3674RSS 5954 HV3696RSS HV36112RSS HV36112RSS 4922B HV36112RSS 4992B HV36112RSS 4863A HV4256RSS HV4274RSS HV4296RSS HV5656RSS HV5656RSS 5382 HV7439RSS HV38RSSRD HV48RSSRD HV56RSSRD HV74RSSRD H...
Страница 4: ...ITIONS This unit is designed for the display of products in ambient store conditions where temperature and humidity are maintained within a specific range Type I display refrigerators are intended for...
Страница 5: ...milarly treated lamps CAUTION CAUTION POWER CORD AND PLUG MAINTENANCE Risk of electric shock If cord or plug becomes damaged replace only with cord and plug of same type CAUTION ADVERSE CONDITIONS SPA...
Страница 6: ...ay not reflect every feature or option of your particular case 2 Remove Case From Skid Casters Remove shipping brackets that may be securing casters to skid Place ramp up against skid to allow case to...
Страница 7: ...inside front panel support bracket and pivot outward to free slots from front panel hooks Lower front panel downward and out away from case Place panel in secure location while performing cleaning or...
Страница 8: ...our way around the pattern tightening more firmly at each pass Do not firmly tighten one bolt and then start on the next H After the cases are bolted together level the second case Repeat this process...
Страница 9: ...ssembly for making electrical connections Note Wiring process must be performed by certified electrician only Voltage rating is on serial label at case rear 8 Cases With Casters Lock and Unlock To loc...
Страница 10: ...ry feature or option of your particular case 12 Condensate Pan Drain Position Self Contained Units Remove the rear panel by lifting up out Slide the refrigeration package out from case Condensate pan...
Страница 11: ...Without Light Controls On Controller Light are hard wired to always come on when case is energized All lights will come on at the same time C Temperature Controller All Self Contained Units and some...
Страница 12: ...s will come on at the same time C Temperature Controller All Self Contained Units and some Remote Units Temperature controller varies depending upon model See TEMPERATURE CONTROLLER sections in this o...
Страница 13: ...condensate system hose and drain trap MUST BE secured and positioned over condensate pan to prevent water seepage spillage When sliding out condenser unit be careful that drain is not pulled from prop...
Страница 14: ...tain along top front of case as shown in illustration below Attachment Magnets will hold Night Air Curtain firmly in place To attach to display case place night curtain on top of case as shown Mark ke...
Страница 15: ...ll downward to desired location OUTSIDE acrylic sneeze guard see illustration below 4 To return Night Air Curtain to its retracted position grasp handle lift up and away from its magnetic attachment a...
Страница 16: ...the two Security Brackets 4 The next page in this manual will show how to secure the top of the Security Grid to the Security Brackets Enlarged View Below Enlarged View shown below shows Security Gri...
Страница 17: ...he two Security Brackets slide the two Padlocks through the Security Grid and the Security Brackets 2 Securely lock the Padlocks one Key fits both Padlocks Removing and Storing Security Grid and Locks...
Страница 18: ...is wired in series so all lights must be plugged in or receptacles capped for case lights to be on See illustration at lower right for general layout 3 Removal of Lamp Removal of lamp Rotate lamp 1 4...
Страница 19: ...ight up Oval form of plug is to connect to LED light oval form See illustration at right 4 Bracket Retainer Removal To remove brackets it may be necessary to remove the nylon shipping bracket retainer...
Страница 20: ...If a temperature setting change is required follow instructions regarding Temperature Control Programming Steps in the technical information section of this operating manual If service is required to...
Страница 21: ...ipped with a red indicator light for wicking material replacement located in the rear of case Wicking Material Replacement See TROUBLESHOOTING TO BE PERFORMED BY TRAINED SERVICE PROVIDERS ONLY PAGE 1...
Страница 22: ...case Wicking Material Replacement See TROUBLESHOOTING TO BE PERFORMED BY TRAINED SERVICE PROVIDERS ONLY PAGE 1 section in manual Hot Gas Loop Condensate Units Model HV3674RSS 5954 etc System Operatio...
Страница 23: ...of the door out The metal door brackets are not connected to the perforated Plexiglas plenum they will easily slide out from existing slots in plenum Carefully set rear sliding doors down to prevent...
Страница 24: ...to support icing buckets Two 2 pull out supplies organizer drawers Two 2 storage doors See illustration below Removable Magnetized Condenser Coil Filter Optional See Cleaning Instructions for specific...
Страница 25: ...ry to entirely remove due obstructions thermostat or rear ledge Photo 3a View of Solid Surface Deck in slightly raised position Photo 3b Use both hands to slide toward case rear Photo 3c After raising...
Страница 26: ...an Housing Shroud etc Illustration 6 View of Fan Housing Fan Shroud Fans Drain TXV Valves etc This is after the four Solid Surface Decks as well as the insulated Sub Decks have been removed 5 Insulate...
Страница 27: ...ass Clean side glass glass shelves and mirrors with a household or commercial glass cleaner Clean out door track with moist cloth Weekly Optional Magnetic Condenser Coil Filter Self Contained Units On...
Страница 28: ...press light bulb icon button to turn lights on See INSTALLATION DISPLAY CASE START UP FRONT ACCESS section in this operating manual for illustration If case lights still do not come on call service p...
Страница 29: ...outlet before beginning fan shroud and surrounding tub area cleaning 1 Turn off power 2 Remove decks from case 3 Clean fan shroud area and surrounding tub area with moist cloth Quarterly Tub Drain Cau...
Страница 30: ...in or connected Caution Condensate pan may be malfunctioning Electrical Heat Rod Condensate system If so water will overflow pan and seep onto flooring causing damage Until condensate pan is function...
Страница 31: ...eck that the MAIN power switch is on Check that fans are plugged in at the fan shroud Check for foreign material obstructing fan performance Check that fan blades freely rotate within fan shrouds Chec...
Страница 32: ...rs Check that condenser coil has been cleaned Check air return grilles for obstructions Check sight glass for flashing and or low charge Check Set Point Temperature it may be adjusted too high Condens...
Страница 33: ...system Check that liquid line filter dryer is not plugged Check that close offs are intact around condensing coil and that air is not recirculate Check that store ambient temperature isn t above maxi...
Страница 34: ...e is no air recirculation around evaporator coil Check that evaporator coil is not iced up High Suction Pressure Check for refrigerant overcharge Check that compressor reed valves aren t bad Look for...
Страница 35: ...scrubbing method Electric heater coil condensate pans can be removed and cleaned After thoroughly cleaning pan with scrub brush and solution rinse thoroughly with clean water in spray bottle and wipe...
Страница 36: ...o collapse the honeycomb to allow it to be pulled out of honeycomb retainer C Carefully pry downward and away from the honeycomb retainer A B C D E F Clean honeycomb with warm water and soap solution...
Страница 37: ...efrigerated Case SAMPLE ONLY SAMPLE ONLY SAMPLE ONLY 37 SERIAL LABEL LOCATION INFORMATION LISTED TECH INFO SERVICE Serial Label Location Information Listed Technical Information Service Serial labels...
Страница 38: ...timeout occur normal operational settings prior to modifications being made will resume 3 If the instrument is switched off before pressing the Prg key all modifications to parameters will be lost Set...
Страница 39: ...set reset HACCP alarms reset temp monitoring Summary Table of Alarm and Signals Display Buzzer and Relay Integrated Electronic Microprocessor Controller Read And Save These Instructions Page 2 of 3 Us...
Страница 40: ...tor min F 1 250 d6 Display on hold during defrost C 0 2 dd Dripping time after defrost min F 0 15 d 1 Display of defrost probe 1 C F F 5 Select Celsius C or Fahrenheit F flag C 0 1 40 For Case Specifi...
Страница 41: ...LL XM67 X K CONTROLLER PAGE 1 of 3 NOTE THIS PAGE MAY NOT LIST EVERY SETTING OR PARAMETER ON YOUR CONTROLLER Note Units With These Temperature Controllers Have Been Hot Keyed At Factory For General Op...
Страница 42: ...LL XM67 X K CONTROLLER PAGE 2 of 3 NOTE THIS PAGE MAY NOT LIST EVERY SETTING OR PARAMETER ON YOUR CONTROLLER Note Units With These Temperature Controllers Have Been Hot Keyed At Factory For General Op...
Страница 43: ...LL XM67 X K CONTROLLER PAGE 3 of 3 NOTE THIS PAGE MAY NOT LIST EVERY SETTING OR PARAMETER ON YOUR CONTROLLER Note Units With These Temperature Controllers Have Been Hot Keyed At Factory For General Op...
Страница 44: ...rmance of the goods that would extend that period of limitation herein contained for bringing an action Indemnifications Purchaser agrees to indemnify hold harmless and defend SCC if so requested from...