background image

Page 7 of 12 


Replacing the Spinner/Anvil


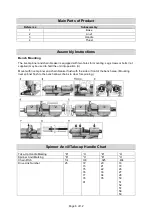
To remove a worn or damaged spinner/anvil, unscrew the take-up handle until the spinner anvil can 
be easily removed (B). Replace it with a new or repaired anvil and take-up handle. 

Note

: The unit is supplied with two spinner anvils marked 

”A” ”B” and two take-up handles to match 

the spinner anvils. 

Before Each Use 

WARNING


Check for damaged or worn parts.


Operating Instructions 

Right or Left Hand Use 

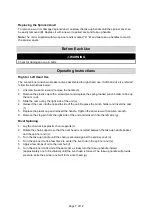
The rivet spinner and chain breaker arrives assembled for right-hand use. If left-hand use is preferred, 
follow the instructions below: 

1. 

Unscrew the set screw and remove the handle (b). 

2. 

Remove the plastic cap with a screwdriver and depress the spring-loaded punch holder to free up 
the cam (c-d). 

3. 

Slide the cam out by the right side of the unit (e). 

4. 

Reinsert the cam into the opposite side of the unit. Depress the punch holder and insert the cam 
(f). 

5. 

Replace the plastic cap and reinsert the handle. Tighten the set screw with an Allen wrench. 

6. 

Remove the stop pin from the right side of the unit and reinsert it into the left side (g). 

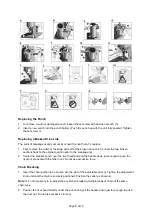
Rivet Spinning 

1. 

Lay the chain across plastic chain supports (c). 

2. 

Rotate the chain supports so that the rivet head is centered between the take-up handle pocket 
and the spinner anvil (c). 

3. 

Turn the take-up handle until the chain is secured against the spinner anvil (d). 

4. 

Turn the spinner crank a few times to center the rivet hub in the spinner anvil (e). 

5. 

Apply a few drops of oil to the rivet hub (f). 

6. 

Turn the spinner crank and at the same time, slowly turn the take-up handle inward 
(approximately one full revolution) until the rivet head is formed. The take-up handle will provide 
pressure while the spinner anvil will form a rivet head (g). 

Содержание 53959

Страница 1: ... Chain Breaker Owner s Manual WARNING Read carefully and understand all ASSEMBLY AND OPERATION INSTRUCTIONS before operating Failure to follow the safety rules and other basic safety precautions may result in serious personal injury Item 53959 ...

Страница 2: ... read the entire manual to become familiar with this product before you begin using it This rivet spinner and chain breaker is designed for certain applications only Northern Tool and Equipment is not responsible for issues arising from modification or improper use of this product such as an application for which it was not designed We strongly recommend that this product not be modified and or us...

Страница 3: ...rmation 4 Specific Operation Warnings 5 Main Parts of Product 6 Assembly Instructions 6 Spinner Anvil Take up Handle Chart 6 Before Each Use 7 Operating Instructions 7 After Each Use 9 Maintenance 9 Parts Diagram 9 Parts List 10 Replacement Parts 10 Limited Warranty 11 ...

Страница 4: ...as designed Use the right tool for the job DO NOT attempt to force small equipment to do the work of larger industrial equipment There are certain applications for which this equipment was designed It will be safer and do a better job at the capacity for which it was intended DO NOT use this sharpener for a purpose for which it was not intended Industrial or commercial applications must follow OSH...

Страница 5: ...and chain breaker in any way Unauthorized modification may impair the function and or safety and could affect the life of the equipment Check for damaged parts before each use Carefully check that the rivet spinner and chain breaker will operate properly and perform its intended function Replace damaged or worn parts immediately Never operate the product with a damaged part Store the rivet spinner...

Страница 6: ...ied may be used to hold the unit into position A Mount with rivet spinner and chain breaker flush with the side or front of the bench area Mounting rivet spinner flush to the bench allows chains to clear for spinning Spinner Anvil Take up Handle Chart Take Up Handle Marking B A B A Spinner Anvil Marking B A B A Chain Pitch 1 4 3 8 325 404 Drive Link Number 25 72 73 75 76 77 78 91 20 21 22 33 34 35...

Страница 7: ... the right side of the unit e 4 Reinsert the cam into the opposite side of the unit Depress the punch holder and insert the cam f 5 Replace the plastic cap and reinsert the handle Tighten the set screw with an Allen wrench 6 Remove the stop pin from the right side of the unit and reinsert it into the left side g Rivet Spinning 1 Lay the chain across plastic chain supports c 2 Rotate the chain supp...

Страница 8: ...iginal position prior to the breakage p 2 Center the breaker punch over the rivet head and pull the handle down just enough to push the rivet out Repeat with the other rivet Do not use excessive force Chain Breaking 1 Insert the chain portion to be broken into the slot of the adjustable anvil j Tighten the adjustment knob unit until the chain is securely positioned Position the cutter as shown k N...

Страница 9: ... WARNING Keep the rivet spinner and chain breaker away from children Maintenance It is recommended that the general condition of any tool be examined before it is used Keep your rivet spinner and chain breaker in good repair by adopting a program of conscientious repair and maintenance Have necessary repairs made by qualified service personnel This rivet spinner and chain breaker is equipped with ...

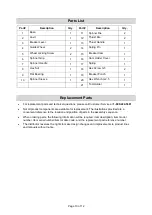
Страница 10: ...5 1 21 Tool Holder 1 Replacement Parts For replacement parts and technical questions please call Customer Service at 1 800 222 5381 Not all product components are available for replacement The illustrations provided are a convenient reference to the location and position of parts in the assembly sequence When ordering parts the following information will be required item description item model num...

Страница 11: ...y claim contact Us at 1 800 222 5381 identify the product by make and model number and follow the claim instructions that will be provided The product and the purchase receipt must be provided to Us in order to process Your warranty claim Any returned product that is replaced or refunded by Us becomes our property You will be responsible for return shipping costs or costs related to Your return vi...

Страница 12: ...Page 12 of 12 Distributed by Northern Tool Equipment Company Inc Burnsville Minnesota 55306 www northerntool com Made in China ...

Отзывы: