


Pg. 2
www.snapav.com Support: 866.838.5052
SM-RBX-PRO-14-BLK Installation Manual
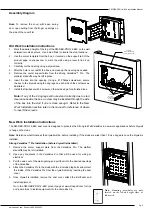
Assembly Diagram
Note:
To remove the cover with ease, swing
door open pulling from the finger openings on
the side of the cover first.
Old Work Installation Instructions
Tighten
Screws with
#1 Phillips
Screwdriver
Cutout Dimensions
14.25" (W) x 8.5" (H)
Horizontal
Dog Ears
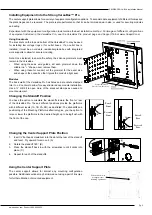
New Work Installation Instructions
The SM-RBX-PRO-14-BLK dust cover is designed to preserve the Strong In-Wall VersaBox in new work applications before drywall
is hung on the studs.
Note:
Determine what thickness the drywall will be, before installing. If the studs are wider than 16” use dog ears once the drywall is
installed.
Note:
Mounting screwholes are only
located on the left and right sides, as
illustrated.
1. Mark the desired height of the top of the SM-RBX-PRO-14-BLK on the wall
between two stud centers. Use a stud finder to locate the stud locations.
2. Use the cutout template from the box, or located on the support tab of the
product page on snapav.com to mark the wall, using a level to line it up
correctly.
3. Carefully cut the opening using a drywall saw.
4. After the hole is cut, test fit the box, and clean up the
opening as needed.
5. Remove the center support plate from the Strong VersaBox™ Pro. The
platform standoffs may be left in place.
6. Insert the box into the opening. Using a #1 Phillips screwdriver, secure
the box to the drywall using the dog legs on each side of the enclosure as
illustrated.
7. Install the trim/bezel with 8 screws on the inside edge for a finished look.
Note:
If any of the 4 dog legs will not extend correctly due to stud
clearance beside the box, a screw may be inserted through the side
of the box into the stud if one is close enough. Refer to the New
Work Installation section later in the manual for reference of where
to insert the screw/s.
Strong VersaBox™ Pro Installation (before drywall is installed)
1. Remove the center support plate from the VersaBox Pro. The platfom
standoffs may be left installed.
2. Open any knockouts in the VersaBox Pro that will be used for wiring or
electrical.
3. Pull the wires out of the wall opening and pull them into the desired openings
of the VersaBox.
4. Attach the VersaBox Pro to the studs with the 4 included lag bolts and protect
the inside of the VersaBox Pro from the drywall install by inserting the dust
cover.
5. Once drywall is installed, remove the dust cover, attach the trim/bezel, and
install equipment.
Go to the SM-RBX-PRO-14-BLK product page at www.SnapAV.com for tips
and instructions to install equipment into the VersaBox Pro.