


FLOW
FLOW
Striem
3100 Brinkerhoff
Kansas City, KS 66115
Tel: 913-222-1500
Fax: 913-291-0457
www.
striemco.com
Made in the U.S.A
For unit details see specification sheet for selected unit
(Connecting pipe and fittings by others)
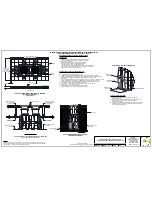
BACKFILLING & FINISHED CONCRETE SLAB
Preparation of sub grade per geotech recommendations.
1.
Stabilize and compact sub grade to 95% proctor.
2.
Fill the tank with water before backfilling to prevent float out during piping installation.
3.
Before backfilling and pouring of slab secure cover(s) and riser/s (if necessary) to the unit(s)
4.
Backfill using crushed aggregate material approximately 3/4" size rock, or sand,
5.
with no fines.
Place 6" of aggregate base under slab. Aggregate should be 3/4" size rock, or sand, with no fines.
6.
Thickness of concrete around cover to be determined by specifying engineer. If traffic
7.
loading is required the concrete slab dimensions shown are for guideline purposes only.
Concrete to be 28 day compressive strength to 4000 PSI.
8.
NO. 4 rebar ( 1/2") grade 60 steel per ASTM A615: connected with tie wire.
9.
Rebar to be 2 1/2" from edge of concrete.
10.
Rebar spacing 12" grid. 4" spacing around access openings.
11.
All pipe penetrations to be sleeved or have slip connections.
12.
BELOW GRADE INSTALLATION INSTRUCTIONS
EXCAVATION
Install the unit(s) as close as possible to fixtures being serviced.
1.
Width and length of excavation shall be minimum 12" greater
2.
than the tank on all sides.
Depth of excavation shall be 6" deeper than tank bottom.
3.
Set the tank in well-packed crushed aggregate material
4.
approximately 3/4" size rock, or sand, with no fines.
Anchor kit is recommended for installations in high water table conditions to
5.
prevent float out. To be determined by specifying engineer. If necessary,
order optional "Anchor Kit" (see detail right).
INTERIOR OR EXTERIOR BELOW GRADE INSTALLATION INSTRUCTIONS
(LB-35 (INTERIOR ONLY), LB-50, LB-125, LB-275)
30"
60"
4"
the unit footprint
Concrete Pad
must extend
18" outside
45.00°
2 1/2" Min.
18" outside the unit footprint
Concrete Pad must extend
8"
4"
Rebar
Finished Grade
Rebar
LB-275
Shown
CONCRETE SLAB DETAIL FOR TRAFFIC LOADING
(INTERIOR OR EXTERIOR)
(LB-275 Shown)
Top View
Elevation View
Stainless steel
anchor strap
Stainless steel
Anchor plate
Stainless hardware
ANCHOR KIT INSTALLATION DETAIL
Anchor Kit Installation Steps
Slide "Anchor Hook" over tie down point on end wall and
1.
bolt to Anchor Strap.
Bolt "Anchor Strap" to "Anchor Plate" using provided hardware
2.
For LB-50, Anchor Strap must be cut and shortened
3.
on-site to avoid piping.
Hold down force achieved by backfill weight acting on Anchor Plate.
4.
Anchor Plate may be bolted to concrete slab, if required, by using
5.
holes provided in Anchor Plate.
Stainless steel
anchor hook
Clean out to grade
on inlet pipe of each
unit (by others)
Clean out to grade
on outlet pipe of each
unit (by others)
Risers to grade
EXCAVATION AND BACKFILL DETAIL
(INTERIOR OR EXTERIOR)
2-Way cleanout
tee (by others)
2-Way cleanout
tee (by others)
SIDE VIEW DETAIL
Optional Anchor kit
see detail
Optional Anchor kit
see detail
Concrete slab
Native soil
Crushed aggregate
or sand
Optional Anchor kit
see detail
ECO:
10/22/18
MJ
REV:
DATE:
DWG BY:
DESCRIPTION:
PROPRIETARY AND CONFIDENTIAL
THE INFORMATION CONTAINED IN THIS DRAWING IS THE SOLE PROPERTY OF
STRIEM, LLC.
ANY REPRODUCTION IN PART OR AS A WHOLE WITHOUT THE WRITTEN PERMISSION OF
STRIEM, LLC.
IS
PROHIBITED.
SHEET NUMBER:
3 of 6
NOTES:
Striem Lab Basins are not to be installed in any other manner except as shown. Consult local
codes for separate trapping requirements, cleanout locations and additional installation instructions.
Vent required on outlet pipe only if outlet diptube is present.
LAB BASIN SERIES INSTALLATION,
OPERATION AND MAINTENANCE GUIDE


