quality ones of the same type and brand. Be careful not to touch the gold contacts on the end
of the battery cartridge or rest them against anything conductive as this could cause a short
circuit. If you do not intend to use the flashlight for a long period of time, remove the batteries
to prevent them leaking and damaging the flashlight.
NOTE:
When the batteries have been depleted after continuous use of the flashlight, it is pos-
sible to use it once again if left for 8 hours to recover. This will enable further use until the
batteries have been completely depleted. Useful in emergency situations or in simply getting
the most from your batteries.
2. Multi-Mode Switch Operation:
This flashlight is equipped with six different modes of opera-
tion, switch on the flashlight, touch the switch you can access the following function (see figure
1): High Beam (100%): For indoor, outdoor or long distance illumination. Stepless Dmming (1%-
100%): Enables you to select the exact level of brightness that you require. Low Beam: For close
illumination, such as reading, repairing, or identification. Strobe Light (12Hz): For signalling in a
rescue situation, self-defence from attack or fun party lighting. Thunderbolt Strobe: For use as
a high visibility warning or distress beacon. SOS Signal: For use in rescue situations, this mode
will continually flash the international Morse code signal for SOS
To access the different modes first switch the flashlight on by fully pressing the end cap switch
until it engages. The flashlight will always start at full power and to change the mode you will
need to lightly press and release the end cap switch, which will then cycle through each mode
in turn. To use the stepless dimming function you will first need to access the high beam mode,
then keep the end cap switch lightly held until the required brightness is achieved. Releasing the
switch will then maintain the current level of brightness.
3. Sliding Optical Focus:
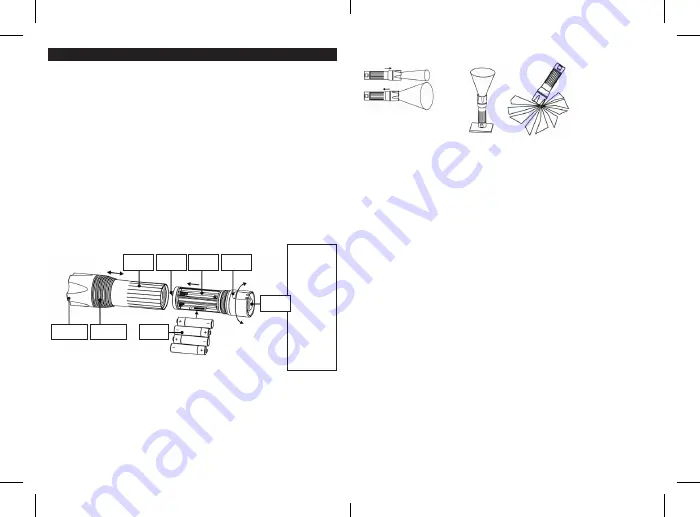
This flashlight is equipped with a sliding optical focus system (figure
2) that allows you to choose between a long beam that is ideal for seeing far into the distanceor
a wide beam which illuminates more of the surrounding area. To adjust this you’ll need to hold
the flashlight normally with the aluminium casing and then using your thumb and forefinger
push the head collar of the flashlight to produce a long beam or pull it back to produce a wide
beam.
4. Lantern/Candle Function:
Although not designed to replace a professional life saving ham-
mer, in an emergency the flashlight can be used to break glass. For best results use strong
physical force and angle the flashlight correctly (figure 4). The crenulated bezel also allows the
flashlight to be used for self defence purposes.
ON/OFF
First for
High Beam
(100%)
Second for
Stepless Dimming
(1%-100%)
Third for Low
Beam mode
Fourth for
Strobe mode
(12Hz)
Fifth for
Thunderbolt
Strobe
Sixth for
SOS signal
Figure 1
Fokus
Close
Open
Aluminium
Casing
Batteries
Crenulated
Bezel
Head
Collar
Gold
Contacts
Druck-
schalter
Battery
Cartridge
End Cap
Figure 2
Firgure 3
Figure 4
Instructions and information LED torch FL4
Please take a moment to read through these instructions and familiarise yourself with the pro-
duct before using it. This will ensure that you enjoy optimum performance and a long service
life. Please keep these instructions in a safe place for future reference.
Technical Information
– Case material: Aerospace-grade 6061-T6 aluminium
– Size: Ø37 x 139mm
– Weight: 133 grams (excluding batteries)
– Batteries: 4 x AAA alkaline
– Contacts: Gold-plated
– LED Chip: US Cree LED
– Max. output: 420 lumens; Low output: 49 lumens
– Max. beam distance: 250 meters; Low beam distance: 27 meters
– Burn time: High beam 13 hours down to 1 lumen; Low beam 51 hours down to 1 lumen
– Dustproof and waterproof grade: IP65
– Optical focus: Wide to narrow beam sliding system
– Shockproof: From a height of one metre
– MCU: 6 modes: High Beam, Stepless Dimminig, Low Beam, Strobe mode,
Thunderbolt strobe, and SOS signal mode
1. Installing the Batteries:
Hold the aluminium casing firmly in one hand and turn the end cap
in a counter-clockwise direction until fully unscrewed (see figure 1). Pull the end cap away from
the casing and this will reveal the battery cartridge. Place each battery in turn within the cartrid-
ge ensuring that the polarity marks (+ and -) on the battery matches that of the cartridge. With
all batteries installed replace the cartridge into the casing and turn the end cap in a clockwise
direction until fully tightened. The flashlight is now ready to be used.
IMPORTANT:
Please ensure that the batteries are installed correctly otherwise battery damage
may occur, possibly resulting in an explosion. Never try to recharge batteries or use new and
used batteries together. Always change all the batteries at the same time and only use high
GB
Содержание LED torch FL4
Страница 7: ......


