background image

Starting up

 for the first time  

(connect/pair the scanner to POD & PC)

To start up the scanner for the first time, you will first need to connect and pair the scanner with both the POD and 
the PC. Follow the procedure below.

Before you start:

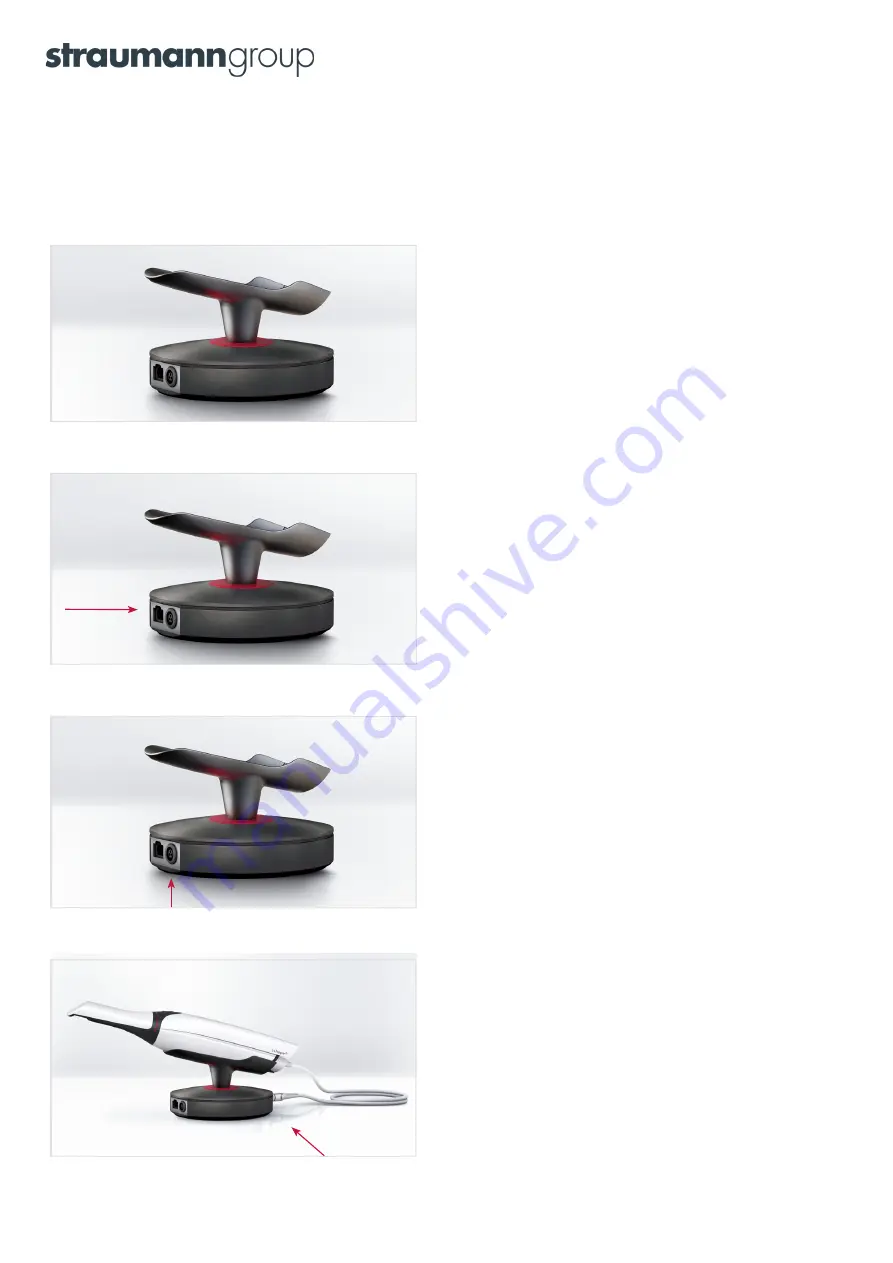
 Set the pod on a flat and horizontal surface, 

optimally placed in relation to the patient chair and your work 
position. Attach the protection tip to the scanner if not already
 in place. It is easiest not to place the scanner onto the pod at 
this time yet, because you may find it easier to lift the pod while 
connecting cables in the following.

Step 1:

 Connect the Ethernet cable to the pod. The cable goes into 

the left connection socket on the back side of the pod (the side 
that has two connection sockets). If you need  to release the 
Ethernet cable, press on the small tab on the top of the 
connector.

Step 2:

 Connect the power supply cable to the pod.  This cable 

goes into the connection socket next  to the Ethernet cable 
described in the previous step. 

• To connect - Align the red orientation dots marked on the 

socket and the plug, and then push the plug into the socket.

• To disconnect - Pull on the outer release sleeve. 

• The indicator light next to the scanner connection socket will 

light green.

Step 3:

 Gently press the smart cord into the back of the scanner 

until it clicks and thereby locked in the correct position. Connect 
the other end of the smart cord to the pod as shown in the 
picture.

3

Содержание 3Shape TRIOS 4

Страница 1: ...3Shape TRIOS Info Pack TRIOS 4 Let s change dentistry together...

Страница 2: ...attery Turning on and shutting down the scanner Automatic shutdown of the scanner Inserting the WI FI adapter into the PC POD systems General recommendations for a stable wireless connection Wireless...

Страница 3: ...pending on battery charge level when charging is initiated What is the battery lifetime Approximately 80 after 300 cycles and 70 after 500 cycles How long does it take to connect a wireless scanner to...

Страница 4: ...for detailed instructions Wired setup Connecting the smart cord to TRIOS 4 wired setup Step 1 Make sure that the smart cord edge is aligned as shown in the picture above Step 2 Gently press the smart...

Страница 5: ...tothepod Thecable goes into the left connection socket on the back side of the pod the side that has two connection sockets If you need to release the Ethernet cable press on the small tab on the top...

Страница 6: ...w scanner field and then press the green plus icon button Hint The serial number is located on the front tube It is the number written in the largest font starting with 1HC Step 8 The indicator light...

Страница 7: ...PC 3 Follow the steps Starting up for the first time to use the scanner on the second PC If the wired setup has previously been used on the second PC 4 Shut down the scanner take the POD and smart co...

Страница 8: ...correctly Attempting to insert incorrectly may cause permanent damage to the scanner Please refer to the Safety Setup Guide for full instructions on how to install the batteries The information below...

Страница 9: ...l reconnect to the PC after approx 10 20 seconds Once the scanner has been reconnected instant heat technology enables the system to be scan ready in seconds If the scanner is connected to a TRIOS sys...

Страница 10: ...be possible to remove the cause of critical the noise In such cases a wired scanner may be a better choice for your practice Many clinics have x ray protective measures installed in the walls This wil...

Страница 11: ...e for thermal variations or aging effects due to wear For a detailed description of the calibration process please refer to the TRIOS Safety and Setup guide If a connection to the scanner is lost If t...

Страница 12: ...I adapter and a copy license dongle are inserted in the second PC 3 Follow the steps Starting up for the first time to use the scanner on the second PC If the wireless setup scanner has previously bee...

Страница 13: ...ate Blue Scanner is on and attempting to connect Yellow Battery is 5 or lower Change the battery now The scanner will continue to scan until the battery is completely exhausted Green Scanner is on con...

Страница 14: ...ng Steady green The battery is fully charged Charging begins automatically when a battery s temperature is between 0 and 45 degrees Celsius During charging the battery s temperature can go up to 52 de...

Страница 15: ...ll consume battery if it is turned on and connected to the PC MOVE Changing batteries when power runs out If the battery runs out simply remove the discharged battery and replace it with a fully charg...

Страница 16: ...arge half of the battery capacity each time before recharging you will consequently have approximately 1000 of these half cycles Smart tips Smart tip for 3D color scans The 3Shape TRIOS 4 tips use a t...

Страница 17: ...ch smart tip has an integrated mirror The optical system that is responsible for the scan quality must be calibrated to each mirror of separate smart tips For a more detailed description of the color...

Страница 18: ...Wi Fi adapter into the USB port Battery level has dropped to 5 or less Tech Specs Please refer to the product catalog which may be found on the partner portal partner 3shape com If you don t have a l...

Страница 19: ...ns for both dental practices and labs Two graduate students founded 3Shape in Denmark s capital in the year 2000 Today 3Shape has over 1 500 employees serving customers in over 100 countries from 3Sha...

Отзывы: