background image

CleanStation™ CSIIP Installation Guide

DOC-03204 Rev. B

3

Contents

1 Introduction

4

1.1 About this Guide

4

2 Safety Guidelines

5

3 Installation

6

3.1 Required Items

6

3.2 Unpacking  the CleanStation™ CSIIP

6

3.3 Connecting the Water Supply and Drainage Hoses

11

3.4 Attaching a Plug to the Power Cable (for 220 V Units)

12

3.5 Plugging the Power Cable into the Power Outlet

13

3.6 Leveling the CleanStation™ CSIIP

14

4 Post-Installation

15

Содержание CLEANSTATION CSIIP

Страница 1: ...DOC 03204 Rev B CLEANSTATION CSIIP INSTALLATION GUIDE ...

Страница 2: ...er parties The specifications on which this document is based are subject to change without notice No part of this book may be reproduced in any form or by any means nor stored in a database or retrieval system without prior permission in writing from Stratasys Ltd If this document is distributed as a PDF file you may print it for internal use February 2016 DOC 03204 Rev B Trademarks Stratasys is ...

Страница 3: ...uidelines 5 3 Installation 6 3 1 Required Items 6 3 2 Unpacking the CleanStation CSIIP 6 3 3 Connecting the Water Supply and Drainage Hoses 11 3 4 Attaching a Plug to the Power Cable for 220 V Units 12 3 5 Plugging the Power Cable into the Power Outlet 13 3 6 Leveling the CleanStation CSIIP 14 4 Post Installation 15 ...

Страница 4: ...ion and an alkaline cleaning solution to rapidly dissolve soluble Support material from printed parts and models 1 1 About this Guide The information and requirements provided in this document ensure proper installation of the CleanStation CSIIP Install the CleanStation CSIIP as described in this document ...

Страница 5: ... and operated as specified the user s safety might be compromised Make sure that the site has been prepared as specified in the Site Preparation Guide All electrical work is to be performed by personnel qualified by local authorities The power cable should be connected to an easily accessible electric socket near the CleanStation CSIIP location Make sure that a Residual Current Device RCD has been...

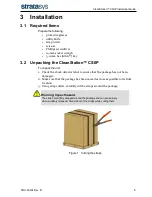
Страница 6: ...tation CSIIP To unpack the unit 1 Check the shock detector label to ensure that the package has not been damaged 2 Make sure that the package has been moved as close as possible to its final location 3 Using strap cutters carefully cut the straps around the package Warning Impact hazard The straps are tightly wrapped around the package and can cause injury when suddenly released Stand clear of the...

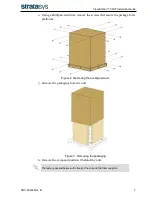
Страница 7: ...r remove the screws that secure the package to its platforms Figure 2 Removing the package screws 5 Remove the packaging from the unit Figure 3 Removing the packaging 6 Remove the ramp and position it behind the unit The ramp is packed between the back of the unit and the foam supports ...

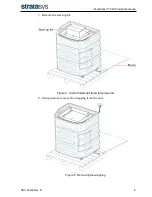
Страница 8: ...Station CSIIP Installation Guide DOC 03204 Rev B 8 7 Remove the start up kit Figure 4 Unit with start up kit and ramp lowered 8 Using scissors remove the wrapping from the unit Figure 5 Removing the wrapping ...

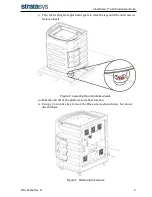
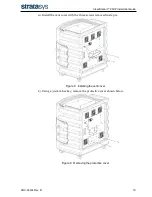
Страница 9: ...stment gears to raise the legs until the unit rests on its four wheels Figure 6 Lowering the unit onto its wheels 10 Roll the unit off of the platform to its final location 11 Using a 3 2 mm hex key remove the three screws shown below but do not discard them Figure 7 Removing the screws ...

Страница 10: ... Guide DOC 03204 Rev B 10 12 Install the vent cover with the three screws removed in step 11 Figure 8 Installing the vent cover 13 Using a 3 2 mm hex key remove the protective cover shown below Figure 9 Removing the protective cover ...

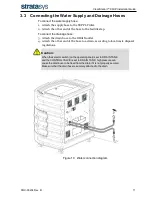
Страница 11: ...ainage hose 3 Attach the drain hose to the DRAIN outlet 4 Attach the other end of the hose to a drain according to local waste disposal regulations Caution When the selector switch on the operator panel is set to DRAIN TANK and the CONTROL VALVE is set to DRAIN TANK high pressure can cause the drain hose to be freed from the drain if it is not properly secured Make sure that the drain hose is secu...

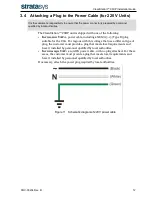
Страница 12: ...A 5 15 Type B plug suitable for the USA For regions with this voltage that use a different type of plug the customer must provide a plug that meets local requirements and have it installed by personnel qualified by local authorities for 220 240 VAC a 14 AWG power cable with no plug attached For these areas the customer must provide a plug that meets local requirements and have it installed by pers...

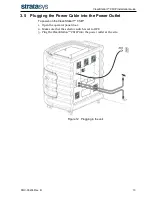
Страница 13: ...5 Plugging the Power Cable into the Power Outlet To power on the CleanStation CSIIP 1 Open the operator panel door 2 Make sure that the selector switch is set to OFF 3 Plug the CleanStation CSIIP into the power outlet at the site Figure 12 Plugging in the unit ...

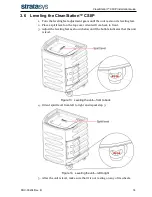
Страница 14: ...Place a spirit level on the top cover oriented from back to front 3 Adjust the leveling feet as shown below until the bubble indicates that the unit is level Figure 13 Leveling the unit front to back 4 Orient spirit level from left to right and repeat step 3 Figure 14 Leveling the unit left to right 5 After the unit is level make sure that it is not resting on any of its wheels ...

Страница 15: ...drained activate the pump and make sure that the flow increases 4 Fill the tank with water 5 Verify that the controller is set to the desired temperature units 6 Set the controller to two minutes record the time and activate the system from the controller 7 While the CleanStation CSIIP is active Increase and decrease the water agitation and make sure that the agitation changes accordingly Make sur...

Отзывы: