Quartz
®
by StoneL
Valve monitor series QX/QN/QG
Installation, Maintenance and
Operating instructions
7 QZ 70 en • 03/2017
StoneL publication 105406revA
Страница 1: ...Quartz by StoneL Valve monitor series QX QN QG Installation Maintenance and Operating instructions 7 QZ 70 en 03 2017 StoneL publication 105406revA...
Страница 2: ...te proximity senors X 12 4 1 4 P F 3 wire solid state proximity sensors E F 14 4 2 Intrinsically safe inductive proximity switches 16 4 2 1 Dual module NAMUR sensors 44 16 4 2 2 Dual module NAMUR sens...
Страница 3: ...QZ 70 en Quartz 3 Table of contents continued 5 Model Type code 46 5 1 QGabcdef 46 5 2 QNabcdef 46 5 3 QXabcdef 46 6 Regulatory specific conditions of use and product marking 47 7 Appendix 49 7 1 Cont...
Страница 4: ...ion 8 Note 9 Warning 10 Approval markings 11 Logo Note See page 47 for specific product markings 1 3 CE markings The Quartz by StoneL meets the requirements of European Directives and has been marked...
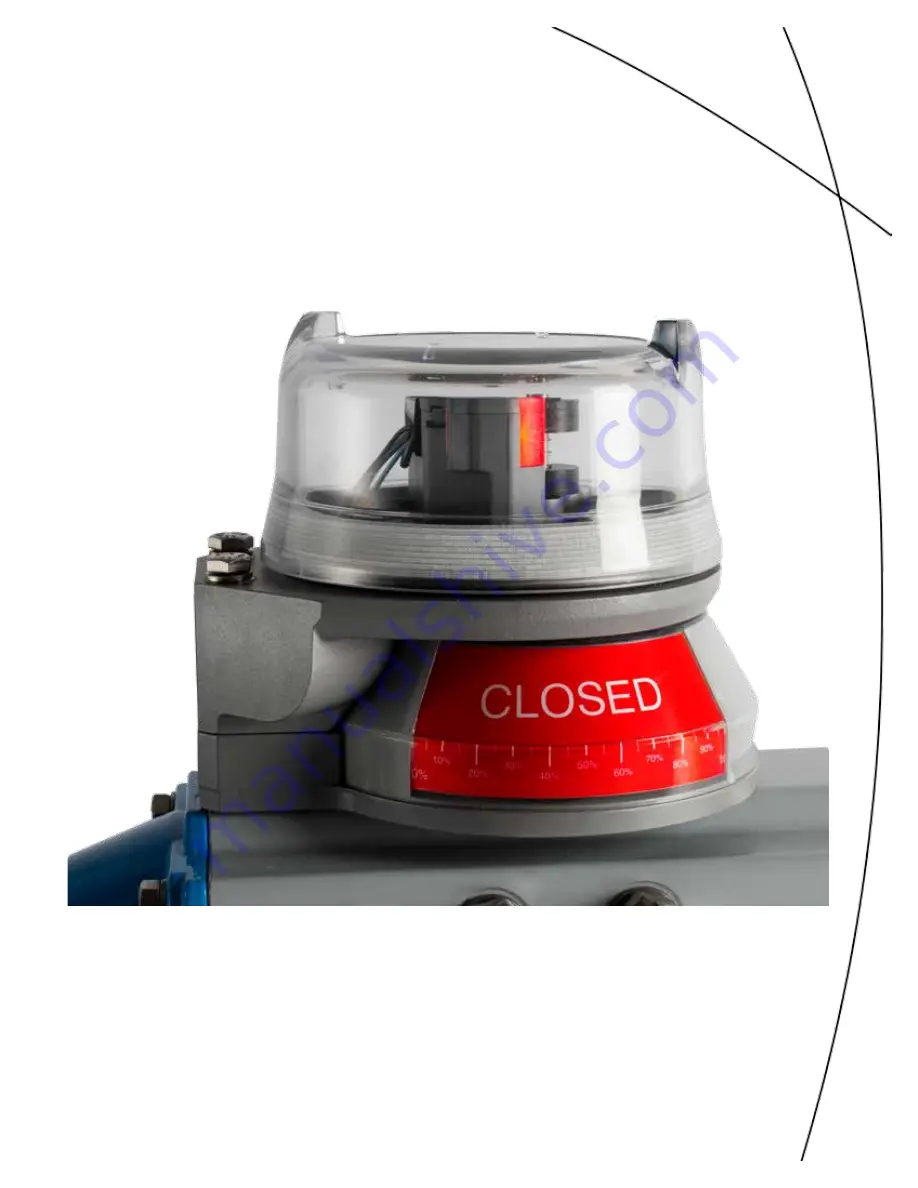
Страница 5: ...in 184 mm 7 24 in Tall cover Unit height Cover removal clearance 155 mm 6 10 in 241 mm 9 48 in Unit dimensions for Output option N Extended visual indicator Consult factory for cover sizes on specific...
Страница 6: ...16 in PINS 2 SEE NOTE 1 3 4 0 14 in 31 8 1 25 in 119 4 4 70 in 14 2 0 56 in Note 1 Cover height varies based on model number Dual module and 2 switch models use short covers Short cover 102 mm 4 0 in...
Страница 7: ...tor mounting plate Item K and place on the actuator Using an M4 allen wrench fasten with the four mounting plate retaining screws Item J Torque screws to 25 to 30 in lbs 2 8 to 3 4 Nm 2 Loosen indicat...
Страница 8: ...ng plate Item K and place on the actuator Using the provided mounting plate retaining screws Item J fasten the mounting plate to the actuator 2 Loosen indicator cover setscrew Item E with an M2 allen...
Страница 9: ...ee Assembly drawing 1 6 Item 5 on page 5 Figure 2 1 Item D on page 7 and Figure 2 3 Item D on page 8 Attention In order to maintain enclosure type and IP ratings cover shall be tightened by hand until...
Страница 10: ...rn counterclockwise until the red LED goes out then clockwise again until the red LED is lit Reverse the direction of the cam if the valve opens clockwise 3 Move the valve to the opposite position ope...
Страница 11: ...rs When the cam is released be sure it slides fully onto the spline One spline tooth setting is 4 1 2 Valve closed to open in counterclockwise rotation Fig 1 1 With the valve in the closed position se...
Страница 12: ...d Warranty All mechanical parts Two years Sensor module Five years 6 SST sensors QN6X QX6X Wiring diagrams Unit has 2 vertically mounted 12 pole terminal blocks fourth switch red LED third switch gree...
Страница 13: ...ation period If the optional green CLOSED visual indicator is used the colors would be reversed in steps 1 and 2 For normally closed function Fig 2 1 With the valve in the closed position set both cam...
Страница 14: ...SW 3rd SW BTM 2nd SW LOAD LOAD 5 4 3 2 1 4 3 wire sensors QN4E_ QN4F_ QX4E_ QX4F_ bottom switch top switch TOP SW BTM SW BTM SW LOAD LOAD TOP SW SPARES SPARES 1 2 3 BTM SW LOAD LOAD TOP SW 4 6 5 2 3 w...
Страница 15: ...ns clockwise For the normally open operation both sensors will be off during the actuation period For normally closed function Fig 2 1 With the valve in the closed position set both cams so that the m...
Страница 16: ...e rotation Fig 2 1 With the valve in the closed position set the bottom cam so that the metal activation strip is centered on the bottom sensor target and the top cam is 180 from the bottom cam 2 Lift...
Страница 17: ...l be lit and green LED out 3 Move valve counterclockwise to the open position Green LED will be lit and red LED will be out If the red LED is lit push down top cam and rotate until magnet in the top c...
Страница 18: ...rclockwise until the ammeter reads 1 mA Release cam Valve closed to open in clockwise rotation Fig 2 1 With the valve in the closed position set the top cam so that the metal activation strip is cente...
Страница 19: ...nd rotate counterclockwise until the ammeter reads 1 mA Release cam Valve closed to open in clockwise rotation Fig 2 1 With the valve in the closed position set the bottom cam so that the metal activa...
Страница 20: ...itch TOP NO TOP C 2nd C 2nd NO 3rd NO 3rd C BTM C BTM NO C NO 3 4 3rd SW 2nd SW TOP SW BTM SW C NO NO C SPARES SPARES 1 2 NO C Touch Tune switch setting 1 Lift bottom cam and rotate until sensor is ac...
Страница 21: ...T models have 2 12 pole terminal block 12 spares top switch second switch TOP C 2nd C 2nd NC 2nd NO TOP NO TOP NC SPARES 1 2 3 4 TOP SW 5 6 NC NC NO NO C C 7 8 9 2nd SW 10 11 third switch bottom switc...
Страница 22: ...der the Entity Concept as Intrinsically Safe for Class I Division 1 Groups A B C D Class II Division 1 Groups E F G and Class III Division 1 Hazardous Classified locations Under the Entity Concept the...
Страница 23: ...second switch TOP C 2nd C 2nd NC 2nd NO TOP NO TOP NC SPARES 1 2 3 4 TOP SW 5 6 NC NC NO NO C C 7 8 9 2nd SW 10 11 third switch bottom switch BTM C BTM NO BTM NC 3rd C 3rd NC 3rd NO SPARES 12 13 14 15...
Страница 24: ...life 100 000 cycles Warranty Two years Recommended for use in 24 VDC computer input applications 4 4 Mechanical micro switches 4 4 1 Silver contacts V and gold contacts W top switch bottom switch BTM...
Страница 25: ...5th NC 6th C 6th NO 6th NC 4th C 4th NC 4th NO NC 1 2 3rd SW 2nd SW NO C NC NO 1st SW SPARES NC NO C C NC 1 2 4th SW 5th SW NO C C NO 6th SW SPARES NC NO C NC top switch second switch TOP C 2nd C 2nd...
Страница 26: ...BTM NC1 BTM NO1 BTM C1 BTM C2 BTM NO2 BTM NC2 C1 C2 NO2 NC2 BTM NO1 NC1 NC2 NO2 TOP NC1 NO1 C1 C2 top switch individual elements actuate with common plunger bottom switch individual elements actuate...
Страница 27: ...StoneL publication 105406revA 7 QZ 70 en Quartz 27...
Страница 28: ...ng DeviceNet network is required Caution To avoid damaging the module when performing the position switch calibration procedure apply 24 30 VDC across V and V Use the LEDs to determine when switches a...
Страница 29: ...gured to be recognized by the control system 2 Set byte 0 bit 2 to 1 in the desired unit Once the correct unit has been physically located on the network indicated by the winking of the CLOSED and OPE...
Страница 30: ...lse Special channel assignments Channel 8 DO1 Discrete Output 1 OUT 1 with state report from Discrete Input 1 READBACK_D Channel 9 DO2 Discrete Output 2 OUT 2 with state report from Discrete Input 2 R...
Страница 31: ...counterclockwise until the green LED is lit Reverse the direction of the cam if the valve opens clockwise For the normally open operation both LEDs will be off during the actuation period If the opti...
Страница 32: ...visual indicator is used the colors would be reversed in steps 1 and 2 For normally closed function Fig 2 1 With the valve in the closed position set both cams so that the metal activation strips are...
Страница 33: ...or the normally open operation both LEDs will be off during the actuation period If the optional green CLOSED visual indicator is used the colors would be reversed in steps 1 and 2 For normally closed...
Страница 34: ...T switches transmitter top switch bottom switch TRANS TRANS TOP NO TOP C BTM C BTM NO SPARES C NO 1 2 3 4 5 6 TOP SW BTM SW TRANS C NO transmitter TRANS TRANS SPARES 3 4 5 6 7 8 9 10 TRANS 2 1 transmi...
Страница 35: ...PWR TOP SW TOP SW BTM SW BTM SW Position transmitter termination TRANS transmitter TOP SW LED green BTM SW LED red SOL 1 SOL 2 SOL PWR 1 SOL PWR 2 TOP SW NO TOP SW C BTM SW NO BTM SW C Position transm...
Страница 36: ...Adjust the screw on the span trimpot for a 20 mA output Zero and span adjustments are non interactive Load curve 4 6 1 4 to 20 mA position transmitters with and without switches Type 5_ 7_ continued...
Страница 37: ...years Wiring diagrams Potentiometer only potentiometer 1 2 3 SPARES 2 3 4 5 6 7 8 9 POT 1 3 2 1 Potentiometer with SPST switches potentiometer top switch bottom switch 1 2 3 TOP NO TOP C BTM NO BTM C...
Страница 38: ...SOL PWR TOP SW TOP SW BTM SW BTM SW Potentiometer termination 1 2 3 potentiometer POT 2 3 1 TOP SW LED green BTM SW LED red SOL 1 SOL 2 SOL PWR 1 SOL PWR 2 TOP SW NO TOP SW C BTM SW NO BTM SW C Potent...
Страница 39: ...r to the desired 100 position assuming 90 rotation and verify ohmmeter reads 2 7K ohms 10 4 Remove all test equipment and place unit in service 4 6 2 Potentiometer with and without switches Type B_ C_...
Страница 40: ...dary solenoid energizes Actuator valve stops in partially closed position 2 Return to full open Controller energizes primary solenoid Actuator valve opens Open switch activates Controller de energizes...
Страница 41: ...ch is activated Release cam and be sure it slides fully onto spline 2 At full closed position lift bottom cam and rotate until switch is activated Release cam and be sure it slides fully onto spline C...
Страница 42: ...il sensor is activated White highlights will overlap and red LED will light if power is applied Release cam and be sure it slides fully onto spline Caution To prevent ignition of hazardous atmospheres...
Страница 43: ...eviceNet communication 82 Caution To avoid damaging the module when performing the position switch calibration procedure apply 24 VDC across V and V Use the LEDs to determine when switches are made Yo...
Страница 44: ...tuator to full OPEN position De energize primary solenoid and observe valve position after intermediate switch is activated and secondary solenoid is energized Readjust top cam if necessary to increas...
Страница 45: ...osition De energize primary solenoid and observe valve position after intermediate switch is activated and secondary solenoid is energized Readjust top cam if necessary to increase or decrease angle o...
Страница 46: ...H CH BJ CJ BL CL BM CM BN CN BO CO BP CP BR CR BS CS BT CT BX CX b A B C D E F G J M N P Q R S T U W Y Z c 02 03 05 06 d S N H e A C D G N R S T U V W X 1 2 3 4 5 0 f A or M 5 3 QXabcdef a 2A 4A 5A 7A...
Страница 47: ...EX Notified Bodies for EU Type Examination Certificates FM Approvals Ltd Windsor Berkshire UK Notified Body Number 1725 Manufacturing Locations 26271 US Hwy 59 Fergus Falls Minnesota 56537 USA Product...
Страница 48: ...Marking 1 To minimize the risk of electrostatic sparking the equipment shall be cleaned only with a damp cloth 2 Using the box provided on the nameplate the user shall permanently mark the Type of Pro...
Страница 49: ...manner as to prevent the possibility of sparks resulting from friction or impact 2 To prevent the risk of electrostatic sparking the equipment enclosure shall be cleaned only with a damp cloth INSTALL...
Страница 50: ...ty of sparks resulting from friction or impact 2 To prevent the risk of electrostatic sparking the equipment enclosure shall be cleaned only with a damp cloth INSTALLATION NOTES Ex ia IIC T5 T6 Entity...
Страница 51: ...continuity between conduit and ground terminal 10 Substitution of components may impair hazardous location safety INSTALLATION NOTES Ex ia IIC T6 Entity Parameters Ui 30 Vdc Ii 100 mA Ci 66 nF Li 0 8...
Страница 52: ...nts may impair hazardous location safety INSTALLATION NOTES Ex ia IIC T6 Entity Parameters Ui 30 Vdc Ii 100 mA Ci 66 nF Li 0 8 mH Pi 2 0 W 1 Voc or Vt Ui Isc or It Ii Ca Ci Ccable La Li Lcable 2 Dust...
Страница 53: ...cleaning of the equipment should only be done with a damp cloth 9 Substitution of components may impair hazardous location safety WARNING 1 When used in intrinsic safety applications the metal enclos...
Страница 54: ...am which might cause a build up of electrostatic charge on non conducting surfaces Additionally cleaning of the equipment should only be done with a damp cloth 9 Substitution of components may impair...
Страница 55: ...am which might cause a build up of electrostatic charge on non conducting surfaces Additionally cleaning of the equipment should only be done with a damp cloth 9 Substitution of components may impair...
Страница 56: ...h Drive P O Box 8044 Shrewsbury M A 01545 USA Tel 1 508 852 0200 Fax 1 508 852 8172 South America Av Independ ncia 2500 Iporanga 18087 101 Sorocaba S o Paulo Brazil Tel 55 15 2102 9700 Fax 55 15 2102...