background image

STIEBEL ELTRON

19

min. 4.5 mm

max. 5.5 mm

m

6

 4 x 35 mm
 6 mm

 4 x 35 mm
 6 mm

17

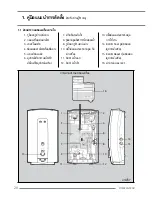
A - Heating Element
B - Electronic control set
C - Control Triac set
D - Thermal cut-out
E - Temperature Sensor (Inlet)
F - Temperature Sensor (Outlet)
G - ELCB (option)

 4 x 35 mm
 4.3 mm

1. คู่มือแนะนำ�ก�รติดตั้ง

 สำ�หรับช่�งผู้ชำ�น�ญ

ภ�พที่ 4

ภ�พที่ 5

ภ�พที่ 6

ก�รใช้แผ่นท�บเจ�ะตำ�แหน่งยึดเครื่อง

วงจรไฟฟ้�

วิธีก�รแขวนเครื่องบนผนัง

Содержание DHC 10 EL

Страница 1: ...ved service technicians in accordance with these instructions เครื องทำ น ำ ร อนนี จะต องทำ การติดตั งตามวิธีการในคู มือโดยช างผู ชำ นาญงานเท านั น English Instantaneous water heater Operation and installation instructions ไทย คู มือแนะนำ การใช งานและติดตั งเครื องทำ น ำ ร อน DHC 6 EL 6 EC 8 EL 8 EC 10 EL ...

Страница 2: ...liance Cleaning and user maintenance shall not be made by children without supervision ข อมูลทั วไป เนื อหาส วนนี เกี ยวข องกับการใช งานซึ งจัดทำ ขึ น สำ หรับผู ใช และช างผู ชำ นาญงาน เนื อหาส วนนี เกี ยวข องกับการติดตั งซึ งจัดทำ ขึ น สำ หรับช างผู ชำ นาญงาน อ านคำ แนะนำ เหล านี อย างละเอียด ก อนการใช งานอุปกรณ และเก บ คำ แนะนำ นี ไว สำ หรับการอ างอิงในอนาคต หาก มีการส งต ออุปกรณ นี ให บุคคลที สา...

Страница 3: ...ions and Provisions 16 2 9 Important notes 16 2 10 Installation location 16 2 11 Care and maintenance 16 3 Guarantee 17 4 Fault elimination for user 17 ไทย 1 คู มือแนะนำ การติดตั ง 18 1 1 ส วนประกอบของเครื องภายใน 19 1 2 การติดตั ง 20 2 คำ แนะนำ การใช งาน 25 2 1 ลักษณะการทำ งาน 25 2 2 ข อสำ คัญโดยสังเขป 25 2 3 ส วนประกอบที สำ คัญของเครื อง ภายนอก 26 2 4 การใช งาน ELCB 27 2 5 การใช งานครั งแรก 28 2...

Страница 4: ...LTRON 4 1 Installation Instructionfor the qualified installer Installation to a bath sink 100 mm 200 mm 35 mm G1 2 G1 2 110 mm 59 mm 280 mm 360 mm 270 mm 264 mm 9 mm 50 mm 65 mm Dimension Cable Fig 1 Fig 2 Fig 3 ...

Страница 5: ...Electronic control set C Control Triac set D Thermal cut out E Temperature Sensor Inlet F Temperature Sensor Outlet G ELCB option 4 x 35 mm 4 3 mm 1 Installation Instructionfor the qualified installer Using the installation template to drill the holes Wall Mounting Wiring diagram Fig 4 Fig 5 Fig 6 ...

Страница 6: ... with seal 5 Copper tank 6 ELCB option 7 Reed switch 8 Flow Limiter 9 Lower mounting hole 10 Plug connecting the circuit board to the cover 11 Hot water connection 12 Cold water connection 16 14 15 13 1 3 5 7 9 11 2 4 6 8 10 12 13 Plug connecting the temperature control to the circuit board 14 ELCB Test option 15 ELCB Reset option 16 Circuit board cover Description of the unit Internal Fig 7 ...

Страница 7: ...underneath the water heater Open the cover of the unit Before taking any action always switch off the water heater s main circuit breaker first Inspect the internal components The cable must be in good condition and the ELCB must be turned to the off position Remove the plug connecting the cover of the unit Create an opening for the water inlet in the case of wall embedded and wall mounted a pipes...

Страница 8: ...e power is turned off at the mains Hang the heater on the screws mounted on the wall and slide the heater down into position A circuit breaker or power control switch should be installed before the unit The size of the circuit breaker must correspond to the voltage of the heater check the size of the circuit breaker in the Technical Information section Measure and cut the insulation at the end of ...

Страница 9: ...th hot and cold water using a rubber leakage gasket Fig 16 C between the joints KW B A InstallingWater Heater wall mounted Connecting the water heater to a wall mounted water pipe Connect the prepared water pipe to the pre assembled nipple joint Screw the joints on the unit Fig 17 A to the pipe both hot and cold water using a rubber leakage gasket Fig 17 B between the joints The company does not a...

Страница 10: ...Installation Instructionfor the qualified installer Install the cover Connect the power cord between the circuit board and the cover After installation is complete close the casing and screw in tightly Fig 18 Fig 19 Fig 20 ...

Страница 11: ...The appliance may be used by children aged 8 and up and persons with reduced physical sensory or mental capabilities or a lack of experi ence provided that they are super vised or they have been instructed on how to use the appliance safely and have under stood the resulting risks Children must never play with the appliance Children must never clean the appli ance or perform user maintenance unles...

Страница 12: ... free location since there will always be some water left in the unit The water heater is to be installed vertically on a wall water connection downwards d ELCB Reset knob e Cold Water Inlet Pipe f Hot Water Outlet Pipe Warning For electrical heating appliances equipped with a heat cutoff device that does not reset automatically if you would like to reset the unit the mains power supply must be di...

Страница 13: ...l cease to func tion Please note that the indicator light at the front of the unit will turn off Then turn the ELCB Reset knob d to start operate again ELCB Knob Positioning Warning If the unit does not operate even pressing the Reset knob contact Stiebel Eltron service for a check and repair 2 4 1 This model features an automatic cutoff device that functions when the water temperature is unusuall...

Страница 14: ...l show The DHC_EC EL Water Heater fea tures a temperature control knob at the front of the unit whereby 3 tempera ture levels may be selected WARNING When selecting an appropriate water temperature the temperature may be dangerously high especially for children Keep away from the hot water outlet as it may cause a potential scald ing hazard The appliance is not to be installed in locations where f...

Страница 15: ...ternal Thread Dimension W x H x D mm 200 x 360 x 110 Weight kg 2 0 Electrical connection 1 N PE AC 220 240 V Recommended circuit breaker A 32 40 50 Recommended cable size Sqmm 4 6 6 8 8 10 Rated power kW Rated current A 220 V 230 V 240 V Kw A 6 0 27 3 6 6 28 7 7 1 29 6 kW A 8 0 36 4 8 7 37 8 9 5 39 6 kW A 9 9 Safety device ELCB ELCB Note The cable sizes can only be a guiding value Always abide by ...

Страница 16: ...llation Steel copper or plastic piping systems If plastic piping systems are being used the following instructions are to be respected Temperature max 60 C Pressure max 10 bar The unit must be connected to the protective earth conductor see electric circuit diagram 2 10 Installation location The instantaneous water heater should be installed in an enclosed frost free area if possible close to the ...

Страница 17: ...es not accept liability for any failure caused by improper installation and or unauthorized installers Fault Cause Rectification No hot water despite water flow through the unit The water flow volume required for the unit to turn it on has not been reached Increase flow volume Water flow too high Reduce water flow Water flow too high Heating setting too low Turn knob to the right max position ELCB...

Страница 18: ... อไปยังอ างอาบน ำ อ างล างมือ 100 mm 200 mm 35 mm G1 2 G1 2 110 mm 59 mm 280 mm 360 mm 270 mm 264 mm 9 mm 50 mm 65 mm 1 คู มือแนะนำ การติดตั ง สำ หรับช างผู ชำ นาญ ภาพที 1 ภาพที 2 ภาพที 3 ขนาดมิติของเครื อง ขนาดความยาวสายไฟจากผนัง ...

Страница 19: ...ent B Electronic control set C Control Triac set D Thermal cut out E Temperature Sensor Inlet F Temperature Sensor Outlet G ELCB option 4 x 35 mm 4 3 mm 1 คู มือแนะนำ การติดตั ง สำ หรับช างผู ชำ นาญ ภาพที 4 ภาพที 5 ภาพที 6 การใช แผ นทาบเจาะตำ แหน งยึดเครื อง วงจรไฟฟ า วิธีการแขวนเครื องบนผนัง ...

Страница 20: ...ริม 16 14 15 13 1 3 5 7 9 11 2 4 6 8 10 12 7 สวิตซ แรงดันน ำ 8 ชุดควบคุมอัตราการไหลของน ำ 9 รูยึดสกรูตำ แหน งล าง 10 ปลั กต อแผงวงจรควบคุม กับ ฝาเครื อง 11 ท อทางน ำ ออก 12 ท อทางน ำ เข า 13 ปลั กต อแผงวงจรควบคุม การใช งาน 14 ELCB Test ปุ มทดสอบ อุปกรณ เสริม 15 ELCB Reset ปุ มทดสอบ อุปกรณ เสริม 16 ฝาครอบแผงวงจร 1 คู มือแนะนำ การติดตั ง สำ หรับช างผู ชำ นาญ ภาพที 7 ภาพส วนประกอบของเครื อง ...

Страница 21: ...กรูใต เครื อง เพื อเปิดฝาครอบเครื องออก เปิดฝาครอบเครื องออก ก อนทำ การใด ๆ ให ปิดเบรคเกอร หลักของเครื อง ทำ น ำ ร อนก อนทุกครั ง ตรวจสอบอุปกรณ ภายใน รวมทั งสายไฟ ต องอยู ในสภาพปกติ และ ELCB ต องอยู ในตำ แหน งปิด ถอดปลั กเชื อมต อที ฝาครอบเครื องออก เจาะทางเข าท อน ำ เตรียมไว ในกรณีเดินท อฝัง ผนัง และกรณีเดินท อลอยบนผนัง 1 คู มือแนะนำ การติดตั ง สำ หรับช างผู ชำ นาญ ภาพที 8 ภาพที 9 ภาพที 10 ภาพที ...

Страница 22: ...ต อง แน ใจว า ได ตัดกระแสไฟฟ าจากเมนหลักแล ว ควรติดตั งเบรคเกอร หรือสวิตซ ควบคุมไฟฟ า ก อนเข าเครื อง ขนาดเบรคเกอร ต องสัมพันธ กับ กำ ลังไฟของเครื อง ดูขนาดเบรคเกอร ที ข อมูลทาง เทคนิค นำ เครื องไปแขวนกับสกรูบนผนัง และเลื อนลง ให เข าที วัด และตัดสายไฟ ปลอกฉนวนที หุ มปลายสาย ไฟเตรียมไว สอดสายไฟเข าช องตามลำ ดับ ดังรูป และหมุน สกรูยึดสายไฟให แน น ให แน ใจว าใช ขนาดสายไฟถูก ต อง 1 คู มือแนะนำ การติด...

Страница 23: ...ที 16 A เข ากับ ข อต อ ทั งน ำ ร อน และน ำ เย น โดยมีประเก นยางกัน รั ว ภาพที 16 C อยู ระหว างกลางข อต อ KW B A การติดตั งเหนือซิงค การติดตั งเข ากับท อน ำ ที เดินลอยบนผนัง ประกอบท อน ำ ที เดินอยู เตรียมไว แล ว เข ากับข อ ต อนิปเปิลที ประกอบไปแล ว ประกอบข อต อนิปเปิล ภาพที 18 A เข ากับทาง น ำ เข าออกที ตัวเครื อง และหมุนข อต อให แน น ต องใส ประเก นยางที ข อต อ ภาพที 18 B ด วยทุกครั งเพื อ ป องกันก...

Страница 24: ...ON 24 เสียบสายไฟเชื อมต อกันระหว างแผงวงจรบนฝา ครอบเครื องและแผงวงจรที ตัวเครื อง เมื อเสร จสิ นการติดตั งปิดฝาครอบเครื อง และยึด สกรูให แน น 1 คู มือแนะนำ การติดตั ง สำ หรับช างผู ชำ นาญ ภาพที 18 ภาพที 19 ภาพที 20 ...

Страница 25: ...ือนจากความเสียหาย เครื องทำ น ำ ร อนนี อาจถูกใช งานโดยเด ก อายุ 8 ปี หรือคนที มีสภาพร างกายไม สมบูรณ คนที สูญเสียความสามารถในการรับรู หรือไม มี ประสบการณ ควรได รับการแนะนำ เกี ยวกับวิธีการ ใช เครื องทำ น ำ ร อนอย างปลอดภัย และยังเข าใจ ถึงความเสี ยง และอันตราย ที จะเกิดขึ นจากการ ใช งานผิดวิธี ห ามเด กเล นเครื องทำ น ำ ร อนนี หรือ ทำ ความสะอาดใด ๆ หรือกระทำ การใด ๆ โดยไม อยู ภายใต การดูแลจากผู ใหญ...

Страница 26: ...บที สำ คัญของเครื อง คำ เตือน ห ามเปิดสวิตซ หากคาดว าน ำ ในเครื องทำ น ำ ร อนเป นน ำ แข ง d ปุ ม ELCB RESET e ท อน ำ เย นเข า f ท อน ำ ร อนออก คำ เตือน สำ หรับเครื องใช ไฟฟ าทำ ความร อน ซึ งมี คัตเอาท ความร อนชนิดไม ตั งใหม เอง หากต องการ ตั งใหม จะปฏิบัติโดยการตัดวงจรแหล งจ ายไฟชุด หลัก 2 คำ แนะนำ การใช งาน สำ หรับผู ใช และช างผู ชำ นาญ ภาพที 21 ...

Страница 27: ...กตุไฟแสดงการ ทำ งานหน าเครื องจะดับ จากนั นหมุนปุ ม ELCB Reset d เพื อเริ มการทำ งานใหม ภาพด านหน าและด านข าง แสดงตำ แหน ง ELCB ของเครื อง คำ เตือน ถ าเครื องทำ น ำ ร อนไม ทำ งาน แม จะกดปุ ม ELCB Reset แล วก ตาม ห ามใช งาน หรือกระทำ การใด ๆ ให ติดต อร านค าผู จำ หน าย มาทำ การตรวจสอบ และซ อมแซม 2 4 1 เครื องรุ นนี ติดตั งระบบตัดการทำ งาน ของเครื อง โดยอัตโนมัติ เมื ออุณหภูมิน ำ สูงเกินปกติ ในกรณี...

Страница 28: ...น ไฟแสดงการทำ งานของเครื องจะสว าง เครื องทำ น ำ ร อนรุ น DHC_EC EL มีปุ มเลือก อุณหภูมิ ด านหน าเครื อง สามารถเลือกอุณหภูมิที ต องการได 3 ระดับ คำ เตือน เมื อเลือกอุณหภูมิ ที เหมาะสม แล ว อุณหภูมิน ำ อาจสูง และเป นอันตราย โดยเฉพาะอย างยิ ง เด กควรให อยู ห างจากทางน ำ ร อนออก เพราะอาจเกิดอันตรายจากการถูกน ำ ลวก ได 2 6 การปรับอัตราการไหลของน ำ หากไม ได อุณหภูมิน ำ ที ต องการ สามารถปรับอัตรา การไหลข...

Страница 29: ...220 240 V ขนาดของเบรคเกอร ที แนะนำ A 32 40 50 ขนาดของสายไฟที แนะนำ Sqmm 4 6 6 8 8 10 กำ ลังไฟฟ า kW อัตราการไหลของกระแสไฟฟ า A 220 V 230 V 240 V Kw A 6 0 27 3 6 6 28 7 7 1 29 6 kW A 8 0 36 4 8 7 37 8 9 5 39 6 kW A 9 9 อุปกรณ ตัดกระแสไฟฟ า ELCB ELCB ข อแนะนำ ค าดังกล าวเป นเพียงข อแนะนำ และจะแตกต างกันไปตามรูปแบบชนิดการติดตั งสายไฟ โปรดตรวจสอบ มาตรฐาน และกฎระเบียบการใช ไฟฟ าให สอดคล องกับประเทศของค...

Страница 30: ...สาระสำ คัญ โปรดแน ใจว าข อมูลตามฉลากที ติดเครื องถูกต อง การติดตั งเครื องต องให แนบชิดกับผนัง วัสดุสำ หรับเดินท อ เหล ก ทองแดง พลาสติก ถ าใช ท อพลาสติกต องปฏิบัติ ตามอย างเคร งครัดเพื อป องกันข อผิด พลาดที อาจเกิดขึ นได อุณหภูมิ สูงสุด 60 องศาเซลเซียส แรงดันน ำ สูงสุด 10 บาร เครื องทำ น ำ ร อน ต องติดตั งสายดิน เพื อ ความปลอดภัย 2 10 สถานที ตั ง เครื องทำ น ำ ร อน ระบบน ำ ผ านร อนทันที ต องติดตั ...

Страница 31: ...สำ หรับสิ งที เกิด ขึ นจากการไม ปฏิบัติตามคู มือ 3 การรับประกัน ข อขัดข อง สาเหตุ การแก ไข น ำ ไม ร อน ถึงแม ว าจะเปิดวาล วน ำ จนสุด แล ว ปริมาณการไหลของน ำ ไม แรงพอที จะทำ ให เครื อง ทำ งาน เพิ มการไหลของน ำ อัตราการไหลของน ำ เย น แรงเกินไป ปรับลดอัตราการไหล ของน ำ ปุ มปรับอุณหภูมิตั งไว ต ำ เกินไป ปรับตั งปุ มปรับอุณหภูมิให สูงขึ น ELCB ตัดการทำ งาน หมุนปุ ม ELCB reset 4 การแก ไขข อขัดข อง ...

Страница 32: ...ial Green read paper 75 g Plastic bag 7 x 11 INCH Product code DHC 6 EL 232209 DHC 6 EC 231279 DHC 8 EL 232210 DHC 8 EC 231280 DHC 10 EL 232211 Part name OPERATING INSTRUCTION DHC EC Th En Rev 04 Part no 7901 293468 ...

Отзывы: