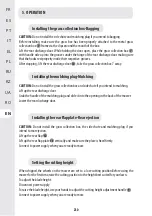
CAUTION:
Do not install the grass collection box if you intend to side ejection.
Lift up the side discharge door.
Place the hooks found on the side chute
10
into their respective grooves underneath the
hinges of the side discharge door. If correctly installed, the side chute
10
should be positioned
approximately parallel to the ground.
Let go of the side discharge door.
Installing the side chute-side ejection
5. OPERATION
Risk of death by electrocution or electric shock or serious personal
injury if power lines or electric cords are contacted. Never operate
mower over electrical sources, cords, or wires.
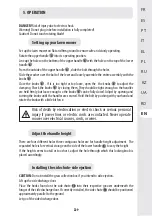
DANGER!
Risk of injury due to electric shock.
Warning! Do not plug in before installation is fully completed!
Caution! Do not touch rotating blade!
Set up the lawn mower on flat and firm ground to ensure safe and sturdy operating.
Rotate the upper handle
4
into its operating position.
Line up the holes on the bottom of the upper handle
4
with the holes on the top of the lower
handle
6
.
From the outside of the upper handle
4
, slide the bolt through the holes.
Slide the washer over the bolt of the lever and loosely assemble the entire assembly with the
knobs
5
.
Close the knobs
5
. If it is too tight or too loose, open the the knobs
5
to adjust the
clamping. Check the knobs
5
by closing them. They should be tight enough so the handles
are held firmly, but loose enough so the knobs
5
can be fully closed. Adjust by opening and
turning the knobs until the handles are secured. Hold the bolt by pushing with your hand and
rotate the knob with a little bit force.
There are four different holes three contiguous holes are for handle height adjustment. The
separated hole is for vertical storage on the side of the lower handle
6
to vary the height.
If the height seems too tall or too short, adjust the hole through which this locking knob is
placed accordingly.
Setting up your lawn mower
Adjust the handle height
229
229
FR
IT
EL
PL
RU
EN
ES
PT
KZ
UA
RO
Содержание ELM2-46SP.4
Страница 3: ......
Страница 26: ...10 VUE ÉCLATÉE ET LISTE DES PIÈCES 25 FR ES PT IT EL PL RU KZ UA RO EN ...
Страница 47: ...10 PLANO DE DESPIECE Y LISTA DE PIEZAS 46 FR ES PT IT EL PL RU KZ UA RO EN ...
Страница 68: ...9 GARANTIA 10 VISTA PORMENORIZADA COM LISTA DE PEÇAS 67 FR IT EL PL RU ES PT KZ UA RO EN ...
Страница 89: ...10 VISTA ESPLOSA ED ELENCO DEI COMPONENTI 88 88 FR ES PT IT EL PL RU KZ UA RO EN ...
Страница 110: ...10 ΑΝΑΛΥΤΙΚΗ ΑΠΕΙΚΟΝΙΣΗ ΜΕ ΚΑΤΑΛΟΓΟ ΕΞΑΡΤΗΜΑΤΩΝ 109 109 FR IT EL PL RU ES PT KZ UA RO EN ...
Страница 131: ...10 RYSUNEK ROZSTRZELONY Z LISTĄ CZĘŚCI 130 130 FR ES PT IT EL PL RU KZ UA RO EN ...
Страница 153: ...10 ИЗОБРАЖЕНИЕ В РАЗОБРАННОМ ВИДЕ И СПИСОК ДЕТАЛЕЙ 152 152 FR ES PT IT EL PL RU KZ UA RO EN ...
Страница 174: ... ɀȺɊɕɅɕɋԔȺɇ ɄԦɊȱɇȱɋ ɀԤɇȿ ȻԦɅȱɄɌȿɊ ɌȱɁȱɆȱ FR IT EL PL RU ES PT KZ UA RO EN 173 173 ...
Страница 195: ...10 ЗОБРАЖЕННЯ В РОЗІБРАНОМУ ВИДІ ТА СПИСОК ДЕТАЛЕЙ 194 194 FR ES PT IT EL PL RU UA KZ RO EN ...
Страница 216: ...10 VEDERE ÎN SPAŢIU ŞI LISTA PIESELOR COMPONENTE 215 215 FR IT EL PL RU RO ES PT KZ UA EN ...
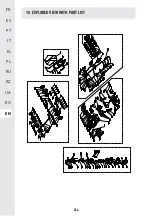
Страница 237: ...10 EXPLODED VIEW WITH PART LIST 236 236 FR ES PT IT EL PL RU EN KZ UA RO ...


