296
FR
ES
PT
IT
EL
PL
RU
KZ
UA
RO
BR
EN
7.1 STORE THE MACHINE
Plug out the battery from the power tool. Examine the unit thoroughly for worn, loose or damaged parts.
Clean the unit before storing. Do not expose the product to sunlight. Make sure the product is always
protected from cold and humidity.
• Always allow the machine to cool down before storing.
7.2 STORE THE LITHIUM BATTERIES
Please make sure that the battery power level is as recommended in the battery instruction manual.
Please refer to the battery instruction manual for further details.
8. MAINTENANCE
DANGER! Risk of injury due to electric shock.
Remove the battery pack before adjusting, inspecting,
cleaning or storing the product.
8.1 CLEANING
Wipe off the housing and the plastic components using a moist, soft cloth. Do not use strong solvents
or detergents on the plastic housing or plastic components. Certain household cleaners may cause
damage, and may cause a shock hazard.
• Keep all nuts, bolts and screws tight to be sure the machine is in safe working condition.
• Check the grass collector frequently for wear or deterioration.
• Be careful during adjustment of the machine to prevent entrapment of the fi ngers
between moving blades and fi xed parts of the machine.
• Always allow the machine to cool down before cleaning.
• When servicing the blades be aware that, even though the power source is switched off ,
the blades can still be moved.
• Replace worn or damaged parts for safety. Use only genuine replacement parts and
accessories.
8.2 CHANGING THE CUTTING BLADE
Turn the mower onto its side to reveal the underside of the machine. Place a block of wood or a stop of
some kind between the blade and the edge of the deck to prevent the blade from turning freely. Using
a wrench , loosen the blade nut on the bottom of the unit . Remove the blade nut, the washer, and the
blade from the machine.
Put the new blade onto the shaft and replace the blade washer and the blade nut. Tighten the blade nut.
Torque the blade nut to 25-30 N•m. Once the blade is secure, check by hand that everything rotates as
it should.
Содержание 20VLM2-33P.1
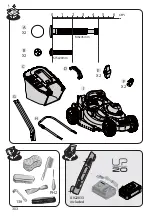
Страница 302: ...PH2 0 1 2 3 4 5 6 cm M6x45mm ST5x20mm A X2 B C I X2 D H G E X2 F X2 13 A022033 included 303 ...
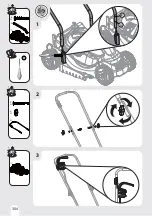
Страница 303: ...2 3 A X2 E X2 G I B X2 1 I H A B 304 ...
Страница 304: ...5 F X2 4 100 cm 92 cm 305 ...
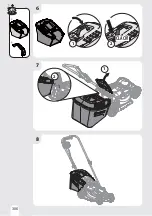
Страница 305: ...6 7 8 C D 1 CLACK 2 1 2 306 ...
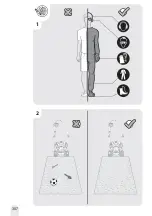
Страница 306: ...1 2 307 ...
Страница 307: ...2 3 1 4 3 2 1 2 5cm 7cm A 1 B 1 A 2 B 2 A 3 B 3 A 4 B 4 1 2 3 4 B A 100 1 2 CLICK 3 308 ...
Страница 308: ...4 5 1 2 3 6 309 ...
Страница 309: ...7 1 3 cm 1 3 cm 1 3 cm 1 3 cm 1 3 cm 1 3 cm 1 3 cm 1 3 cm 1 3 cm 1 2 3 4 1 2 3 4 A 1 B 1 A 4 B 4 4 2 3 1 310 ...
Страница 310: ...8 15 311 ...
Страница 311: ...12 13 11 9 10 312 ...
Страница 312: ...3 2 4 1 90 3 4 2 1 5 313 ...
Страница 313: ...2 3 1 90 3 4 2 1 314 ...
Страница 314: ...5 4 7 6 9 8 A022033 included 25 30N m 315 ...
Страница 315: ...1 2 4 5 3 4 2 1 3 316 ...
Страница 316: ...1 2 4 с 24 с 317 ...

