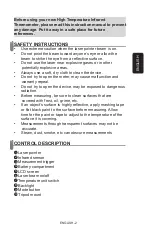
background image

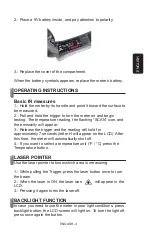
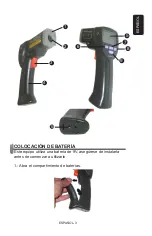
2.- Place a 9V battery inside, and pay attention to polarity.

3.- Replace the cover of the compartment.

When the battery symbols appears, replace the meter’s battery.

OPERATING INSTRUCTIONS

Basic IR measures

1.- Hold the meter by its handle and point it toward the surface to 
be measured.
2.- Pull and hold the trigger to turn the meter on and begin 
testing. The temperature reading, the 

fl

 ashing “SCAN” icon, and 

the emissivity will appear.
3.- Release the trigger and the reading will hold for 
approximately 7 seconds (letter H will appear on the LCD). After 
this time, the meter will automatically shut off. 
4.- If you want to select a temperature unit (°F / °C) press the 
Temperature button.

LASER POINTER

Use the laser pointer to know which area is measuring.

1.- While pulling the Trigger, press the laser button once to turn 
the beam.
2.- When the laser is ON, the laser icon            will appear in the 
LCD.
3.- Pressing it again turns the laser off.

BACKLIGHT FUNCTION

In case you need to use the meter in poor light conditions, press 
backlight button, the LCD screen will light on. To turn the light off, 
press once again the button.

ENGLISH

ENGLISH-4

Содержание HER-420

Страница 1: ......

Страница 2: ...tion Before measuring be sure to clean surfaces that are covered with frost oil grime etc If an object s surface is highly reflective apply masking tape or flat black paint to the surface before measu...

Страница 3: ...BATTERY PLACEMENT This meter uses a 9V battery make sure to install before to use it 1 Open the battery compartment 1 2 3 4 5 6 7 8 9 10 ENGLISH ENGLISH 3...

Страница 4: ...e reading will hold for approximately 7 seconds letter H will appear on the LCD After this time the meter will automatically shut off 4 If you want to select a temperature unit F C press the Temperatu...

Страница 5: ...veraged and the value is displayed Max In the MAX mode only the highest reading encountered in the current measurement session is displayed Min In the MIN mode only the lowest reading is displayed Max...

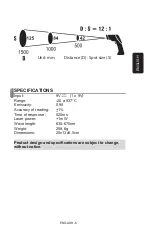
Страница 6: ...ime of response 520ms Laser power 1mW Wave length 630 670nm Weight 258 6g Dimensions 20x13x5 5cm Product design and specifications are subject to change without notice Product design and specification...

Страница 7: ......

Страница 8: ...r las superficies que est n cubiertas por hielo aceite suciedad etc Si la superficie de un objeto tiene alta reflexi n aplique masking tape o una capa de pintura negra antes de realizar una medici n D...

Страница 9: ...COLOCACI N DE BATER A Este equipo utiliza una bater a de 9V aseg rese de instalarla antes de comenzar a utilizarlo 1 Abra el compartimiento de bater as 1 2 3 4 5 6 7 8 9 10 ESPA OL ESPA OL 3...

Страница 10: ...la pantalla de LCD 3 Suelte el interruptor de medici n la ltima lectura permanecer en pantalla por aproximadamente 7 segundos la letra H aparecer en la pantalla Despu s de este tiempo el term metro s...

Страница 11: ...OT N DE MODO El bot n de modo le permite elegir entre diferentes funciones al momento de realizar mediciones de temperatura Podr elegir entre las siguientes opciones Promedio AVG En pantalla se mostra...

Страница 12: ...e luz ESPECIFICACIONES Entrada 9V 1 x 9V Rango 20 a 537 C Emisividad 0 95 Precisi n de lectura 1 Tiempo de respuesta 520ms Potencia de l ser 1mW Longitud de onda 630 670nm Peso 258 6g Dimensiones 20x1...

Страница 13: ...the addresses mentioned later THIS WARRANTY IS VOID IN THE NEXT CASES If the product has been damaged by an accident acts of God mishandling leaky batteries failure to follow enclosed instructions im...

Страница 14: ...arant a ante la propia casa comercial donde adquiri el producto Si la presente garant a se extraviara el consumidor puede recurrir a su proveedor para que le expida otra p liza de garant a previa pres...

Отзывы: