


16
17
LImITed wARRAnTy
Y. Stern Engineering Ltd. warrants that its electronic products will be free of defects in
material and workmanship during normal use for two years from the date the product is
purchased.
If a defect is found in normal use, Y. Stern Engineering Ltd. will, at its discretion, repair,
provide a replacement part or product, or make appropriate adjustments. Damage
caused by accident, misuse, or abuse is not covered by this warranty. Improper care
and cleaning will void the warranty. Proof of purchase (original sales receipt) must be
provided to Stern Engineering Ltd. with all warranty claims.
Stern Engineering Ltd is not responsible for labor charges, installation, or other
incidental or consequential costs other than those noted above. In no event shall the
liability of Stern Engineering Ltd. exceed the purchase price of the product.
If you believe that you have a warranty claim, contact your Stern Distributor, Dealer or
Plumbing contractor. Please be sure to provide all pertinent information regarding your
claim, including a complete description of the problem, the product, model number,
the date the product was purchased, from whom the product was purchased and the
installation date. Also include your original invoice.
Y. STErN ENgINEErINg AND/Or SELLEr DIScLAIM ANY LIABILITY FOr SPEcIAL,
INcIDENTAL Or cONSEQuENTIAL DAMAgES. This warranty excludes product damage
due to installation error, incorrect maintenance, wear and tear, battery, product
abuse, or product misuse, whether performed by a contractor, service company, or the
consumer. This warranty does not cover product damage caused by the following:
- Incorrect installation.
- inversions of supply pipes.
- Pressures or temperatures exceeding recommended limits.
- Improper manipulation, tampering, bad or lapsed maintenance.
- Foreign bodies, dirt or scale introduced by the water supply or soap tank.
- use of the soap outside of viscosity specifications.
- Alteration of the original soap/foam dispenser components (including pipes).
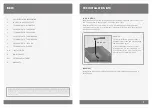
seTTIngs AdjUsTmenT
ENTrANcE TO THE SELF ADJuSTMENT MODE: check that no objects are in front
of the sensor. Press the ADJ button. Once a quick flashing of the LED of the
sensor eye is perceived, remove your hand holding the remote control and move
away from the sensor area. The ideal sensor range for the specific location will
be set automatically. Once the self adjustment has taken place, the hand dryer
will activate for 1 second as an indication that the ideal sensor range was set
and the product is ready for use.
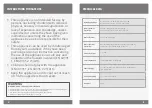
SEcurITY TIME: The Security time, prevents continuous running due to
reflections or vandalism. By default, if the sensor is covered for more than 90
seconds the unit will shut off automatically. To resume regular operation any
obstruction must be removed.
Press the SEc button. Wait until a quick flashing of the LED in the sensor eye is
perceived. Then, press + to increase the security time and – to reduce it.
DELAY IN TIME: If required, the delay in time can also be modified as follows:
Press the IN button. Wait until a quick flashing of the LED in the sensor eye is
perceived. Then, press + to increase the delay in time and – to reduce it.
DELAY OuT TIME: The delay out time is the amount of time it takes for the unit to
shut off after the user removes their hands.
If required, the delay out time can be modified as follows:
Press the OuT button. Wait until a quick flashing of the LED in the sensor eye is
perceived. Then, press + to increase the delay out time and – to reduce it.
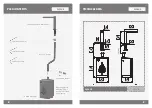
TEMPOrArY OFF FuNcTION: This function is ideal to perform any kind of activity
in front of the sensor without operating the system (for example, cleaning).
The Hand Dryer will remain shut for 1 minute when this button is pressed once.
To cancel this function and to return to normal operation press the On/Off
button again or wait 1 minute.
rESET BuTTON: This function restores all the factory settings except for the
sensor range. If required, press the reset button and without releasing it, press
the + button once.
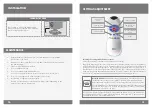
note:
To enter the self adjusting mode, use the ADJ button. To change the sensor range, use
the rANgE button.