background image

10

-Presione 

R

  para  comenzar  la  grabación.  Dirija  el             

micrófono hacia la fuente de sonido.
-Presione   para pausar y/o recomenzar la grabación.
-Presione 

R

 para detener la grabación. En la pantalla 

aparecerá su duración.

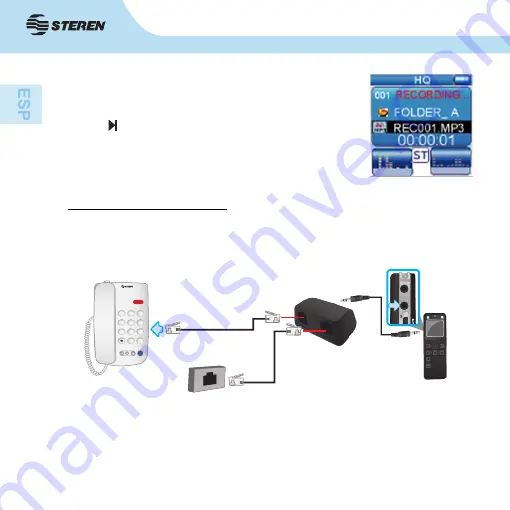
2) Conversaciones telefónicas

* Antes de activar esta función, instale el filtro para grabación telefónica como 
se indica en el diagrama: 

-Presione 

M

  por  unos  segundos,  muévase  en  el  menú  con  las  teclas  de                         

navegación 

+/-

 y elija “Grabar desde”, seleccione “Entrada de micrófono”.

-Presione 

M

 por unos segundos y elija “Modo ATR” con las teclas de navegación 

+/-

, posteriormente seleccione “Activar”.

1

2

3

4

5

6

7

8

9

0

#

Содержание REC-850

Страница 1: ......

Страница 2: ... cómo utilizar apropiadamente el producto Para apoyo compras y todo lo nuevo que tiene Steren visite nuestro sitio web www steren com GRABADORA DIGITAL DE VOZ DE 4 GB La información que se muestra en este manual sirve únicamente como referencia sobre el producto Debido a actualizaciones pueden existir diferencias Por favor consulte nuestra página web www steren com para obtener la versión más reci...

Страница 3: ...amiento y anular la garantía No exponga el equipo a temperaturas extremas No use ni almacene este equipo en lugares donde existan goteras o salpicaduras de agua Puede causar un mal funcionamiento o un choque eléctrico Evite las caídas del equipo ya que podría sufrir daños ...

Страница 4: ...en carpetas diferentes para organizar mejor las grabaciones además de 5 niveles de calidad de grabación Tiene pantalla LCD a color que permite visualización de fotos imágenes y archivos de texto en formato txt dos micrófonos internos para grabación estéreo altavoz salida de audífono entrada para micrófono externo ranura de expansión para memorias micro SD y memoria interna de 4 GB Sistema activado...

Страница 5: ... BATT ON Grabación Pausa 5 Subir volumen Navegación hacia arriba en el menú Bajar volumen Navegación hacia abajo en el menú 6 Micrófono 7 Bocina 8 Conector USB 9 Ranura para tarjeta Micro SD o Micro SDHC Todas las tarjetas deben formatearse antes de usarse con la grabadora 10 RE FL Cambiar carpeta Modo de repetición 11 Grabar 12 Entrada para audífonos 13 Entrada auxiliar 14 Interruptor de encendid...

Страница 6: ...nciende la grabadora b HOLD Desactiva todos los botones de la grabadora Al presionar cualquier botón aparecerá en la pantalla HOLD Mueva el interruptor a la posición ON para activar de nuevo los botones c BATT OFF Apaga la grabadora 15 Compartimento de baterías ...

Страница 7: ...de fotos TXT Carpeta de texto PCM HQ SP LP SLP Calidad de grabación PCM PCM lineal HQ Alta calidad SP Calidad estándar LP Tiempo largo SLP Tiempo extralargo 000 000 Número de archivo en reproducción Número de archivo en la grabación RECORDING Grabación en curso Temporizador activo Indicador de nivel de batería Alarma activada ...

Страница 8: ... Deslice el interruptor de encendido a OFF No cambie las baterías mientras la grabadora esté encendida puede causar un mal funcionamiento Abra el compartimento e inserte las baterías poniendo atención en su polaridad Coloque de nuevo la tapa Deslice el interruptor de encendido a la posición ON El nivel de la batería se indica mediante un ícono en la pantalla Completo Media carga Casi vacía Batería...

Страница 9: ... ON Pulse durante unos segundos hasta que la grabadora se encienda 3 MODO DE USO Antes de comenzar 1 Ajuste la fecha y hora Ver pág 18 2 Elija la calidad de las grabaciones Ver pág 22 3 Escoja una fuente de grabación Ver pág 22 GRABACIÓN 1 Micrófono integrado Presione M por unos segundos muévase en el menú con las teclas de navegación y elija Grabar desde presione M seleccione Micrófono ...

Страница 10: ... duración 2 Conversaciones telefónicas Antes de activar esta función instale el filtro para grabación telefónica como se indica en el diagrama Presione M por unos segundos muévase en el menú con las teclas de navegación y elija Grabar desde seleccione Entrada de micrófono Presione M por unos segundos y elija Modo ATR con las teclas de navegación posteriormente seleccione Activar 1 2 3 4 5 6 7 8 9 ...

Страница 11: ...be tener al menos un conector de 3 5 mm para conectar en la grabadora Presione R para comenzar y o detener la grabación Asegúrese de que el dispositivo conectado esté en un nivel alto de sonido para que la grabación se haga correctamente REPRODUCCIÓN Encienda la grabadora y presione M para cambiar entre la reproducción de música o archivos de voz Presione RE FL para cambiar entre las carpetas de l...

Страница 12: ... soltarlo continuará a velocidad normal Ajuste el volumen con Durante la reproducción aparecerá en la pantalla el tiempo transcurrido Al pausarla se mostrará el tiempo total de la grabación 2 Música La grabadora solamente reproduce archivos de música en formato MP3 y WMA Conecte la grabadora a una computadora mediante un cable USB Copie los archivos MP3 o WMA en la carpeta MUSIC de la grabadora De...

Страница 13: ... pantalla aparecerá el indicador Presione de nuevo RE FL al final de la sección que desea repetir El indicador aparecerá en la pantalla La sección marcada se repetirá hasta que presione otra vez RE FL Presione de nuevo para desactivar la repetición y continuar con la reproducción normal Repetir un archivo Durante la reproducción presione para pausar y luego oprima M y seleccione Repetir con las te...

Страница 14: ...reproduce imágenes en formato JPEG Conecte la grabadora a una computadora mediante un cable USB Copie las imágenes JPEG en la carpeta PHOTO de la grabadora Desconecte la grabadora de la computadora y enciéndala Presione RE FL para seleccionar la carpeta PHOTO Presione para seleccionar una imagen para verla en la pantalla y para regresar a la anterior o para avanzar a la siguiente 4 Texto La grabad...

Страница 15: ...pantalla y para regresar o avanzar las páginas Oprima de nuevo para detener la reproducción y M para volver a la carpeta con archivos TXT Si presiona M durante la reproducción podrá agregar una marca en la página seleccionando Agregue la etiqueta Borre alguna de estas marcas eligiendo Borrar lista Favoritos y seleccione alguna entre una lista con Lista de favoritos Regrese a la reproducción con Sa...

Страница 16: ...nte unos segundos Utilice para seleccionar Borrar carpeta y vuelva a presionar M Elija la carpeta a eliminar con y presione M Seleccione Sí con y oprima otra vez M para confirmar 3 Repetir Vea las páginas 13 y 14 Repetir una sección un archivo y una carpeta REPRODUCCIÓN 2 Música 4 Ecualizador Presione M durante unos segundos Utilice para seleccionar Ecualizador y vuelva a presionar M Seleccione al...

Страница 17: ...eleccione Activar para activar la función o Desactivar para desactivarla Presione M para confirmar 6 Alarma Antes de ajustar la alarma es necesario fijar la hora Vea el punto 8 Presione M durante unos segundos Utilice para seleccionar Alarma y vuelva a presionar M Active la alarma seleccionando Alarma encendida o desactívela eligiendo Alarma apagada Seleccione Hora de Alarma y ajuste la hora con P...

Страница 18: ...n encendido o desactívela eligiendo Grabación apagado Seleccione Tiempo grab para fijar la hora de inicio de la grabación Utilice para ajustarla Seleccione Ciclo de Grabación para determinar el tiempo de grabación ilimitado 30 60 90 o 120 minutos Seleccione Carp grab para elegir la carpeta en que se guardará la grabación Presione 2 veces para volver a la pantalla principal 8 Hora y fecha Presione ...

Страница 19: ... veces para volver a la pantalla principal 10 Idioma Presione M durante unos segundos Utilice para seleccionar Idioma y vuelva a presionar M Elija el idioma de su preferencia con Puede escoger entre inglés y español Presione M para guardar los cambios y 2 veces para volver a la pantalla principal 11 Apagado automático La grabadora puede apagarse automáticamente después de pasar cierto tiempo inact...

Страница 20: ...pantalla principal 12 Formatear Esta opción le permite borrar todos los archivos guardados en la grabadora Asegúrese de tener un respaldo antes de ejecutarla Presione M durante unos segundos Utilice para seleccionar Formato y vuelva a presionar M Seleccione Formatear con y presione M para confirmar Después de formatearse la grabadora regresará automáticamente a la pantalla principal 13 Sonido de l...

Страница 21: ...os Utilice para seleccionar Modo VOR y vuelva a presionar M Ajuste el nivel de sensibilidad del micrófono del 1 al 7 de este modo se activa automáticamente la función VOR o desactívela seleccionando desactivar Utilice y presione M para confirmar Presione 2 veces para volver a la pantalla principal 15 Dividir grabaciones Presione M durante unos segundos Utilice para seleccionar Dividir y vuelva a p...

Страница 22: ...la señal de un dispositivo externo Utilice y presione M para confirmar Presione 2 veces para volver a la pantalla principal 17 Calidad de grabación Presione M durante unos segundos Utilice para seleccionar Tipo de grabación y vuelva a presionar M Seleccione la calidad de grabación con y presione M para confirmar PCM Pulse Code Modulation lineal HQ High Quality Alta calidad SP Standard Play Calidad...

Страница 23: ... 520 h 1078 h Al seleccionar PCM las grabaciones se guardarán en la carpeta P 18 Reducción de ruido Presione M durante unos segundos Utilice para seleccionar Cortar ruido y vuelva a presionar M Seleccione Activar si desea que la grabadora aumente la calidad de la grabación de voz al reducir el ruido del ambiente Elija Desactivar para desactivar esta función Presione M para guardar los cambios y 2 ...

Страница 24: ...ón automática de conversaciones telefónicas o ATR Automatic Telephone Recording Antes de activar esta función instale el filtro para grabación telefónica Presione M durante unos segundos Utilice para seleccionar Modo ATR y vuelva a presionar M Seleccione Activar para activar la grabación automática de conversaciones telefónicas o elija Desactivar para desactivarla Presione M para confirmar y 2 vec...

Страница 25: ...ciona la pantalla Compruebe que las baterías tengan carga o que la grabadora esté correctamente conectada a una computadora No se puede grabar Compruebe que las baterías tengan carga o que la grabadora esté correctamente conectada a una computadora Deslice el interruptor de encendido a la posición BATT ON Elimine algunos archivos de la memoria Asegúrese de respaldarlos antes No se oye nada Comprue...

Страница 26: ... de encendido podría estar en HOLD Deslícelo a la posición BATT ON No hay sonido mientras se usan audífonos Compruebe que los audífonos estén bien conectados Ajuste el volumen 6 ESPECIFICACIONES Alimentación 3 V 2xAAA Memoria 4 GB Rango de frecuencia 20Hz 20 000Hz El diseño del producto y las especificaciones pueden cambiar sin previo aviso ...

Страница 27: ...ó el producto Si la presente garantía se extraviara el consumidor puede recurrir a su proveedor para que le expida otra póliza previa presentación de la nota de compra o factura respectiva DATOS DEL DISTRIBUIDOR Nombre del Distribuidor __________________________ Domicilio ______________________________________ Producto ______________________________________ Marca __________________________________...

Страница 28: ......

Страница 29: ... version of the instruction manual Thank you on purchasing your new Steren product This manual includes all the feature operations and troubleshooting necessary to install and operate your new Steren s 4 GB digital voice recorder Please review this manual thoroughly to ensure proper installation and operation of this product For support shopping and everything new at Steren visit our website www s...

Страница 30: ...en the device may cause damages and warranty will be void Do not expose to extreme temperatures Do not use or store the equipment near wet places May cause malfunction or shock hazard Avoid dropping the unit as this may cause damage ...

Страница 31: ...he recorder has segmentation function or storing in different folders and 5 recording qualities It features colour LCD screen to view pictures text files in txt format two internal microphones for stereo recordings speaker headphone output external microphone input micro SD card slot and 4GB of internal memory VOR Hold function Colour screen Battery indicator ...

Страница 32: ... File Search 4 Play Pause Power ON OFF plus the BATT ON switch Record Pause 5 Volume Up Menu Navigation Up Volume Down Menu Navigation Down 6 MIC 7 SPEAKER 8 USB Jack 9 Micro SD Card Slot 10 RE FL Folder Change Repeat Mode Change Repeat A B 11 Record 12 EAR Earphone Jack 13 Line In MIC Jack 14 Battery Switch BATT ON HOLD BATT OFF ...

Страница 33: ...recorder Pressing any button HOLD appears on the screen Move the switch to ON to activate the buttons again c BATT OFF If you change the switch to this position BATT ON the recorder will light as it was before 15 Battery compartment L R STEREO 1 2 3 4 5 6 9 10 11 8 7 12 13 14 15 ...

Страница 34: ...der MP3 IMAGE Photo Folder TXT Text Folder PCM HQ SP LP SLP Record Quality PCM Lineal PCM HQ High Quality SP Standard Quality LP Long Time SLP Super Long Time MP3 000 000 File Number in Play File Number in recording RECORDING Recording in Progress Timer is activated Battery level indicator Alarm is ON ...

Страница 35: ...de the battery switch to BATT OFF do not replace the batteries while the voice recorder is switched ON as this may cause malfunction Open the battery cover and insert batteries taking care of polarity Place the cover again Slide the Battery Switch to BATT ON to turn on the voice recorder Battery level is indicated by an icon on the display Full Approximately half used Almost empty Battery empty Re...

Страница 36: ...ery switch on the side to BATT ON Press for a few seconds until the voice recorder is in normal operating mode 3 HOW TO USE Before you begin 1 Set the date and time See page 18 2 Choose the quality of the recordings See page 22 3 Choose a recording source See page 22 RECORDING 1 Microphone recording Press M for few seconds move through the menu with choose Record from press M and select Microphone...

Страница 37: ...ll be displayed 2 Automatic Telephone Recording option accessory Before activate this function refer to following diagram and connect the telephone recording kit Press M for few seconds use choose Record from and select microphone input Press M for few seconds use choose ATR and select Enable Press R Whenever the handset of the telephone is off hook recording starts automatically When the handset ...

Страница 38: ... of the external device it must have at least one 3 5 mm connector to fit into the recorder Press R to begin or stop recording Make sure the connected device is in high sound level to allow the recording is done correctly PLAYBACK Turn on the recorder and press M to change between music or voice files playback Press RE FL to switch between voice files A B C P images PHOTO or text TXT folders L R S...

Страница 39: ...ck Release it to continue at normal speed Adjust the volume with During playback will display the elapsed time The pause will display the total recording time 2 Music The recorder only plays music in MP3 and WMA format files Connect the recorder to a computer using a USB cable Copy the MP3 or WMA files in the MUSIC folder on the recorder Disconnect the recorder from your computer and turn it on Pr...

Страница 40: ...the section to be repeated The indicator appears on the display Press RE FL again at the end of the section to be repeated The indicator appears on the display The marked section will be repeated until you press RE FL again Press again to turn repeat off and resume normal playback Repeat a file During playback press to pause and then press M and select Repeat with Select One File with and then pre...

Страница 41: ... recorder only displays images in JPEG format Connect the recorder to a computer using a USB cable Copy the JPEG images in the PHOTO folder on the recorder Disconnect the recorder from your computer and turn it on Press RE FL to select the PHOTO folder Press to select a picture to see it on the screen and to return to the previous or to advance to the next 4 Text The recorder only opens files in T...

Страница 42: ...elect a file to see it on the screen and to return or forward pages Press again to stop playback and M to return to the folder with TXT files If you press M during playback you can add a mark on the page by selecting Bookmark Add Delete some of these marks by choosing Delete Bookmark and select one from a list with Bookmark Selection Return to play with Exit 4 MENU The first 4 functions can only b...

Страница 43: ...he main screen 2 Delete folder Press M for a few seconds Use to select Delete Folder and press M Choose the folder to delete with and press M Select Yes with and press M again to confirm 3 Repeat See pages 13 and 14 Repeat a file and Repeat folder 4 Equalizer Press M for a few seconds Use to select Equalizer and press M Select any equalizer with and press M to confirm ...

Страница 44: ...ress M Select Disable or Enable to activate or deactivate the function Press M to confirm 6 Alarm Before setting the alarm it is necessary to set the time See point 8 Press M for a few seconds Use to select Alarm and press M Activate the alarm by selecting Alarm On or disable it by selecting Alarm Off Select Alarm Time and adjust time with Press M to save the changes and adjust the minutes Press M...

Страница 45: ... selecting Record on or disable it by selecting Record off Select Record Time to set the starting time Use to adjust it Select Record Cycle to determine the recording time unlimited 30 60 90 or 120 minutes Select Record Folder to choose the folder where the recording will be saved Press two times to return to the main screen 8 Date and time Press M for a few seconds Use to select Clock Setting and...

Страница 46: ...and 2 times to return to the main screen 10 Language Press M for a few seconds Use to select Language and press M Choose the language of your choice with You can choose English or Spanish Press M to save the changes and 2 times to return to the main screen 11 Sleep The recorder can be turned off automatically after some inactive time You can enable or disable this feature and set the time that it ...

Страница 47: ...n allows you to delete all files stored on the recorder Be sure to have a backup before you activate it Press M for a few seconds Use to select Format and press M Select Format Yes with and then press M to confirm The recorder will automatically return to the main screen after formatting 13 Key sound Press M for a few seconds Use to select Key Tone and press M Activate the key sound by selecting O...

Страница 48: ...ated automatically or disable this feature by selecting Disable Use and then press and then press M to confirm Press 2 times to return to the main screen 15 Split recordings Press M for a few seconds Use to select Split and press M Select Enable If you want the recorder to save a continuous recording separated in 60 minutes files Choose Disable to disable this feature Press M to save the changes a...

Страница 49: ...o confirm Press two times to return to the main screen 17 Recording quality Press M for a few seconds Use to select Record Type and press M Select the recording quality with and then press M to confirm PCM Pulse Code Modulation linear HQ High Quality SP Standard quality LP Long Play Long recordings SLP Super Long Play Extra long recordings Press 2 times to return to the main screen ...

Страница 50: ...65 h 130 h 260 h SLP 136 h 270 h 520 h 1078 h When you select PCM recordings are saved in the P folder 18 Noise reduction Press M for a few seconds Use to select Noise Cut and press M Select Enable If you want the recorder to increase the quality of the voice recording by reducing the ambient noise Choose Disable to disable this feature Press M to save the changes and 2 times to return to the main...

Страница 51: ...20 Autorecording of telephone conversations or ATR Automatic Telephone Recording Before enabling this feature install the filter for telephone recording Press M for a few seconds Use to select ATR Mode and press M Select Enable to activate automatic recording of telephone conversations or choose Disable to disable it Press M to confirm and 2 times to return to the main screen 21 Hearing aids for h...

Страница 52: ...ck that the batteries are charging or the recorder is properly connected to a computer Unable to record Check that the batteries are charging or the recorder is properly connected to a computer Slide the power switch to BATT ON position Delete some files from the memory Be sure to back them up before I cannot hear anything Check that the batteries are charging or the recorder is properly connected...

Страница 53: ...r switch could be on HOLD Slide it to the BATT ON position There is no sound while using headphones Check that the headphones are connected properly Adjust the volume 6 SPECIFICATIONS Input 3 V 2xAAA Internal memory 4 GB Frequency range 20Hz 20 000Hz Product design and specifications are subject to change without notice ...

Страница 54: ...ty service at any of the addresses mentioned later THIS WARRANTY IS VOID IN THE NEXT CASES If the product has been damaged by an accident acts of God mishandling leaky batteries failure to follow enclosed instructions improper repair by unauthorized personnel improper safe keeping among others a The consumer can also claim the warranty service in the purchase establishment b If you lose the warran...

Страница 55: ......

Отзывы: