background image

10

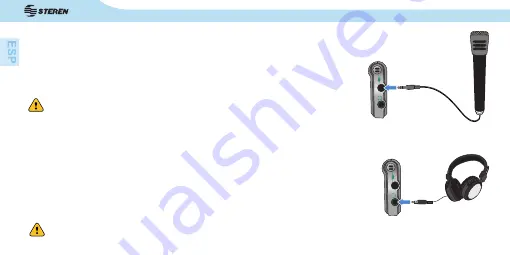
6. CONEXIÓN DE UN MICRÓFONO EXTERNO  

7. CONEXIÓN DE AURICULARES   

El equipo cuenta con un micrófono integrado y con una salida para conectar un 

micrófono externo. 
• La conexión MIC permite conectar micrófonos con plug de 3,5 mm. 

El  equipo  cuenta  con  un  altavoz  integrado  y  con  una  salida  para  conectar                  

auriculares o un sistema externo de altavoces. 
•  La  salida  para  auriculares  es  compatible  con  auriculares  o  altavoces  con              

conector de 3,5 mm.  

MI

C

MI

C

 Si se conecta un micrófono externo a la toma MIC, el micrófono integrado 

se desactivará. 


Si se conectan a la grabadora auriculares o altavoces, el altavoz integrado se desactivará. 

Содержание REC-845

Страница 1: ......

Страница 2: ...ias para instalar y operar su nueva Grabadora digital de voz de 4 GB con altavoz Steren Por favor revise el manual completamente para estar seguro de instalar y poder operar apropiadamente este producto Para apoyo compras y todo lo nuevo que tiene Steren visite nuestro sitio Web en www steren com GRABADORA DIGITAL DE VOZ DE 4 GB CON ALTAVOZ ...

Страница 3: ...ras extremas pueden acortar la vida del dispositivo Las caídas pueden ocasionar daños y pueden provocar un mal funcionamiento de la unidad 1 CARACTERÍSTICAS 4 2 CONTROLES 5 3 INDICADORES DE PANTALLA 7 4 INSTALAR BATERÍAS 8 5 FUNCIONAMIENTO 9 6 CONEXIÓN DE UN MICRÓFONO EXTERNO 10 7 CONEXIÓN DE AURICULARES 10 8 GRABAR 11 9 REPRODUCIR UNA GRABACIÓN 12 10 EDITAR UNA GRABACIÓN 14 11 AJUSTAR LAS OPCIONE...

Страница 4: ...acenamiento en 4 carpetas diferentes para organizar mejor las grabaciones 4 niveles de calidad de grabación pantalla de LCD micrófono altavoz salida de audífono y entrada de micrófono externo ranura de expansión para memorias micro SD y memoria interna de 4 GB Sistema activado por voz Función Hold Cuatro modos de grabación SP LP MP HP Indicador de batería Grabadora digital Audífono Cable USB 1 1 C...

Страница 5: ...5 2 CONTROLES ...

Страница 6: ...r alguna opción en los menús 8 Reproducir Detener Permite reproducir o detener una grabación 9 Bajar volumen Disminuye el volumen del altavoz o el auricular 10 FILE REPEAT Sirve para seleccionar una carpeta y para elegir el modo de repetición de una reproducción 11 PAUSE ERASE Hace una pausa durante la reproducción de una grabación Sirve para eliminar una grabación 12 Altavoz 13 Puerto USB Sirve p...

Страница 7: ... SD Permite expandir la memoria de la grabadora hasta 16 GB con una tarjeta micro SD Estado del nivel de la batería Estado de la carpeta actual Indicador del sistema activación por voz Indicador del bloqueo de teclas Indicador de tarjeta micro SD Indicador Reproducción Grabación Número de grabación o año 3 INDICADORES DE PANTALLA MODO TIEMPO MODO DE ESPERA A A A A ...

Страница 8: ...de las baterías 1 Abra la tapa del compartimento de las baterías Indica que las baterías están cargadas Indica que las baterías necesitan ser cambiadas 2 Introduzca 2 baterías AAA teniendo cuidado que los polos y de las baterías coincidan con las marcas de polaridad Indicador de repetición A B Fecha Mes Día Hora hora minutos segundos ...

Страница 9: ... número de grabaciones aparecerán en la pantalla LCD La unidad está lista para realizar o revisar grabaciones La grabadora entrará automáticamente en el modo reposo para ahorrar baterías la pantalla estará en blanco Pulse una vez para activar la grabadora y salir del modo reposo Este interruptor bloquea los controles de su grabadora para prevenir que se pulse accidentalmente un botón cuando se enc...

Страница 10: ...lug de 3 5 mm El equipo cuenta con un altavoz integrado y con una salida para conectar auriculares o un sistema externo de altavoces La salida para auriculares es compatible con auriculares o altavoces con conector de 3 5 mm MIC MIC Si se conecta un micrófono externo a la toma MIC el micrófono integrado se desactivará Si se conectan a la grabadora auriculares o altavoces el altavoz integrado se de...

Страница 11: ...alles consulte la sección Indicadores de pantalla 2 Pulse FILE REPEAT para cambiar o seleccionar la carpeta donde desea guardar el archivo A B C D 3 Pulse para empezar a grabar Se encenderá una luz roja que indica el comienzo de la grabación 4 Pulse para ver el tiempo de grabación disponible 5 Pulse PAUSE ERASE para pausar la grabación El mensaje PAUSE parpadeará en la pantalla Pulse el mismo botó...

Страница 12: ...normal Para proteger sus grabaciones de voz guarde copias de seguridad regularmente para más información consulte la sección Conexión al ordenador MODE FILE REPEAT PAUSE ERASE REC STOP 9 REPRODUCIR UNAGRABACIÓN Si la grabadora está ajustada en modo de hora pulse el botón MODE para pasar al modo de espera 1 Pulse FILE REPEAT para seleccionar una carpeta de archivo A B C D El indicador del número de...

Страница 13: ...ación Pulse y mantenga presionado el botón para retroceder la reproducción de la grabación Pulse o para ajustar el volumen Mantenga presionado el botón FILE REPEAT para cambiar las opciones de repetición en la reproducción Repeat Repeat All 4 Pulse para detener la reproducción el archivo Durante la reproducción mantenga presionado el botón FILE REPEAT para cambiar las opciones de repetición en la ...

Страница 14: ...a pantalla mostrará A y parpadeará B Pulse FILE REPEAT de nuevo para establecer el punto final B de la reproducción La pantalla mostrará A B y la reproducción comenzará desde el punto A cuando llegue al punto B la grabación se reproducirá de nuevo Pulse FILE REPEAT para reanudar el modo normal de reproducción Puede dividir una grabación en dos partes o suprimir una sección de la grabación 10 EDITA...

Страница 15: ...usará y la pantalla mostrará el mensaje bEd Esto indica el punto final de la sección a sustituir B End 4 Pulse para confirmar la edición La pantalla mostrará bEd OK La sección A B habrá sido suprimida de la grabación Podrá pulsar MODE para cancelar la operación en cualquier momento 10 2 Suprimir una sección 2 Pulse FILE REPEAT cuando haya encontrado el punto deseado La grabación se pausará 3 Pulse...

Страница 16: ...arpadeará en la pantalla Pulse PAUSE ERASE de nuevo para confirmar y borrar la grabación o pulse cualquier otra tecla para cancelar 4 Para borrar todas las grabaciones Pulse y mantenga presionado PAUSE ERASE durante unos segundos El mensaje dELALL parpadeará en la pantalla Pulse o para seleccionar YES SI si desea borrar todos los archivos después pulse para borrar todas las grabaciones de la graba...

Страница 17: ... ajustar la calidad de la grabación HP MP SP o LP y después pulse para confirmar el ajuste 3 Cuando haya completado todos los ajustes pulse MODE para guardar y volver al modo de espera A continuación se describen los modos de grabación Modo de Grabación Calidad HP Alta reproducción Excelente MP Reproducción Media Muy Buena SP Reproducción Estándar Buena LP Larga Reproducción Media 11 AJUSTAR LAS O...

Страница 18: ...4 Cuando haya confirmado todos los ajustes pulse MODE para volver al modo de espera 11 3 Grabación por activación de voz VAS Si la grabadora está en modo hora pulse MODE para pasar al modo de espera 1 Pulse y mantenga MODE para acceder al modoAjustes la pantalla mostrará el mensaje SET 2 Pulse el botón un par de veces La pantalla mostrará el mensaje SET OFF y el indicador VAS aparecerá en la panta...

Страница 19: ...ra 5 Presione el botón de este modo la grabadora comenzará a grabar pausará al no detectar sonido y reanudará cuando el ruido comience Cuando el modo VAS está activado el comienzo de la grabación puede resultar ligeramente entrecortado La grabación se pausará automáticamente después de dos segundos de silencio Un cambio en el volúmen de la voz no causará pausa en la grabación Pulse PAUSE ERASE par...

Страница 20: ...lse o para ajustar el mes y después pulse el botón para finalizar El indicador DÍA parpadeará en la pantalla 5 Pulse o para ajustar la fecha y después pulse el botón para finalizar El indicador de la hora parpadeará en la pantalla 6 Pulse o para ajustar la hora y después pulse el botón para finalizar El indicador de los minutos parpadeará en la pantalla 7 Pulse o para ajustar los minutos y después...

Страница 21: ... Pulse o para cambiar el ajuste entre OFF APAGADO y ON ENCENDIDO Utilice el ajuste OFF para grabar utilizando la memoria interna de la grabadora Utilice el ajuste ON para grabar en la tarjeta de memoria micro SD 6 Cuando se hayan completado todos los ajustes pulse MODE para volver al modo de espera 13 USO DE TARJETAS MICRO SD micro SD Cuando la tarjeta micro SD está en uso el dispositivo grabará y...

Страница 22: ...mensaje FoR No aparecerá en la pantalla 4 Pulse o para cambiar el ajuste entre YES SI o NO Seleccione YES SI y presione una vez La pantalla mostrará el mensaje FOR durante el proceso de formateo Este proceso dura aproximadamente 20 segundos Seleccione NO para cancelar Pulse el botón MODE para volver al modo de espera 14 FORMATEANDO LAGRABADORA Una vez que las grabaciones se hayan borrado no podrán...

Страница 23: ...archivos grabados y poder reproducirlos en su PC 2 En su PC y haga doble clic en el ícono Disco Extraíble para ver los archivos que contiene su grabadora Seleccione la carpeta RECORD y aparecerán cuatro carpetas A B C D Éstas son las carpetas en las que se han guardado los archivos Es posible guardar archivos en la grabadora así como descargarlos a su computadora utilizando las funciones del siste...

Страница 24: ...ión Compruebe el nivel de volumen Compruebe el conector de audífonos La grabación por voz VAS no se detiene Para que se detenga la grabación por voz automáticamente debe anularse cualquier ruido 16 PROBLEMAS Y SOLUCIONES 17 ESPECIFICACIONES Alimentación 3 V 2xAAA Memoria 4 GB Rango de frecuencia 300 Hz 3 kHz Consumo nominal 0 657 kWh año Consumo en espera 0 236 kWh año El diseño del producto y las...

Страница 25: ...nsumidor podrá solicitar que se haga efectiva la garantía ante la propia casa comercial donde adquirió el producto Si la presente garantía se extraviara el consumidor puede recurrir a su proveedor para que le expida otra póliza de garantía previa presentación de la nota de compra o factura respectiva DATOS DEL DISTRIBUIDOR Nombre del Distribuidor _________________________ Número de serie _________...

Страница 26: ......

Страница 27: ...ting necessary to install and operate your new Steren s Speaker digital 4 GB voice recorder Please review this manual thoroughly to ensure proper installation and operation of this product For support shopping and everything new at Steren visit our website www steren com REC 845 SPEAKER DIGITAL 4 GB VOICE RECORDER ...

Страница 28: ...TTING THE RECORDER 22 15 PC CONNECTION 23 16 TROUBLESHOOTING 25 17 SPECIFICATIONS 25 CONTENT IMPORTANT For outdoor safety never use the earphones of the REC 845 while riding a bicycle motor bike or while driving a car It is dangerous to increase the sound volume too much because you cannot hear external sounds take great care about traffic around you Do not use or store the equipment near wet plac...

Страница 29: ...ge in four different folders to better organize recordings 4 levels of recording quality LCD screen microphone loudspeaker earphone output and external microphone input slot for micro SD memory expansion and internal 4 GB memory VOR system Hold function Four recording modes SP LP MP HP Battery indicator Digital recorder Earphones USB cable 1 1 Content MODE FILE REPEAT PAUSE ERASE REC STOP ...

Страница 30: ...5 2 CONTROLS ...

Страница 31: ...D Display 3 Mode 4 Record Stop 5 Volume Up 6 Previous Reverse 7 Next Forward 8 Play Stop 9 Volume Down 10 File Repeat 11 Pause Erase 12 Speaker 13 USB Port Top View 14 Integrated Microphone 15 3 5 mm Microphone In 16 3 5 mm Headphone Out ...

Страница 32: ...microSD Card Slot 3 LCD DISPLAY TIME MODE STANDBY MODE Battery level status Current file folder status Voice activated system indicator Key lock indicator microSD card indicator Play Record indicator Recording number or year A A A A ...

Страница 33: ...he batteries are charged Indicates that the batteries need to be replaced 2 Insert 2 x AAA batteries taking care to match the and battery polarities with the markings inside the compartment Recording quality Repeat mode repeat repeat all Time remaining Repat A B indicator Date mount day Time hours minutes seconds ...

Страница 34: ...will be displayed on the LCD screen Press MODE to place the recorder in Standby mode The unit is now ready to make or review recordings The current folder and number of recordings will be displayed on the LCD screen The Hold switch locks disables your recorder s controls to prevent accidental key presses when it is in your pocket or bag To lock the controls set the Hold switch to the position up 5...

Страница 35: ...or plug The recorder is equipped with both an integrated speaker and a headphone output jack that can be used to connect headphones or an external speaker system The Headphone Out jack will accept headphones or speakers with a 3 5 mm connector plug If an external microphone is connected to the MIC In jack the integrated microphone will be disabled If headphones or speakers are connected to the Hea...

Страница 36: ...r location A B C or D as well as the File Number See the Getting Started section for details 2 Press FILE REPEAT to change or select a File Location A B C or D 3 Press to start recording The Record Indicator LED will light red 4 Press recording to view the remaining recording time 5 Press PAUSE ERASE to pause recording The display will flash PAUSE Press PAUSE ERASE again to resume recording 6 If t...

Страница 37: ...ce recordings it is good practice to regularly save backup copies or your recordings see the PC Connection section of this manual for more information 9 PLAYING BACKARECORDING If the recorder is in Time mode press MODE to enter Standby mode 1 Press FILE REPEAT to select a File Folder A B C D The Recording Number indicator in the upper right corner will display the total number of recordings in the...

Страница 38: ...cording Press and hold to scan in reverse through the current recording Press to adjust the volume level up or down Press and hold the FILE REPEAT button to change the Repeat Playback options Repeat Repeat All 4 Press to stop the selected recording During playback press and hold the key FILE REPEAT to change the Repeat Playback options Repeat Repeat All Repeat Play back the current recording repea...

Страница 39: ...splay A Press FILE REPEAT again to set the end point B of the loop The LCD will display A B and the loop will now play from point A to point B Press FILE REPEAT to resume normal playback You can split a recording into two or remove a section of a recording 10 EDITINGARECORDING Select a recording to edit and then press and hold to enter Edit mode The LCD will display EDT 1 Press to advance to the t...

Страница 40: ...int of the section you want to remove Press and hold or to skip backwards or forwards in 30 second increments 2 Press PAUSE ERASE when the desired starting time point has been reached The LCD will display AST This marks the start point of the section to be removed A Start 3 Press PAUSE ERASE when the desired end time point has been reached The recording will pause and the LCD will display BED This...

Страница 41: ...ording Press PAUSE ERASE The recording will start playing and the display will flash DEL Press PAUSE ERASE again to delete the recording or press any other key to cancel 4 To erase all recordings Press and hold PAUSE ERASE for 5 seconds The display will flash DELALL Press or to select Yes or No Press to delete all recordings in the selected folder or press anyother key to cancel 10 3 Deleting a Re...

Страница 42: ...d SET 2 Press or to adjust the Recording Quality HP MP SP or LP and then press to set 3 When all settings have been completed press MODE to save and return to Standby mode The recording modes are described in the table below Record Mode Quality HP High Play Best MP Medium Play Very Good SP Standard Play Good LP Long Play OK 11 SETTING THE RECORD OPTIONS ...

Страница 43: ...Press once The LCD will display SET mic HI or SET mic LO 3 Press or to change the setting between HI and LO 11 3 Voice Activated Recording VAS If the recorder is in Time mode press MODE to enter Standby mode 1 Press and hold MODE to enter Setup mode the LCD should read SET 2 Press twice The LCD will display SET OFF and the VAS indicator VAS will appear on screen A A VAS ...

Страница 44: ...ress the button the recorder will start recording pause if not detect noise and resume when the sound starts The beginning of the recording may be clipped slightly when VAS is enabled The recorder will pause automatically after 2 seconds of silence A change in speaking volume will not cause the recorder to pause Press PAUSE ERASE to pause recording manually For normal voice recording maintain a di...

Страница 45: ...or will blink 4 Press or to adjust the month and then press to finish The Date indicator will blink 5 Press or to adjust the day and then press to finish The Hour indicator will blink 6 Press or to adjust the hour and then press to finish The Minutes indicator will blink 7 Press or to adjust the minutes and then press to finish 12 SETTING THE DATEAND TIME A A A A MODE When all settings have been c...

Страница 46: ...he micro SD Card indicator will appear on screen 5 Press or to change the setting between OFF and ON Use the OFF setting to use the recorder s internal memory Use the ON setting to use the micro SD card flash memory 6 When all settings have been completed press MODE to return to Standby mode 13 USING MICRO SD CARD When the micro SD card is in use the device will automatically record and playback f...

Страница 47: ...display FOR NO 4 Press or to change the setting between YES and NO Select the YES setting and then press once The LCD will display FOR during the formatting process The process should take about 20 seconds Select the NO setting to cancel and do nothing Press MODE to return to Standby mode 14 FORMATTING THE RECORDER Once a recording has been deleted it cannot be recovered Formatting will permanentl...

Страница 48: ... your PC MODE FILE REPEAT PAUSE ERASE REC STOP 2 In your PC and double click on the Removable disc icon to view files contained in your recorder Select the RECORD folder and four folders A B C D will show These are folders where the saved files are stored It is possible to save files in the recorder as well as download them to your computer using the operating system functions e g Drag and drop or...

Страница 49: ...ing a recording Check the volume level Check the headphone jack The voice recording VAS does not stop To stop the voice recording automatically be canceled any noise 16 TROUBLESHOOTING 17 SPECIFICATIONS Input 3 V 2xAAA Memory 4 GB Frequency range 300 Hz 3 kHz Product design and specifications are subject to change without notice Nominal consumption 0 657 kWh year Stand by power consumption 0 236 k...

Страница 50: ...s of God mishandling leaky batteries failure to follow enclosed instructions improper repair by unau thorized personnel improper safe keeping among others a The consumer can also claim the warranty service in the purchase establishment b If you lose the warranty card we can reissue it if you show the invoice or purchase ticket RETAILER INFORMATION Name of the retailer _____________________________...

Страница 51: ...26 NOTAS NOTES ...

Страница 52: ......

Отзывы: