background image

5

12

3

#

INSTRUCCIONES 

Modo de uso del soporte del cautín 

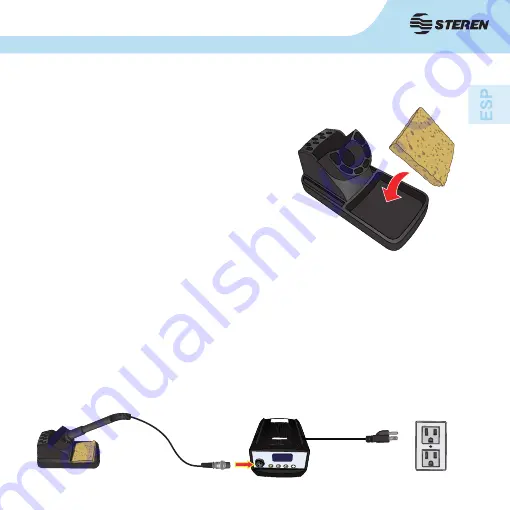
Antes de usar el CAU-270  prepare la esponja de la 

base, le será útil para limpiar la punta del soldador 

en caso de que aplique demasiada soldadura, de 

este modo removerá los excesos evitando daños en 

la punta.

1.  Humedezca  la  esponja  de  limpieza  y  luego                    

exprímala hasta quitar el exceso de humedad. 

2.  Agregue  un  poco  de  agua  sobre  la  base  del             

soporte para que la esponja se mantenga húmeda.

3.  Finalmente  coloque  la  esponja  sobre  la  base  del                      

soporte del cautín.

Conexiones 

Para evitar daños, asegúrese de apagar el interruptor de encendido/apagado antes de 

conectar o desconectar el soldador.

1. Conecte el cable del soldador al CAU-270  y cerciórese de que el seguro que sostiene el 

conector esté firmemente apretado.

2. Coloque el soldador en su soporte.

3. Conecte el cable de alimentación de cautín a un tomacorriente.

SOPORTE DEL CAUTÍN

CAU-270 

El soldador debe ser colocado en el soporte de hierro cuando no esté en uso.

Содержание CAU-270

Страница 1: ......

Страница 2: ... necesarios para instalar y operar su nuevo Cautín de estación con termo control Steren Por favor revise el manual completamente para estar seguro de instalar y poder operar apropiadamente este producto Para apoyo compras y todo lo nuevo que tiene Steren visite nuestro sitio Web en www steren com CAUTÍN DE ESTACIÓN CON TERMO CONTROL ...

Страница 3: ...ance de los niños Para la instalación de piezas de repuesto o accesorios primero desconecte el cautín de la alimentación y espere a que la punta se enfríe a temperatura ambiente Siempre apague el cautín cuando deje de usarlo No opere la unidad con las manos mojadas Use el cautín en un área ventilada y evite inhalar el humo de la soldadura ya que contiene plomo que va directo a los pulmones CARACTE...

Страница 4: ...4 CONTROLES Estado de la pantalla SET Ajuste de temperatura REAL Temperatura real CAL Calibración de temperatura Indica que el cautín se está calentando Pantalla LCD ...

Страница 5: ... la base del soporte para que la esponja se mantenga húmeda 3 Finalmente coloque la esponja sobre la base del soporte del cautín Conexiones Para evitar daños asegúrese de apagar el interruptor de encendido apagado antes de conectar o desconectar el soldador 1 Conecte el cable del soldador al CAU 270 y cerciórese de que el seguro que sostiene el conector esté firmemente apretado 2 Coloque el soldad...

Страница 6: ...las unidades de temperatura Cuando el cautín está apagado enciéndalo mientras presiona para cambiar entre C y F Alarma Cuando H E o S E aparezca en pantalla hay algo malo con el elemento térmico o circuito Póngase en contacto con un técnico para reemplazar el elemento térmico Ajuste rápido de temperatura Se puede ajustar rápidamente la temperatura de trabajo utilizando los botones programables Pul...

Страница 7: ...intervalo de calibración es 50 50 C de la temperatura seleccionada Pulse para salir del modo de calibración Modo de uso 2 Cuando la punta esté caliente aplique cuidadosamente una capa ligera de soldadura nueva en la punta Si aplica demasiada limpie la punta con la esponja húmeda para retirar el exceso 3 Aplique la soldadura con la punta del cautín sobre las conexiones a unir La soldadura se derret...

Страница 8: ...la punta del soldador con la esponja húmeda y revise su estado 3 Si la punta se torna oxidada de color negro aplique soldadura nueva sobre la parte desgastada y posteriormente limpie con la esponja húmeda Repita este proceso hasta remover el oxido 4 Si la punta está deformada o destruida reemplácela por una nueva Cambio de punta 1 Cuando la punta se desgaste apague y desconecte el cautín deje que ...

Страница 9: ...9 ESPECIFICACIONES Alimentación 120 V 60 Hz 80 W Consumo nominal 59 76 kWh mes Consumo en espera 130 Wh día El diseño del producto y las especificaciones pueden cambiar sin previo aviso ...

Страница 10: ...a casa comercial donde adquirió el producto Si la presente garantía se extraviara el consumidor puede recurrir a su proveedor para que le expida otra póliza previa presentación de la nota de compra o factura respectiva DATOS DEL DISTRIBUIDOR Nombre del Distribuidor __________________________ Domicilio ______________________________________ Producto ______________________________________ Marca ____...

Страница 11: ......

Страница 12: ...ng necessary to install and operate your new Steren s Soldering station with thermo control Please review this manual thoroughly to ensure proper installation and operation of this product For support shopping and everything new at Steren visit our website www steren com CAU 270 SOLDERING STATION WITH THERMO CONTROL ...

Страница 13: ...ore replacing parts or storing the unit turn the power off and allow the unit to cool down to room temperature Do not use the unit when your hands are wet Soldering process will produce smoke make sure that the area is very well ventilated HIGHLIGHTS The soldering station has electronic temperature control allowing set in the range of 150 to 450 C it features anti static properties to avoid damage...

Страница 14: ...4 CONTROLS Status display SET Temperature set REAL Real temperature CAL calibration temperature Indicates when the soldering iron is heating LCD display ...

Страница 15: ...sorb it to keep the larger sponge above it wet at all times 3 Finally place the sponge in the iron holder base Connections To avoid damages be sure to turn off the power switch before connection or disconnecting the soldering iron 1 Connect the cord assembly plug to the receptacle in the station and adjust the secure knob 2 Place the soldering iron in the iron holder 3 Plug the power cord into the...

Страница 16: ... button Temperature unit exchange When the soldering iron is off turn it on while holding to switch between C and F Alarm When H E or S E is displayed on screen there is something wrong with heating element or circuit Contact a technician to replace heating element Quickly adjusting temperature You can quickly adjust working temperature using the programmable buttons Press one of these buttons to ...

Страница 17: ...ean the surface where you ll make unions Temperature calibration You will need to calibrate the tip s temperature after tip or heating element replacement Enter to calibration mode by long pressing Use or to adjust temperature You have to use an external thermocouple to take tip s temperature Select a preset temperature and pair the tip s temperature with the displayed one The calibration range is...

Страница 18: ... cleaning sponge and check the condition of the tip 3 If there is black oxide on the solder plated portion of the tip apply new solder and wipe the tip on the cleaning sponge Repeat until the oxide is completely removed 4 If the tip is deformed or heavily eroded replace it with a new one Changing the tip 1 When the tip is deformed or damage turn off and unplug the CAU 270 then allow the unit to co...

Страница 19: ...9 SPECIFICATIONS Input 120 V 60 Hz 80 W Nominal consumption 59 76 kWh month Stand by power consumption 130 Wh day Product design and specifications are subject to change without notice ...

Страница 20: ...ervice at any of the addresses mentioned later THIS WARRANTY IS VOID IN THE NEXT CASES If the product has been damaged by an accident acts of God mishandling leaky batteries failure to follow enclosed instructions improper repair by unauthorized personnel improper safe keeping among others a The consumer can also claim the warranty service in the purchase establishment b If you lose the warranty c...

Страница 21: ......

Отзывы: