background image

75

Appendix C: Wave Utilities

© 2017 Stenograph

c. Write a stroke on the steno machine.

d. In the TrueView dialog box, select 

Connect Realtime

. The Save As dialog box displays. 

Navigate to where you want to save the realtime file. Type a file name and select 

Save

.

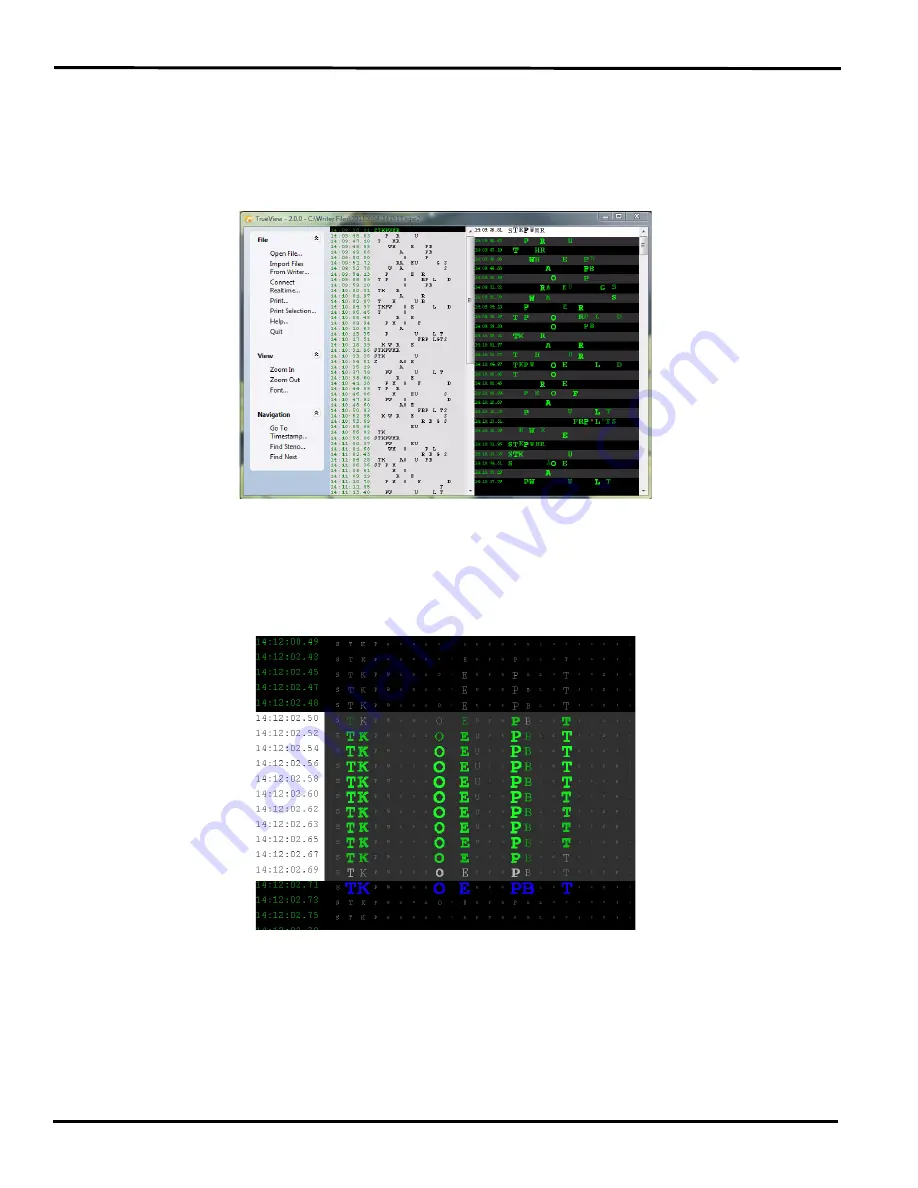
3. The selected file displays with the steno note file in the middle column and the TrueStroke data, in 

Compact view, in the right column. 

Vertical Notes with TrueStroke Data in Compact View

4. Double click the TrueStroke data column to toggle the view, from Compact to Expanded. Expanded 

view shows the TrueStroke details for each stroke. The details reveal the timing, direction of travel, 
depressed or released, and velocity of the steno keys in a stroke. See 

Understanding the TrueStroke 

Data

 on page 76 for more information on data interpretation.

TrueStroke Data in Expanded View

5. Additional TrueView features allow you to search, zoom, modify the font and print the TrueStroke 

data. See 

TrueView Menu Features

 on page 78 for feature details.

Содержание WAVE

Страница 1: ...Wave User Guide ...

Страница 2: ...terial constitutes proprietary and trade secret information of Stenograph and shall not be disclosed to any third party nor used by the recipient except under the terms and conditions of the purchase agreement between the customer and Stenograph Changes may be made periodically to the information in this publication Such changes will be incorporated in any new edition of this manual Stenograph is ...

Страница 3: ...e aware that batteries are consumable items and are usually ready to be replaced every twelve to eighteen months EasyLockTM Z12 tripod positioning with a positive locking mechanism provides quick and easy setup Simply open and set the tripod on the floor and place your machine on it according to the instructions in this guide The design of the tripod assures a smooth even writing platform for you ...

Страница 4: ...f the shorthand machine appropriately for your body Position the shorthand machine comfortably close to you Place the tripod between your knees Do not sit sidesaddle Minimize the use of the shorthand machine on surfaces other than the tripod stand At Your Computer Place the monitor screen perpendicular to the window to help avoid glare Adjust or close window coverings Arrange materials such as ref...

Страница 5: ...Writing on the Wave 33 Accessing Wave Features 34 Writing Jobs 36 Beeper Volume 37 Copy Log 38 Display Set Strokes Per Minute 39 Electronic Marks 40 Keyboard Layout 41 Keyboard Options 42 Memory 45 Options 48 Prompt to End a Job Option 49 Scroll 50 Search 51 Serial Protocol Option 52 Status 53 Steno Test 54 Test Mode 55 Tilting Screen Appearance 56 Time and Date 58 USB Communication Option 59 Chap...

Страница 6: ...Wave User Guide vi 2017 Stenograph Splash Screen 71 TrueView 73 ...

Страница 7: ...nformation should you need additional assistance Package Contents Review your package contents before setting up your Wave Your new Wave comes with the following items Wave Carrying case EasyLockTM Z12 tripod 1 main removable rechargeable battery pack 110 220 AC adapter charger USB cable 6 ft Optical quality spray cleaner and cleaning cloth Stenograph One Year Commercial Warranty document Chapter ...

Страница 8: ...Wave User Guide 8 2017 Stenograph Wave Features ...

Страница 9: ... to provide a lightweight but strong and stable stand for your Wave When folded the tripod is 12 inches long 1 Fully extend each leg of the tripod making sure the braces lock 2 Set the tripod on the floor 3 Loosen the thumb lock knob on the tripod base 4 Extend the inner tripod tube to a comfortable height 5 Turn the tripod head so that one of the flat sides of the tripod head is facing you EasyLo...

Страница 10: ...ing the Wave The Wave is constructed with a built in recessed tilt mechanism Once the Wave is secured on the tripod tilt the writing machine forward or backward within 10 degrees to a position comfortable for your writing style To tilt the Wave 1 Open the Tilting screen before adjusting the tilt position of the Wave 2 Position one hand on the back of the Wave behind the Tilting screen and the othe...

Страница 11: ...ve For details about inserting the battery See Changing the Battery on page 22 2 Plug the AC charger adapter into a wall outlet Use only the AC charger adapter supplied with your Wave 3 Insert the small plug on the AC adapter charger cord into the CHGR socket on the back of the Wave 4 The Wave turns On A black dot in the lower right corner of the Status LCD indicates the Wave is On A row of runnin...

Страница 12: ...r download from the Stenograph website at www stenograph com At the Stenograph website click Support Download Center and Utilities links 3 Right click the on the Stenograph Writer USB Drivers and select Save Target as or Save Link as and save the file to a location on computer desktop or your hard drive 4 Navigate to the location where you saved the file highlight the file right click and select E...

Страница 13: ...o 6 00 p m CT Monday through Friday Excluding Stenograph Holidays To assist the Specialist have the Wave with you know your customer number and know your Wave serial number The serial number is located on the bottom of the writing machine Be prepared to describe your question or problem in detail Additional Help topics are available at www stenograph com Click Support Solution Center To order acce...

Страница 14: ...Wave User Guide 14 2017 Stenograph ...

Страница 15: ...wel Keys the four keys at the front of the keyboard The Upper and Lower banks of keys to the left of the asterisk are the Initial keys These consonants are generally used to begin a word The Upper and Lower bank of keys to the right of the asterisk are the Final keys These constants are generally used following the vowels to end a word or abbreviated phrase The Number Bar is used in conjunction wi...

Страница 16: ...they phonetically hear them For example in two strokes they may write courthouse K O R T H O U S or workhorse WORBG HORS The writer may also record an entire phrase in just one stroke state your name ST A U R PL or could you tell us KOUTS The machine automatically creates spaces between the strokes so the writer never needs to take their fingers off the keyboard to press a Return or Enter key Comp...

Страница 17: ...are components of your Wave This includes details on battery charging and use communication port and setup function buttons for accessing menus Status LCD icons adjusting the Tilting screen personalizing the opening graphic and resetting the writing machine Chapter 3 Wave Hardware Features ...

Страница 18: ...ry functions to retain the Wave date time and user settings This battery has a lifespan of approximately 10 years It is not necessary to keep the Wave plugged into the AC adapter charger when not in use for long periods of time If you have an additional main battery pack Stenograph recommends alternating the batteries monthly Charging the Batteries When the Wave is powered by the AC adapter charge...

Страница 19: ...attery icon with the battery gauge showing running black and yellow stripes When the batteries are fully charged a plug icon replaces the battery icon until you disconnect the AC adapter charger Battery Charging Battery Fully Charged When the main battery is charging the Status LCD displays black bars in running sequence from left to right The black bars are not visible when you are writing but re...

Страница 20: ...p battery needs charging and automatically charges when the charger adapter is attached State the most recent charging history When checking battery status with the adapter charger not attached the message Not Charging displays If the adapter charger was removed before the charging is complete an INCOMPLETE message displays along with a Cause of Failure message indicating the charger was removed 4...

Страница 21: ... indicates the battery is low a battery with a short red gauge indicates the battery is almost completely drained The battery icon flashes on and off a battery with black and yellow running stripes indicates the Wave is plugged into the AC adapter charger and the batteries are charging Tilting Screen Battery Messages The Tilting screen displays four progressive warning messages as the main battery...

Страница 22: ...ry 1 Place the palm of your hand squarely against the back of the Wave on the battery Grasp the back portion of the battery with your two middle fingers 2 Pull the battery gently away from the Wave 3 To replace the battery slide it into the slot 4 Press the battery firmly until it locks into place ...

Страница 23: ...tinue to operate The USB port provides power to run all the Wave components When powered by the USB port the Wave Tilting screen displays at about half of the Backlight brightness setting Updating With the USB Cable Software updates for your Wave when available can be easily downloaded from the Stenograph web site Once downloaded onto your computer you can load the software update onto your Wave o...

Страница 24: ...ngs do not apply 5 Write a few strokes on the Wave before starting realtime If the USB realtime connection is active when you break the realtime screen may not display new steno strokes when you resume writing This may happen when the USB port becomes inactive after remaining idle for a period of time If this occurs disconnect the USB cable from the back of the Wave and reconnect it The realtime f...

Страница 25: ... of time If the virtual serial port communication becomes inactive you cannot reconnect to the realtime file It is necessary to start a new realtime job See Troubleshooting on page 61 about disabling power saving features on the USB port to avoid an inactive connection To establish USB virtual serial port communication 1 Ensure your Wave and computer are turned On and are fully booted 2 Each end o...

Страница 26: ... important that you complete the following steps in order This ensures your computer shuts down properly a Press End on the Wave to close the file If the option Prompt to confirm ending job is active press End again at the prompt b Close and save the realtime file c Unplug the Wave USB cable from your computer and the Wave ...

Страница 27: ...fferent menus The menu bar is located at the bottom of the Tilting screen Press the associated button just below a function on the menu bar to perform the action For example on the Opening menu the word Off displays above the left most button Pressing Off turns the Wave Off Again on the Opening Menu press the Setup button to display another menu listing additional menu choices related to customizi...

Страница 28: ... of the wheel allows you to customize the tension to your particular writing touch Do not force the wheel past either stopping position Adjust Depth of Stroke To adjust the depth of stroke 1 Face the front of the Wave 2 Do one of the following To shorten the stroke depth roll the left thumbwheel toward the front of the Wave To lengthen the stroke depth roll the left thumbwheel toward the back of t...

Страница 29: ...er computer equipment the Wave can seem unresponsive when it receives a series of commands it does not recognize If the Wave appears unresponsive press the Reset button on the back of the Wave When you press the Reset button the Wave reboots and is then ready to use If you had a file open before pressing Reset the Wave ends the job and the file closes Start writing to create a new job ...

Страница 30: ...onnect the cable the icon does not display The battery icon displays when the backup battery is charging The backup battery is automatically maintained when charging the main battery This icon does not display if the backup battery does not need to be charged A row of rectangular black blocks display in running sequence from left to right when the main battery is charging When the Wave is finished...

Страница 31: ...e on page 56 for more information about brightness and font size settings Cleaning the Tilting Screen 1 Turn the Wave Off It is easier to see the areas that are dirty when the screen is dark 2 Very gently wipe the screen using the cleaning cloth that came with your Wave or a microfiber cloth available in computer camera and eyeglass stores Do not use materials such as paper towels tissue paper or ...

Страница 32: ...Wave User Guide 32 2017 Stenograph ...

Страница 33: ...1 for information The Wave offers the following features Steno outlines display on a seven inch color non glare Tilting screen View steno outlines in Vertical Note format Realtime ready through USB or virtual serial port Adjustable digital clock with month date and time Adjustable beeper volume Set the Tilting screen brightness and font size Update Wave software from Internet download via USB Date...

Страница 34: ...g screen display access test mode set options including backlight beeper volume keyboard layout and options prompt to end a job display strokes per minute and USB communication Writing Menus Once you begin writing on the steno keyboard the first of two Writing menus replaces the Opening menu First Writing Menu The First Writing menu includes features that allow you to close the file insert electro...

Страница 35: ...features that allow you to view Wave status information adjust Tilting screen steno note font size and backlight level access the First Writing menu Return to First Writing Menu Continue writing or pressing More on the second Writing menu returns you to the First Writing menu Return to Opening Menu Pressing End on the First Writing menu closes the current job and returns you to the Opening menu ...

Страница 36: ...ages the estimated number of text pages in the open file 4 Wave menus allow you to perform a function select to display another menu or to set options The Opening menu is used to select options prior to writing 5 When you write a steno stroke the Wave opens a new file and replaces the Opening menu with the first of two writing menus 6 To close the job when finished writing press End The Wave write...

Страница 37: ...ery To adjust the beeper volume 1 From the Opening menu press Setup Options 2 Press the Up and Down buttons as necessary to highlight the Beeper Volume option 3 Press the Change button to toggle the Beeper volume between Soft and Loud The Wave emits a softer or louder tone indicating the volume level selected 4 To display the Opening menu press OK More Quit ...

Страница 38: ...information to Stenograph for analysis To copy the error information 1 From the Opening Menu press Diag Copy Log The Wave copies all the appropriate log information to the Support Info Files folder 2 To return to the Opening menu press Quit 3 Use the GetSupportInfo utility to transfer the log error information from the Wave Support Info Files folder to your computer See Wave Utilities on page 69 f...

Страница 39: ...strokes per minute SPM while writing The Status screen shows strokes per minute data for the most recent job While writing the Status screen shows strokes per minute data for the current job 1 From the Opening menu press Setup Options 2 Press the Up and Down buttons as necessary to highlight the Display Strokes per minute SPM option 3 Press the Change button to toggle the option between Yes and No...

Страница 40: ...ally mark locations in your steno notes You can use the Search feature to locate the Marks in the file To mark your steno notes 1 From the First Writing menu press either Mark button The symbol displays in the steno notes to indicate the insertion of an electronic mark 2 Continue writing ...

Страница 41: ...board Layout should only be made when your steno keyboard layout uses a specific language steno theory 1 From the Opening menu press Setup Options 2 Press the Up and Down buttons as necessary to highlight the Keyboard Layout option 3 Press the Change button to cycle through the available keyboard 4 To display the Opening menu press OK More Quit ...

Страница 42: ...ption a Keyboard Sensitivity Adjusts the overall keyboard sensitivity This may be particularly necessary when your depth of stroke is very shallow It is strongly recommended that you select the first available setting and assess the change Turn on CNN or the equivalent and write against the broadcast for 20 30 minutes The default setting is Medium Use the and buttons to select one of the following...

Страница 43: ...es continue to show your steno notes e Return to Factory Default Settings Returns all the keyboard options to the default factory settings Use the or button to select Yes 6 To return to the Opening menu press OK Quit Adjust Individual Keys Adjust individual keys only when a dragged or dropped key continues to occur after adjusting the depth of stroke the keyboard tension and making appropriate cha...

Страница 44: ... gray vertical bar highlights the key selected for adjustment 5 Perform one of the following adjustments More Increase the key sensitivity when the key is not showing in the steno notes and you want it to register Increase the sensitivity using increments of 5 It is strongly recommended that you make the first incremental setting and assess the change Turn on CNN or the equivalent and write agains...

Страница 45: ...west folder first Use the Up and Down button and Date Sort to view the files 5 To return to the first Memory screen press Back 6 To return to the Opening menu press Quit Read Steno Notes from Memory You can read steno notes from Memory into your CAT software via USB cable or USB virtual serial port connection The Memory screen displays the list of files in a year month date and time format 2009071...

Страница 46: ...hich installs when you install the USB driver The virtual serial port uses Stentura protocol See Installing the USB Drivers on page 63 for instructions on loading the driver To read notes via USB virtual serial port cable 1 Ensure your Wave and computer are turned On and are fully booted 2 Each end of the USB cable has a different connection plug Insert the appropriate end of the USB cable into th...

Страница 47: ...e memory if you are using software that translates steno notes from memory To erase Memory files 1 From the Opening menu press Memory Erase All 2 The Wave prompts you with a confirmation message to delete all the files in Memory 3 Do one of the following Press Yes to erase all the files When the Wave completes erasing the Memory files press OK to return to the Opening menu To keep the current file...

Страница 48: ...ange the Serial Protocol adjust the Beeper Volume and select a prompt when ending a job To access Options 1 From the Opening Menu press Setup Options 2 For details about each option see the appropriate topic in this chapter Beeper Volume Display Strokes Per Minute SPM Keyboard Layout Prompt To End a Job Serial Protocol USB Communication ...

Страница 49: ...nue to close the job by selecting End again Pressing Cancel or continuing to write cancels the message and the job remains open To set the end job confirmation prompt 1 From the Opening menu press Setup Options 2 Press the Up and Down buttons as necessary to highlight the Prompt to end job option 3 Press the Change button to toggle the option between Yes and No No is the default 4 To display the O...

Страница 50: ... the Tilting screen one line at a time When you resume writing the Wave returns to the current spot in the testimony 1 From the First Writing menu press Scroll 2 Use any of the following menu options Up move to a previous line Down move to the following line 3 To exit the Scroll menu continue writing or press Quit ...

Страница 51: ...for the previous electronic Mark Up scroll backward in the file Down scroll forward in the file 2 Continue writing or press Quit The First Writing menu and your current writing position display Search for Steno Strokes 1 From the First Writing menu press Search Steno The Enter Steno To Search For field displays 2 Write the steno strokes for which you want to search If you make a mistake press Clea...

Страница 52: ...ption is a fixed option that displays the Wave communication protocol when using the Virtual Serial Port driver provided by Stenograph Select Stentura as the writer in your CAT system if you are using the serial protocol with a CAT system not compatible with the Wave USB protocol ...

Страница 53: ...ate for all jobs taken Keyboard type and Serial Protocol The amount of space remaining in Memory Whether or not the AC adapter charger is charging Main Battery status See Batteries on page 18 for more information Check Status Information To check status information Before Writing 1 From the Opening menu press Status 2 To return to the Opening press OK While Writing Realtime 1 From the Writing menu...

Страница 54: ...ph Technical Support Representative to test the Read and Writing features of the Wave To activate Steno Test 1 From the Opening menu press Diag Steno Test 2 Writing any steno stroke exits the Steno Test mode but keeps the file open To close the file press End If the option Prompt to confirm ending job is active a confirmation prompt displays Press End to close the job or continue writing to cancel...

Страница 55: ... when you take a certification test To turn Test Mode On or Off 1 Connect the Wave to your computer for realtime writing For more information See Connect for Realtime Writing on page 23 2 From the Opening Menu press Setup Test Mode The Status and Menu bars display in red to indicate that the Wave is in Test mode The Wave remains in Test Mode until you turn the feature Off or turn the Wave Off 3 To...

Страница 56: ...uces the amount of the power required to display the screen which can reduce battery consumption Optionally setting the Backlight to automatically dim after a period of inactivity also reduces battery consumption Dimming options allow you to customize automatic dimming when selected To customize the Tilting screen Backlight levels 1 Do one of the following From the Opening menu press Setup Display...

Страница 57: ...Chapter 4 Writing on the Wave 2017 Stenograph 4 Do one of the following With no open job return to the Opening Menu by pressing OK More Quit During a job continue writing The First Writing menu redisplays ...

Страница 58: ...u press Setup Time The Time and Date screen displays 2 Press the Next button to select the unit of time or date you want to change Month Day Year Hour Minutes AM PM 3 Do one of the following To increase the unit of time or date press To decrease the unit of time or date press 4 Repeat the previous steps for each unit of time or date you want to change 5 To apply your selection press Accept 6 To di...

Страница 59: ...e communication The USB Communication option only affects realtime communication via USB Virtual USB serial port communication is not available To change the USB Communications option 1 From the Opening Menu press Setup Options 2 Use the Up Down buttons to highlight the USB Communication Wave will Reset if Changes field 3 Press Change to switch to Mira Emulation or Standard Standard is the default...

Страница 60: ...Wave User Guide 60 2017 Stenograph ...

Страница 61: ...ars Unresponsive If you leave the USB realtime connection active when you take a break the realtime screen on the CAT system may not display the new steno strokes when you resume writing This is a function of the USB port power management settings when it remains idle for a period of time Power management settings determine if the USB ports turn off when not in use for a specified amount of time C...

Страница 62: ...Wave User Guide 62 2017 Stenograph ...

Страница 63: ... security feature prompting you for permission to run the displayed program name or service being accessed To load the Wave device drivers you must choose Allow in the UAC or Permissions message box The User Account Control is an important security feature of Windows operating systems Stenograph does not recommend disabling it Complete the instructions to install the USB Wave device drivers runnin...

Страница 64: ...riter driver click Install 5 The Wave driver installation begins 6 Once the drivers install the Stenograph Writer Drivers Setup Complete dialog box displays Press Enter Finish to close the wizard Confirm Device Drivers Installation Confirm both the Stenograph Ports COM LPT virtual serial driver and the Stenograph USB Writer driver installed successfully using the Windows Device Manager To verify t...

Страница 65: ...65 Appendix A Installing the USB Drivers 2017 Stenograph 6 Close Device Manager ...

Страница 66: ...Wave User Guide 66 2017 Stenograph ...

Страница 67: ...om and navigate to Support Downloads 2 Select Wave 3 Right click on the selected update file to download and choose Save Target as The Save As dialog box displays The File name field displays the name of the selected file to download Do not alter this name 4 Select a location on your computer where you want to place the download file and select Save Stenograph recommends saving the file to your De...

Страница 68: ...icating it is sending the updated software build The Wave beeps twice and then displays the message Programming Flash 11 When the update is complete the Wave reboots and displays the Opening menu Your computer displays the message Successfully Updated the Wave Click OK to Exit 12 Click OK and in the Wave Update dialog box on your computer click Quit You can delete the update file ...

Страница 69: ...esktop or your hard drive Navigate to the location where you saved the file highlight the file right click and select Extract All Stenograph recommends that you create a Stenograph Utility folder on your Desktop and copy the utilities to that folder Windows operating system When copying or running a Wave Utility the User Account Control message box may display The User Account Control UAC is a sec...

Страница 70: ...ive At the Stenograph website click Support Download Center and Utilities links Navigate to the location where you saved the file highlight the file right click and select Extract All 6 Connect the appropriate end of the USB cable to the USB port on the Wave and the other end to a USB port on your computer 7 Double click the GetSupportInfo exe icon on your Desktop The GetSupportInfo dialog box dis...

Страница 71: ...sh screen 1 Turn your computer On Ensure that it is fully booted 2 Download the Luminex Diamante Wave Splash Screen Loader Utility from the Stenograph web site On the Stenograph web site select Support Download Center Utilities Links and then right click the Luminex Diamante Wave Splash Screen Loader Utility link select Save Target as or Save Link as and save it to your computer desktop or hard dr...

Страница 72: ...9 When the picture has successfully loaded the Success dialog box displays Click OK 10 Click Quit to close the Splash Screen program 11 To view your picture on the Wave turn Off the writing machine and turn it back On The startup screen displays the selected picture If you want to load a different picture double click the Splashloader exe icon and repeat the picture selection steps ...

Страница 73: ...ewable by double clicking a steno stroke from the vertical notes Copy the TrueView Utility To view TrueStroke data using TrueView you must first copy the TrueView utility to your computer The TrueView Utility is available for download at www stenograph com Click Support Downloads Utilities links TrueView Utility for Diamante Wave users To copy the TrueView Utility 1 Turn your computer On Ensure th...

Страница 74: ...d turned On b Click Import Files From Writer The Select the files you wish to copy dialog box displays It may take a few seconds to display the list The Wave files are stored in Year Month folders with a date time name c Use Windows conventions to select files and click OK The Browse For Folder displays d Navigate to the location to which you are copying the files and select OK The imported files ...

Страница 75: ...tical Notes with TrueStroke Data in Compact View 4 Double click the TrueStroke data column to toggle the view from Compact to Expanded Expanded view shows the TrueStroke details for each stroke The details reveal the timing direction of travel depressed or released and velocity of the steno keys in a stroke See Understanding the TrueStroke Data on page 76 for more information on data interpretatio...

Страница 76: ...a shadowed character displays with a horizontal bar through it The green color indicates the key has been held down long enough and with sufficient velocity to register The brighter the color the more pressure or velocity occurred when the key was depressed In a multi character steno outline some keys are visible in the down stroke before other characters This indicates that the keys were pressed ...

Страница 77: ...ll the intended keys did not get pressed or released at the same time resulting in the single stroke splitting into two strokes Example 3 The steno outline for the Q followed by the word I occur in the steno notes This one stroke outline was intended to be written as two strokes Double clicking in the TrueView column displays the steno strokes in Expanded view The S T K P W H and R keys display in...

Страница 78: ...t of files to display 2 Use Windows conventions to select one or more files for copying onto your computer and select OK The Browse For Folder displays 3 Navigate to the location where you are copying the files and select OK The imported files are saved in the selected location with the original file name 4 Use Open File to view the TrueStroke data for a selected file Connect Realtime View TrueStr...

Страница 79: ...tes has no affect on either display Navigation Go To Timestamp Move the cursor to a specific steno outline based on the timestamp Type the hour and minute or the entire timestamp and select OK This option may be useful when searching for the same steno note location in a transcript on your CAT system Find Steno Move the cursor to a specific steno outline Type each character in the steno outline yo...

Страница 80: ... See Tilting the Wave on page 10 6 Perform Keyboard Option adjustments See Adjust Keyboard Options on page 42 for specific steps on performing Keyboard Sensitivity Split Stack and Transition Time option changes 7 Make individual key contact adjustments Conduct this procedure only after completing all the previous troubleshooting steps See Adjust Individual Keys on page 43 Troubleshooting TrueView ...

Страница 81: ...ilities 2017 Stenograph File Closed on Writer When you press End on the writing machine the realtime connection ends Reestablish the realtime connection Write a few strokes on the writing machine and select Connect Realtime ...

Страница 82: ...Wave User Guide 82 2017 Stenograph ...

Отзывы: