background image

37

 -

37

 -

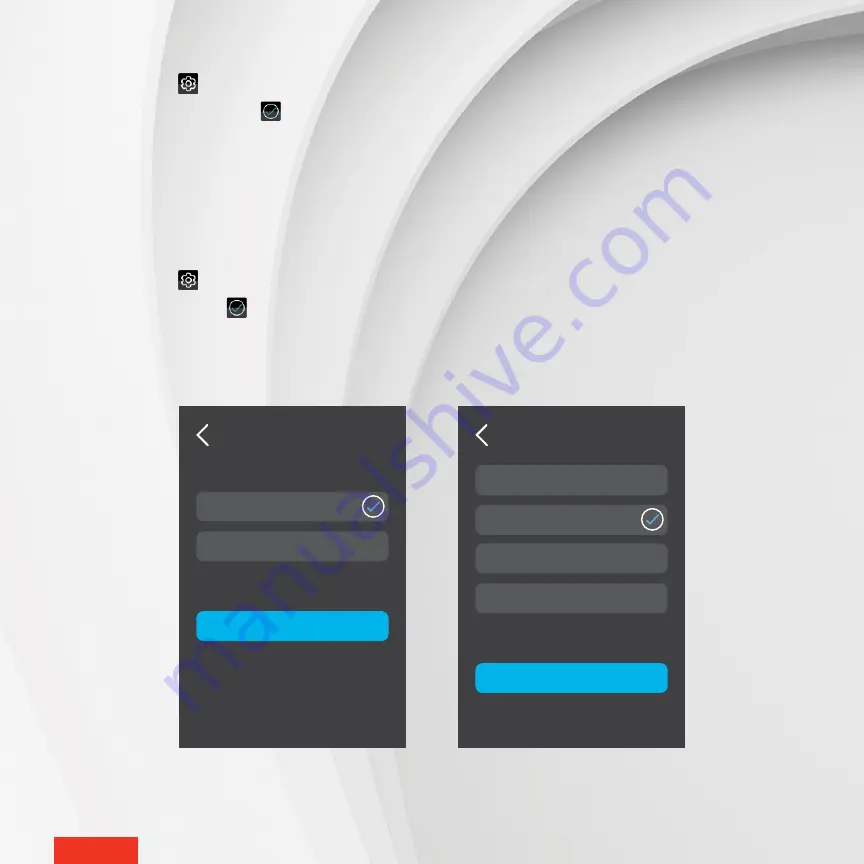
MODIFYING THE TIME FORMAT DISPLAY

1 - 

Access 

SETTINGS 


> OPTIONS > TIME FORMAT

.

2 - 

Tap 

24 Hours 

or 

12 Hours

. The 

 icon will appear to the right of the selected option.

3 - 

Tap 

APPLY

 to save the selection.

MODIFYING THE “SCREEN SAVER” OPTION

The “screen saver” option allows you to choose the time of inactivity before the display goes off. The times options are  
1, 5, 10 and 30 minutes.

1 - 

Access 

SETTINGS 


> OPTIONS > SCREEN SAVER

.

2 - 

Tap the desired time. The 

 icon will appear to the right of the selected option.

3 - 

Tap 

APPLY

 to save the selection.

SCREEN SAVER

APPLY

1 Minute
5 Minutes
10 Minutes
30 Minutes

TIME FORMAT

APPLY

24 Hours
12 Hours

Содержание 626296556955

Страница 1: ...1 1 USER GUIDE SMART CONTROLLER THERMOSTAT Model ASMC402 INS ASMC402 US 0518...

Страница 2: ...er thermostat 20 With the MAESTRO app 20 Without the MAESTRO app 21 Changing statuses or activities 22 Description of statuses 22 Examples of status and activity changes 23 Selecting a status for your...

Страница 3: ...ill adjust the temperature of your rooms at the right time ANTICIPATED START MAESTRO takes into account the outside temperature to reach the desired temperature at the perfect time GEOFENCING COMFORT...

Страница 4: ...not compatible with Systems with inductive loads Central heating systems Systems with resistive loads that are o inferior to 260 W at 208 VAC or 300 W at 240 VAC o superior to 3400 W at 208 VAC or 40...

Страница 5: ...the appropriate circuit breaker or fuse You must regularly clean dirt accumulations on the controller thermostat Do NOT use fluid to clean controller thermostat air vents Do NOT install controller th...

Страница 6: ...n function on its own but it offers more options when used with MAESTRO thermos tats and the MAESTRO app By using the complete MAESTRO system you ll benefit from maximum comfort flexibility and energy...

Страница 7: ...risk of overheating leave a clearance of at least 12 in around the controller thermostat to ensure proper ventilation Also the front of the unit should be completely clear of any obstruction to ensur...

Страница 8: ...es as a thermostat for the room in which it is installed 2 INSTALL YOUR MAESTRO THERMOSTATS Now install your MAESTRO thermostats For instructions on how to do this read the thermostat s installation a...

Страница 9: ...the controller thermostat screen to create a home 3 IntheMAESTROapp the ConnectathermostattomyMAESTROsystem featurewillactivateandsetthe controller ther mostat in thermostat pairing mode see www stel...

Страница 10: ...al panel Make sure the power is off by checking for example that the heating system remains off even if the setpoint temperature is higher than the ambient temperature mechanical thermostat INSTALLING...

Страница 11: ...thermostat with a STELPRO mounting plate 1 Loosen the screw at the base of the thermostat without completely removing it to separate the thermostat from the mounting plate 2 Gently pull the thermostat...

Страница 12: ...2 Slide the mounting plate downward and then pull on it to separate it from the controller thermostat 3 Using the mounting screws supplied 2 secure the MAESTRO controller thermostat mounting plate to...

Страница 13: ...m 2 or 4 wires Tighten the caps onto the wires to ensure the connection is secure Then place all the wires inside the electrical box NOTE If the electrical wires are aluminum use CO ALR connectors ins...

Страница 14: ...ermostat are clean and clear of any obstruction 2 Align the slot on the top of the controller thermostat with the slot on the mounting plate 3 Then secure the controller thermostat to the mounting pla...

Страница 15: ...ch the screen The controller thermostat should turn on If it doesn t read the Controller thermostat troubleshooting section on page 39 Once installed the controller thermostat will prompt you to choos...

Страница 16: ...ANCAIS ENGLISH 7 SET UP BASIC OPTIONS ON FIRST START 4 SETTINGS TO BE SET Language Francais English Temperature format Celsius Fahrenheit Time format 12 hours 24 hours HEATING MODE Baseboard Fan force...

Страница 17: ...ies WI FI CONNECTED ACTIVE ALERTS LOCAL TIME HEATING POWER KEYBOARD LOCKED ACCESS SETTINGS ACCESS THERMOSTAT OUTDOOR RELATIVE HUMIDITY OUDOOR TEMPERATURE ACCESS STATUS ACTIVITIES ACCESS GROUPS ROOM TE...

Страница 18: ...download the MAESTRO app and create your user account CONNECTING THE CONTROLLER THERMOSTAT TO YOUR WI FI NETWORK AND REGISTERING IT IN THE MAESTRO APP 1 Access SETTINGS WI FI SETUP 2 Tap SCAN NETWORKS...

Страница 19: ...Fi network you will need to follow these steps to obtain your registration code For example you may need to obtain the registration code when a MAESTRO system changes owners 1 Access SETTINGS WI FI SE...

Страница 20: ...MY MAESTRO SYSTEM The screen ADD A NEW THERMOSTAT on the controller thermostat will display the Zigbee channel being used 2 On the thermostat access menu 1 and select the channel displayed by the cont...

Страница 21: ...splayed by the controller thermostat You can also use the auto connect option ON but the connection may take more time 3 On the thermostat tap the button to confirm the selection The icon will blink r...

Страница 22: ...to 20 activities e g movie night to adjust the temperature of some groups of thermostats based on your lifestyle The activities can be programmed to start automatically at a given time or on demand A...

Страница 23: ...8 am 9 am 10 am 11 am 12 pm 1 pm 2 pm 3 pm 4 pm 5 pm 63 F 68 F 72 F Workout 68 F Relaxation 72 F 70 F 70 F 70 F PROGRAMMED ACTIVITIES MANUAL SETPOINTS STATUS Example 4 7 am 8 am 9 am 10 am 11 am 12 pm...

Страница 24: ...perature of all thermostat groups associated with the activity will adjust based on the chosen activity and the controller thermostat will return to the home screen NOTE The home status will automatic...

Страница 25: ...thermostats see Changing statuses or activities on page 22 TIP Deactivate geofencing to maintain your home status at I am home even when your mobile devices are outside the boundary This will ensure t...

Страница 26: ...ist associated with geofencing The MAESTRO system will then automatically re register all mobile devices that still have the option Use this mobile device activated 1 Access SETTINGS Geofencing 2 Tap...

Страница 27: ...ill display to confirm the selection If the controller thermostat needs to activate the heating system to reach the setpoint temperature the icon will indicate the intensity at which the heating syste...

Страница 28: ...f the home changes or until an activity associated with this group begins The MAESTRO system will support a maximum of 8 groups 1 Access GROUPS 2 Tap the group you want to modify The group s screen wi...

Страница 29: ...mperature will be applied until the status of the home changes or until an activity associated with this group begins NOTE You can also modify the temperature directly on the thermostat if the keyboar...

Страница 30: ...e The group screen will display the group s list of thermostats and the defined setpoint temperature for each 3 Tap the thermostat you want to remove 4 In the thermostat screen tap the icon to access...

Страница 31: ...ctionality is deac tivated simply tap the controller thermostat screen to turn it back on 1 Access SETTINGS OPTIONS PROXIMITY SENSOR 2 Tap Sensor Off or Sensor On The icon will appear to the right of...

Страница 32: ...all thermostats connected to the controller thermostat to prevent the setpoint temperature from being modified directly on these units 1 Access SETTINGS OPTIONS LOCK 2 Under THIS THERMOSTAT select Unl...

Страница 33: ...ontroller thermostat displays different types of alerts Alerts generally serve to inform you of a system malfunction that needs to be resolved 1 On the home screen tap or access SETTINGS ALERTS The AL...

Страница 34: ...ON THE CONTROLLER THERMOSTAT The STELPRO screen displays the following technical information on the controller thermostat NOTE You may need to provide the following information when contacting STELPRO...

Страница 35: ...page 31 Activating or deactivating proximity sensor on page 31 and Locking and unlocking the controller thermostat screen on page 32 MODIFYING THE DISPLAY LANGUAGE 1 Access SETTINGS OPTIONS LANGUAGE...

Страница 36: ...controller thermostat controls as a thermostat baseboard convector or fan forced heater 1 Access SETTINGS OPTIONS HEAT MODE 2 Tap Baseboard or Fan Forced Heater The icon will appear to the right of th...

Страница 37: ...THE SCREEN SAVER OPTION The screen saver option allows you to choose the time of inactivity before the display goes off The times options are 1 5 10 and 30 minutes 1 Access SETTINGS OPTIONS SCREEN SA...

Страница 38: ...returns to the home screen ALL SETTINGS WILL BE RESET TO THEIR DEFAULT VALUES AND THE CONNECTION TO THE ZIGBEE AND WI FI NETWORKS WILL BE DELETED THIS ALSO MEANS THAT THE SETPOINT TEMPERATURES GROUPS...

Страница 39: ...tected an open window Close the window or deactivate open window detection Overheating equipment The heating system is overheating Inspect your heating system and replace it if malfunctioning This ale...

Страница 40: ...have entered the correct password The connection may also have failed due to an intermittent Wi Fi network problem Try reconnecting later The iCloud service may also be down In this case the controlle...

Страница 41: ...work is deactivated all the thermostats connected to it will disconnect You will need to connect them to the controller thermostat s Zigbee network to control them from the controller thermostat and f...

Страница 42: ...keyboard Screen saver Proximity sensor Thermostat Version Zigbee Version Wi Fi Version Produced on yyyy mm dd Control Checksum Add a new thermostat Leave network Scan networks Register device Selected...

Страница 43: ...t Time format 12 Hours Heat mode Baseboard Open window detection Deactivated Locking Keyboard unlocked Screen saver 1 minute Proximity sensor Activated Geofencing Deactivated Group Only 1 group is def...

Страница 44: ...PLAY Actual measured temperature 32 F to 122 F Temperature display increments 1 F Temperature setpoint 41 F to 86 F Temperature setpoint increments 1 F CONNECTIVITY Zigbee IEEE 802 15 4 protocol Wi Fi...

Страница 45: ...r the warranty to be valid the unit must have been installed and used according to instructions If the installer or the user modifies the unit he she will be held responsible for any damage resulting...

Отзывы: