background image

20

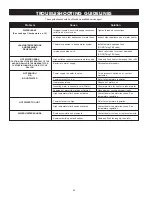
These guidelines should be utilized by a qualified service agent.

TROUBLESHOOTING GUIDELINES

Improperly sealed, hot or cold supply connection,
relief valve or drain valve.

Leakage from other appliances or water lines.

Thermal expansion in closed water system.

Improperly seated valve.

High sulfate or mineral content in water supply.

Bacteria in water supply.

Power supply to heater is not on.

Thermostat set too low.

Heater undersized.

Incoming water is unusually cold (Winter).

Leaking hot water from pipes or fixtures.

High temperature limit switch activated.

Thermostat set too high.

High temperature limit switch activated.

Scale accumulation on elements.

Sediment build-up on tank bottom.

Tighten threaded connections.

Inspect other appliances near water heater.

Install thermal expansion tank
(DO NOT plug T&P valve).

Check relief valve for proper operation
(DO NOT plug T&P valve).

Drain and flush heater thoroughly, then refill.

Chlorinate water supply.

Turn disconnect switch on or contact
electrician.

Refer to temperature regulation.

Reduce hot water use.

Allow more time for heater to reheat water.

Have plumber check and repair leaks.

Contact dealer to determine cause. See
temperature regulation.

Refer to temperature regulation.

Contact dealer to determine cause. See
temperature regulation.

Contact dealer to clean or replace elements.

Drain and flush thoroughly, then refill.

                 Problem

                                          Cause

                                    Solution

WATER LEAKS

(See Leakage Checkpoints on 19)

LEAKING TEMPERATURE

AND PRESSURE

RELIEF VALVE

HOT WATER ODORS

(CAUTION: UNAUTHORIZED REMOVAL OF THE

ANODE(S) WILL VOID THE WARRANTY FOR

FURTHER INFORMATION, CONTACT YOUR

DEALER)

NOT ENOUGH

OR

NO HOT WATER

HOT WATER TOO HOT

WATER HEATER SOUNDS

Содержание 184748-001

Страница 1: ...RECTEDTOTHELOCALDEALERFROMWHOMTHEWATERHEATERWAS PURCHASED IFYOUAREUNSUCCESSFUL PLEASEWRITETOTHECOMPANYLISTEDONTHERATINGPLATEONTHEWATERHEATER GAMA certification applies to all residential electric water heaters with capacities of 20 to 120 gallons Input rating of 12 Kw or less Instruction Manual RESIDENTIAL HUD SIDE PLUMBING ELECTRIC WATER HEATERS FOR POTABLE WATER HEATING ONLY NOT SUITABLE FOR SPA...

Страница 2: ...al Code and applicable local electrical and plumbing codes and tools necessary to confirm proper installation and operation of the water heater as they relate to the installation of electric water heaters The qualified installer must have a thorough understanding of the water heater Instruction Manual Service Agency A service agency also must have ability equivalent to a licensed tradesman in the ...

Страница 3: ...3 GENERAL SAFETY ...

Страница 4: ...r whose name appears on the rating plate 4 Carefully plan the place where you are going to put the water heater INSTALLATIONORSERVICEOFTHISWATERHEATERREQUIRES ABILITYEQUIVALENTTOTHATOFALICENSEDTRADESMAN IN THEFIELDINVOLVED PLUMBINGANDELECTRICALWORKARE REQUIRED Examine the location to ensure the water heater complies with the Facts to ConsiderAbout the Location section in this manual 5 For Californ...

Страница 5: ... COLD WATER INLET LINE AS REQUIRED BY LOCAL CODES INSTALL SUITABLE DRAIN PANS UNDER HEATERS TO PREVENT DAMAGE DUE TO LEAKAGE REFER TO WATER HEATER LOCATION ON PAGE 8 INSTALLTHERMALEXPANSIONTANK OR DEVICE IF WATER HEATER IS INSTALLED IN A CLOSED WATER SYSTEM ...

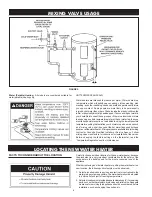
Страница 6: ...xing valves are available local plumbing contractor Consult a Qualified Installer or Service Agency Follow mixing valve manufacturer s instructions for installation of the valves Before changing the factory setting on the thermostat read the Temperature Regulation section in this manual LOCATING THE NEW WATER HEATER FACTS TO CONSIDERABOUT THE LOCATION Carefully choose an indoor location for the ne...

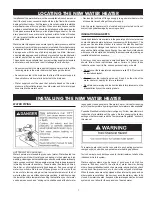
Страница 7: ...n blanket unnecessary Should you choose to apply an insulation blanket to this heater you should follow these instructions below Failure to follow these instructions can result in fire serious personal injury or death Do not cover the temperature and pressure relief T P valve with an insulation blanket Do not cover the instruction manual Keep it on the side of the water heater or nearby for future...

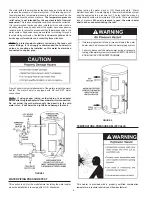
Страница 8: ...e water heater The water heater is equipped with 3 4 inch NPT water connections NOTE If using copper tubing solder tubing to an adapter before attaching the adapter to the cold water inlet connection Do not solder the cold water supply line directly to the cold water inlet it will harm the dip tube and damage the tank FIGURE 3 WATER PIPING PRESSURE TEST This section is only for the manufacturer in...

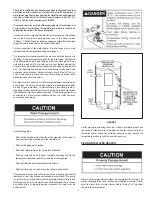
Страница 9: ...lief valve and the tank Do not connect tubing directly to discharge drain unless a 6 inch air gap is provided To prevent bodily injury hazard to life or property damage the relief valve must be allowed to discharge water in quantities should circumstances demand If the discharge pipe is not connected to a drain or other suitable means the water flow may cause property damage The Discharge Pipe Sha...

Страница 10: ...ucet Allow water to run until a constant flow is obtained This will let air out of the water heater and the piping 4 Check all water piping and connections for leaks Repair as needed T P VALVE and PIPE INSULATION On Selected Models Remove insulation for T P Valve and pipe connections from carton Fit pipe insulation over the incoming cold water line and the hot water line Make sure that the insulat...

Страница 11: ...11 WIRING DIAGRAMS TURN OFF THE HEATER ELECTRICAL SUPPLY BEFORE SERVICING ANY ELECTRICAL COMPONENTS FIGURE 7 ...

Страница 12: ...power when working on the water heater This could be with a circuit breaker or fuse block in the entrance box or a separate disconnect switch 2 Install and connect a circuit directly from the main fuse or circuit breaker box This circuit must be the right size and have its own fuse or circuit breaker 3 If metal conduit is used for the grounding conductor A The grounding electrode conductor shall b...

Страница 13: ...ople are more likely to be permanently injured by hot water than others These include the elderly children the infirm or physically mentally handicapped If anyone using hot water in your home fits into one of these groups or if there is a local code or state law requiring a certain temperature water at the hot water tap then you must take special precautions In addition to using the lowest possibl...

Страница 14: ...armless bacteria is nontoxic to humans D An excess of active hydrogen in the tank This is caused by the corrosion protective action of the anode Smelly water may be eliminated or reduced in some water heater models by replacing the anode s with one of less active material and then chlorinating the water heater tank and all hot water lines Contact the local water heater supplier or service agency f...

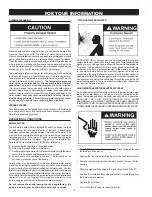
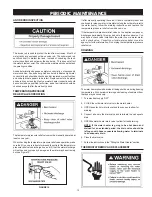
Страница 15: ...terminate to an adequate drain 6 Close the drain valve 7 Follow the instructions in the Filling the Water Heater section THERMOSTAT REMOVAL REPLACEMENT ANODE ROD INSPECTION The anode rod is used to protect the tank from corrosion Most hot water tanks are equipped with an anode rod The submerged rod sacrifices itself to protect the tank Instead of corroding the tank water ions attack and eat away t...

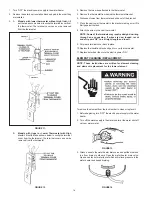
Страница 16: ...against the tank 8 Attach the wires to the new thermostat NOTE Some of the terminals may require straight in wiring through an eye opening If wires are now looped recut and strip wire 3 8 to a straight length and insert 9 Put plastic terminal cover back in place 10 Replace the insulation block and pad to cover the thermostat 11 Replace outer door then turn the electric power ON ELEMENT CLEANING RE...

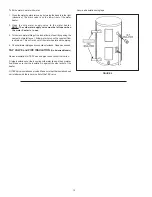
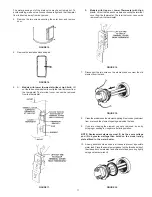
Страница 17: ... terminal cover from the thermostat The terminal cover can now be removed from the thermostat FIGURE 18 7 Disconnect the two wires on the element and unscrew the old element from the tank FIGURE 19 8 Clean the area around the element opening Remove any sediment from or around the element opening and inside the tank 9 If you are cleaning the element you have removed do so by scraping or soaking in ...

Страница 18: ...re the thermostat remains firmly against the surface of the tank FIGURE 21 16 Replace terminal cover on thermostat making sure the locking tabs on the terminal cover are in place 17 Replacetheinsulationblockandpadsothatitcoversthethermostat and element see Figure 21 18 Replace outer door 19 Turn ON electric power to water heater FIGURE 22 DRAIN VALVE WASHER REPLACEMENT See Figure 23 1 Follow Drain...

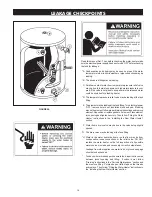
Страница 19: ...ions and remove element Reposition or replace gasket on element Place element into opening and tighten securely Then follow Filling the Water Heater instructions in the Installing the New Water Heater section F Water from a drain valve may be due to the valve being slightly opened G The drain valve may be leaking at the tank fitting H Water in the water heater bottom or on the floor may be from co...

Страница 20: ...iances near water heater Install thermal expansion tank DO NOT plug T P valve Check relief valve for proper operation DO NOT plug T P valve Drain and flush heater thoroughly then refill Chlorinate water supply Turn disconnect switch on or contact electrician Refer to temperature regulation Reduce hot water use Allow more time for heater to reheat water Have plumber check and repair leaks Contact d...

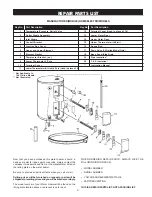
Страница 21: ...ed accordingly The model number of your Water Heater will be found on the rating plate located above or adjacent to outer door Key No Part Description 1 Temperature Pressure Relief Valve 2 Outlet Nipple Assembly 3 Inlet Nipple 4 Conduit Bracket 5 Junction Box Cover 6 Upper and Lower Element 7 Element Gasket 8 Thermostat Bracket ea 9 Lower Thermostat 2 Pole 10 Terminal Cover 11 Lower Thermostat w H...

Страница 22: ...22 NOTES ...

Страница 23: ...23 NOTES ...

Страница 24: ...24 ...

Отзывы: