StarTech.com RK616WALM Скачать руководство пользователя страница 7

6

To view manuals, videos, drivers, downloads, technical drawings, and more visit www.startech.com/support

l’operazione in ordine decrescente di peso, in modo che le apparecchiature più 

leggere siano installate nelle parti superiori del prodotto e quelle più pesanti 

nella parte inferiore.

Avertissements

Assemblez ce produit conformément aux instructions.
Lisez tout le manuel et assurez-vous que vous comprenez les instructions avant 

de commencer à assembler et utiliser ce produit.
Les structures des murs varient. Vous devez impérativement vérifier que le 

type de mur et le matériel de fixation que vous utilisez permettent de soutenir 

correctement l’équipement. Dans le cas contraire, vous risquez de vous blesser 

ou d’endommager le matériel. La structure du mur doit pouvoir supporter au 

moins quatre fois le poids de l’équipement monté.
Ce rack de serveur est extrêmement lourd. Ne tentez jamais de le déplacer ou de 

le soulever sans aide.
Risque de basculement ! L’extension de plusieurs composants à partir du rack de 

serveur augmente le risque de basculement. Pour éviter ce risque, n’étendez pas 

plus d’un composant à partir du rack de serveur.
Ne placez aucun objet sur ce rack de serveur et n’empilez pas le rack sur un 

autre rack.
N’approchez aucun liquide du rack de serveur.
Veillez à installer le rack de serveur dans un endroit pouvant supporter le poids 

combiné du rack et des équipements que vous comptez placer à l’intérieur.
Ce produit nécessite un raccordement à la terre. N’utilisez pas ce produit sans 

raccordement à la terre.
Avant d’ajouter des équipements à ce produit, vérifiez que vous l’avez 

correctement assemblé, installé et fixé au mur.
Lorsque vous chargez des équipements dans ce produit, chargez les 

équipements les plus lourds dans la partie inférieure du produit en priorité. 

Continuez de charger les équipements dans un ordre de poids décroissant, 

de sorte que les équipements les plus légers soient installés dans les parties 

supérieures du produit, et les éléments plus lourds dans les parties inférieures.

Содержание RK616WALM

Страница 1: ...Manual Revision 05 10 2019 User Manual For the latest information and specifications visit www startech com RK616WALM 6U Wall Mount Rack Enclosure Actual product may vary from photos SKU RK616WALM...

Страница 2: ...Where they occur these references are for illustrative purposes only and do not represent an endorsement of a product or service by StarTech com or an endorsement of the product s to which this manua...

Страница 3: ...lace any items on this enclosure and do not stack the enclosure on top of another enclosure Keep liquid away from this enclosure Make sure that you install the enclosure in an area that can handle the...

Страница 4: ...att du har monterat installerat och f st den till en v gg korrekt N r du lastar produkten med utrustning st ll in den tyngsta utrustningen i den nedersta delen f rst Forts tt st lla in utrustning i vi...

Страница 5: ...sen Dit product vereist een geaarde verbinding Gebruik dit product niet zonder een geaarde verbinding Voordat u apparatuur aan dit product toevoegt moet u er zeker van zijn dat u dit product op de jui...

Страница 6: ...Non tentare di spostarlo o sollevarlo senza assistenza Pericolo di ribaltamento L estensione di pi componenti dal box esterno aumenta il rischio di ribaltamento del box esterno Per evitare questo risc...

Страница 7: ...lacer ou de le soulever sans aide Risque de basculement L extension de plusieurs composants partir du rack de serveur augmente le risque de basculement Pour viter ce risque n tendez pas plus d un comp...

Страница 8: ...nhum artigo nesta caixa e n o empilhar a caixa em cima de outra caixa Manter l quidos afastados desta caixa Certifique se de que instala a caixa numa rea que pode suportar o peso combinado da caixa e...

Страница 9: ...de la misma Este producto requiere conexi n a tierra No utilice este producto sin conexi n a tierra Antes de instalar equipos en este producto aseg rese de haberlo ensamblado e instalado correctamente...

Страница 10: ...s Geh use aufgestellt wird in der Lage ist das Gesamtgewicht des Geh uses und der Ger te die Sie darin platzieren m chten zu tragen Dieses Produkt erfordert einen Schutzleiteranschluss Verwenden Sie d...

Страница 11: ...ents 12 Requirements 12 Grounding the Wall Mount Enclosure 13 Locking or Unlocking the Front Door 14 Removing the Side Panels 14 Replacing the Side Panels 15 Removing the Cable Access Cover 15 Replaci...

Страница 12: ...ads technical drawings and more visit www startech com support Product Diagram 1 Front Door 5 Cable Access Openings x 2 2 Side Panels x 2 6 Mounting Plate 3 Vents 7 Top Panel 4 Cable Access Covers x 2...

Страница 13: ...oll of Hook and Loop Fastener x 1 12 24 Cage Nuts x 24 12 24 Screws x 24 Door Keys x 2 Side Panel Keys x 2 Cup Washers x 24 User Manual x 1 Requirements Phillips type screwdriver Appropriate tools and...

Страница 14: ...ust be grounded Do not use this product without an earth ground connection 1 Use an M6 Screw to attach a Grounding Wire to the front or rear Grounding Point on the Wall Mount Enclosure Installing the...

Страница 15: ...r of the enclosure insert one of the provided Door Keys in the Lock on the Front Door on the Wall Mount Enclosure and turn the key clockwise or counterclockwise Removing the Side Panels 1 If the Side...

Страница 16: ...nels 1 Place one of the Side Panels in the groove at the bottom of the Wall Mount Enclosure 2 Pull the two Tabs on the Side Panel towards the center of the panel 3 Push the top part of the Side Panel...

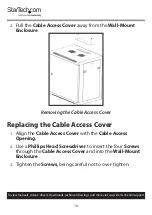
Страница 17: ...from the Wall Mount Enclosure Removing the Cable Access Cover Replacing the Cable Access Cover 1 Align the Cable Access Cover with the Cable Access Opening 2 Use a Phillips Head Screwdriver to insert...

Страница 18: ...hat are located at the top and bottom of the Front Door 1 In the top corner of the inside of the Front Door pull the lever down and move the top corner of the Front Door away from the Wall Mount Enclo...

Страница 19: ...Rails come pre installed in the Wall Mount Enclosure The Mounting Rails can be adjusted independently in 3 4 inch 20 mm increments to accommodate different sizes of equipment Warning Remove all equip...

Страница 20: ...utward However the Mounting Rails can be adjusted so that you can use the Tapped Holes to install your equipment Warning Remove all equipment before adjusting the Mounting Rails 1 Use a Phillips Head...

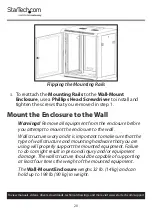
Страница 21: ...move all equipment from the enclosure before you attempt to mount the enclosure to the wall Wall structures vary and it is important to make sure that the type of wall structure and mounting hardware...

Страница 22: ...nd you should not attempt to lift and hang the enclosure without the assistance of other people 3 Secure the Wall Mount Enclosure to the Mounting Plate Installing Equipment Warnings Do not add equipme...

Страница 23: ...rawings and more visit www startech com support 2 Line up the Mounting Holes on the equipment with the Cage Nuts 3 Insert the Screws through the Mounting Holes on the equipment and into the Cage Nuts...

Страница 24: ...damages whether direct or indirect special punitive incidental consequential or otherwise loss of profits loss of business or any pecuniary loss arising out of or related to the use of the product exc...

Страница 25: ...tools StarTech com is an ISO 9001 Registered manufacturer of connectivity and technology parts StarTech com was founded in 1985 and has operations in the United States Canada the United Kingdom and Ta...

Отзывы: