


18
To view manuals, videos, drivers, downloads, technical drawings, and more visit www.startech.com/support
5.
In the top corner of the
Front Door
, pull the
Lever
down
and release it into the washer and hole in the
Wall-Mount
Enclosure
.
6.
In the bottom corner of the
Front Door
, pull the
Lever
up
and release it into the washer and hole in the
Wall-Mount
Enclosure
.
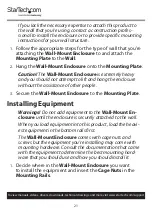
Adjust the Depth of the Mounting Rails
The
Mounting Rails
come pre installed in the
Wall-Mount
Enclosure
. The
Mounting Rails
can be adjusted independently
in 3/4 inch (20 mm) increments to accommodate different sizes
of equipment.
Warning!
Remove all equipment before adjusting the
Mounting Rails
.
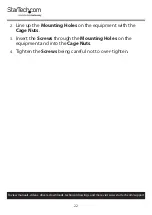
1.
Use a
Phillips Head Screwdriver
to remove the
Screw
and
Cage Nut
located in the upper and lower corners of the
Mounting Rails
.
2.
Install the
Cage Nuts
at the desired depth, along the upper
and lower
Mounting Rails
.
3.
Slide the
Mounting Rail
to the depth of the
Cage Nuts
and
use a
Phillips Head Screwdriver
to install and tighten the
Screws
that you removed in step 1.