background image

Instruction manual

iii

Table of Contents

Introduction ............................................................................................1

Product diagram ........................................................................................................................................ 1
Product dimensions ................................................................................................................................. 2
Package contents ...................................................................................................................................... 3
Requirements ............................................................................................................................................. 3

Ground the enclosure ............................................................................4

Lock or unlock the front or rear door ..................................................5

Remove the side panels ........................................................................5

Access your cables .................................................................................7

Reverse the front door ..........................................................................8

Adjust the depth of the mounting rails ..............................................10

Use the mounting rail tapped holes ...................................................11

Mount the enclosure to the wall ..........................................................12

Install equipment ...................................................................................13

Technical support ...................................................................................14

Warranty information ............................................................................14

Содержание RK12WALHM

Страница 1: ...com RK12WALHM FR Guide de l utilisateur fr startech com DE Bedienungsanleitung de startech com ES Gu a del usuario es startech com NL Gebruiksaanwijzing nl startech com PT Guia do usu rio pt startech...

Страница 2: ...endorsement of a product or service by StarTech com or an endorsement of the product s to which this manual applies by the third party company in question Regardless of any direct acknowledgement els...

Страница 3: ...behuizing Houd vloeistof uit de buurt van deze behuizing Zorg dat u de behuizing installeert op een plaats die geschikt is voor het gecombineerde gewicht van de behuizing en de apparatuur die u in de...

Страница 4: ...tar dicho riesgo no a ada m s que un solo componente No coloque ning n elemento encima de la caja y no apile la caja encima de otra caja Mantenga cualquier l quido lejos de la caj Aseg rese de instala...

Страница 5: ...ents 3 Ground the enclosure 4 Lock or unlock the front or rear door 5 Remove the side panels 5 Access your cables 7 Reverse the front door 8 Adjust the depth of the mounting rails 10 Use the mounting...

Страница 6: ...on manual 1 Introduction Product diagram 1 3 2 4 5 4 5 7 1 Front door 2 Rear door 3 Horizontal mounting rail 4 Vertical mounting rail 5 Cable access cover 6 Cable access opening 7 Side panel 6 8 Vent...

Страница 7: ...loop fastener 48 x 12 24 cage nuts 48 x 12 24 screws 2 x door keys 2 x side panel keys 1 x instruction manual Requirements Phillips type screwdriver Appropriate tools and mounting hardware for the ty...

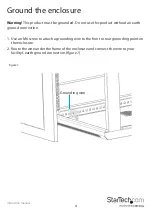
Страница 8: ...his product without an earth ground connection 1 Use an M6 screw to attach a grounding wire to the front or rear grounding point on the enclosure 2 Route the wire under the frame of the enclosure and...

Страница 9: ...s To lock or unlock the front or rear door of the enclosure insert one of the provided door keys in the lock on the door and turn the key clockwise or counterclockwise Remove the side panels 1 If the...

Страница 10: ...panel To put the side panels back on the enclosure place one of the side panels in the groove at the bottom of the enclosure Pull the two tabs on the side panel towards the center of the panel push th...

Страница 11: ...access cover use a Phillips type screwdriver to remove the two screws on both ends of the cable access cover 2 Pull the cable access cover away from the enclosure figure 4 To put the cable access cov...

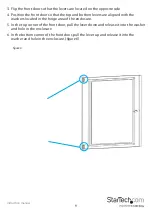
Страница 12: ...ont door of the enclosure is attached to the enclosure with levers that are located at the top and bottom of the front door 1 In the top corner of the inside of the front door pull the lever down and...

Страница 13: ...nd bottom levers are aligned with the washers located in the hinge area of the enclosure 5 In the top corner of the front door pull the lever down and release it into the washer and hole in the enclos...

Страница 14: ...the enclosure Remove the equipment first before you adjust the mounting rails 1 Each of the mounting rails is connected to the enclosure with a screw and cage nut in the upper and lower corners of the...

Страница 15: ...you adjust the mounting rails 1 Each of the mounting rails is connected to the enclosure with a screw and cage nut in the upper and lower corners of the mounting rail Use a Phillips type screwdriver...

Страница 16: ...weighs 59 5 lb 27 kg and can hold up to 198 lb 90 kg in weight Warning If you lack the necessary expertise to attach this product to the wall that you re using contact a construction professional to i...

Страница 17: ...ns of this enclosure and the heavier items are on the bottom This enclosure comes with cage nuts and screws but the equipment you re installing may come with mounting hardware Consult the documentatio...

Страница 18: ...ned for repair or replacement with equivalent products at our discretion The warranty covers parts and labor costs only StarTech com does not warrant its products from defects or damages arising from...

Страница 19: ...ts and we quickly deliver them wherever they need to go Just talk to one of our tech advisors or visit our website You ll be connected to the products you need in no time Visit www startech com for co...

Отзывы: