background image

2

To view manuals, videos, drivers, downloads, technical drawings, and more visit www.startech.com/support

1

2

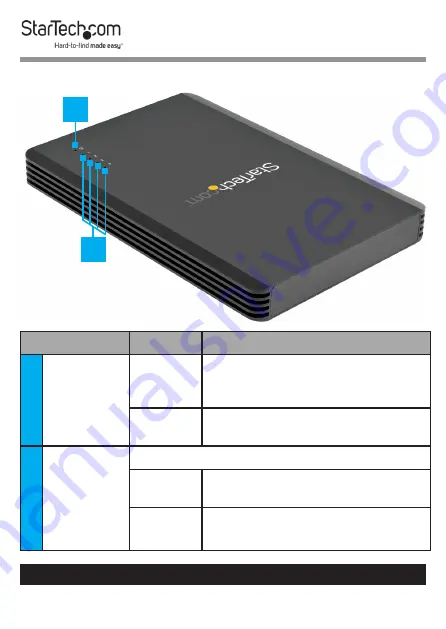
Top Angled View

Component

Status

Indication

1

Power 

LED 

Indicator

On

• 

Enclosure

 is receiving power 

from the 

Universal Power 

Adapter

Off

• 

Universal Power Adapter

 is 

not connected

2

Drive 

Activity 

LED 

Indicators

• 

Correspond with 

M.2 Drives 

1-4

On/

Flashing

• 

M.2 Drive

 activity detected

Off

• 

M.2 Drive

 not connected

• 

No 

M.2 Drive

 activity detected

Содержание M2E4BTB3

Страница 1: ...al Revision 03 05 2020 User Manual For the latest information and specifications visit www startech com M2E4BTB3 4 Bay M 2 NVMe Enclosure Thunderbolt 3 PCIe Actual product may vary from photos SKU M2E4BTB3 ...

Страница 2: ...at to which the receiver is connected Consult the dealer or an experienced radio TV technician for help Industry Canada Statement This Class B digital apparatus complies with Canadian ICES 003 Cet appareil numérique de la classe B est conforme à la norme NMB 003 du Canada CAN ICES 3 B NMB 3 B Use of Trademarks Registered Trademarks and other Protected Names and Symbols This manual may make referen...

Страница 3: ...lacés et acheminés de façon à éviter tout risque électrique de chute ou de sécurité 安全対策 電源が入っている状態の製品または電線の終端処理を行わないでくださ い ケーブル 電源ケーブルと充電ケーブルを含む は 適切な配置と引き回し を行い 電気障害やつまづきの危険性など 安全上のリスクを回避するよう にしてください Misure di sicurezza I terminiali dei fili elettrici non devono essere realizzate con il prodotto e o le linee elettriche sotto tensione I cavi inclusi i cavi di alimentazione e di ricarica devono es...

Страница 4: ...e Bay Closed 3 Bottom View Drive Bay Open 4 Requirements 5 Installation 5 Connect the Drives 5 Optional Connect a Thunderbolt 3 Peripheral 6 Optional Connect Displays 6 Powering the Enclosure 7 Connect the Enclosure to the Host Computer 7 Operation 8 Operating Temperature 8 Removing the Drives 8 Supported Video Resolutions 9 Daisy Chain Multiple Thunderbolt 3 Devices 10 Configure the Display Devic...

Страница 5: ...nnect the Enclosure to the Host Computer Connect Thunderbolt 3 Peripherals Cascade the Enclosure to other Enclosures Connect a Thunderbolt 3 Enabled Display Device 2 DisplayPort Output Port Connect a DisplayPort Enabled Display Device 3 DC 12V Power Port Connect a Universal Power Adapter 4 Rubber Foot Pads Prevent scratching Allow air to flow under the Enclosure 4 1 2 3 ...

Страница 6: ... Component Status Indication 1 Power LED Indicator On Enclosure is receiving power from the Universal Power Adapter Off Universal Power Adapter is not connected 2 Drive Activity LED Indicators Correspond with M 2 Drives 1 4 On Flashing M 2 Drive activity detected Off M 2 Drive not connected No M 2 Drive activity detected ...

Страница 7: ...ads technical drawings and more visit www startech com support Bottom View Drive Bay Closed Component Function 1 Drive Bay Screws Secure the Drive Bay Cover 2 Drive Bay Cover Cover and protect the M 2 Drives 3 Fan Cool the M 2 Drives 1 3 1 2 ...

Страница 8: ...tech com support Bottom View Drive Bay Open Component Function 1 Thermal Pads Transfer heat from the M 2 Drives to the body of the Enclosure 2 M Key Socket Connect up to 4 M 2 Drives Drives are numbered to correspond with the Drive Activity LED Indicators from left to right 1 2 3 4 1 2 ...

Страница 9: ...tional DisplayPort Enabled Display Device x 1 Optional DisplayPort Cable x 1 Optional Thunderbolt 3 Peripheral x 1 Optional Thunderbolt 3 to DisplayPort Adapter Cable x 1 Installation Connect the Drives 1 Turn the Enclosure upside down 2 Remove the Drive Bay Cover on the bottom of the Enclosure Remove the two Drive Bay Screws using a Phillips Head Screwdriver Carefully flip the Enclosure to releas...

Страница 10: ...wdriver 7 Repeat steps 3 6 to instal the remaining M 2 Drives 8 Replace the Drive Bay Cover that was removed in step 2 9 Screw in the two Drive Bay Screws that were removed in step one using a Phillips Head Screwdriver Optional Connect a Thunderbolt 3 Peripheral Connect a Thunderbolt 3 Cable sold separately to one of the Thunderbolt 3 Ports on the Enclosure and to a Thunderbolt 3 Port on the Thund...

Страница 11: ...bled Display Device Thunderbolt 3 Enabled Display Device Connect a Thunderbolt 3 Cable included to one of the Thunderbolt 3 Ports on the Enclosure and to a Thunderbolt 3 Input Port on a Thunderbolt 3 Enabled Display Device Powering the Enclosure 1 Select the appropriate regional Power Cord and connect it to the Universal Power Adapter 2 Connect the Universal Power Adapter to the DC 12V Power Port ...

Страница 12: ...higher temperatures These higher temperatures do not present a safety hazard to the user Removing the Drives Notes After extended use the M 2 Drives may stick to the Thermal Pads The labels of the M 2 Drives may become damaged during removal This will not impact the performance of the M 2 Drives The Thermal Pads may leave residue on the M 2 Drives during removal 1 Turn the Enclosure upside down 2 ...

Страница 13: ...nderbolt 3 Port 5120 x 2880 p 60Hz 2 DisplayPort Output Port and Thunderbolt 3 Peripheral Port 4096 x 2160p 60Hz 2 DisplayPort Output Port and Thunderbolt 3 Peripheral Port USB C to DisplayPort 4096 x 2160p 60Hz Depending on the configuration and the supported resolutions of the connected Display Device s the Enclosure can support video resolutions lower than specified above In a multi display con...

Страница 14: ...t 3 Display Devices can be used in a daisy chain configuration For example connect a Thunderbolt 3 Display Device to a Thunderbolt 3 Port on the Enclosure Then connect another Thunderbolt 3 Display Device or a Thunderbolt 3 Peripheral Device through the first Thunderbolt 3 Display Device Configure the Display Devices Use the Windows operating system to adjust display settings for multiple Display ...

Страница 15: ... damages whether direct or indirect special punitive incidental consequential or otherwise loss of profits loss of business or any pecuniary loss arising out of or related to the use of the product exceed the actual price paid for the product Some states do not allow the exclusion or limitation of incidental or consequential damages If such laws apply the limitations or exclusions contained in thi...

Страница 16: ... tools StarTech com is an ISO 9001 Registered manufacturer of connectivity and technology parts StarTech com was founded in 1985 and has operations in the United States Canada the United Kingdom and Taiwan servicing a worldwide market Reviews Share your experiences using StarTech com products including product applications and setup what you love about the products and areas for improvement StarTe...

Отзывы: