Introduction
Thank you for purchasing a StarTech.com Fast Ethernet media converter. Now you can
switch from fiber optic to UTP cables and vice versa. Simply plug your ST or SC multi-
mode fiber optic cables into the two fiber optic ports and your UTP cable into the RJ-45
port and your data transfers seamlessly at 100BaseTX or 100BaseFX Fast Ethernet
standards. The converter also supports automatic full- and half-duplex modes so that
your Fast Ethernet devices will be operating at their maximum speeds.
Features
• Converts fiber optic data to UTP data and vice versa
• Supports 100BaseTX and 100BaseFX Fast Ethernet standards
• Supports fiber optic transmission up to 2KM
• Supports full- and half-duplex operating modes
• Backed by StarTech.com’s one-year warranty
Before You Begin
To ensure a quick and easy device installation, please read through this section carefully
before attempting to install the device.
WARNING!
The Fast Ethernet converter must be installed and operated in an
environment with temperatures between 32-131ºF (0-55ºC) and humidity levels of 10-
95% (non-condensing)
. Make sure that the converter is kept away from heating sources
and that the vents at the side of the device are not blocked. Do not place any objects on
top of the device. Make sure that no water or moisture enters the unit. If necessary, use a
dehumidifier to reduce humidity near the device.
Requirements
You must be using Category 5 or above UTP media cables and 62.5/125 micron
multimode ST or SC fiber optic cables in order to use this device.
NOTE:
StarTech.com carries a wide range of UTP and fiber optic cables to suit your
networking needs. Visit www.startech.com and click on the “Networking” tab for
product information, as well as ideas and suggestions on setting up your network.
Contents
This package should contain:
• 1 x Fast Ethernet converter
• 1 x power adapter
2
Installation
This section will guide you through the installation of your Fast Ethernet converter.
Please read through the instructions carefully and complete each step in the order listed.
WARNING!
Exposure to live fiber optic cable can potentially pose an irreversable threat
to your vision. Under no circumstances should you look directly into a fiber optic
cable.
Before you begin make sure that all devices are turned off and disconnected and
keep fiber optic cables pointed away from your eyes and face at all times. The delicate
nature of fiber optic cabling also means it can be easily damaged or broken. Be sure to
handle fiber optic cables carefully.
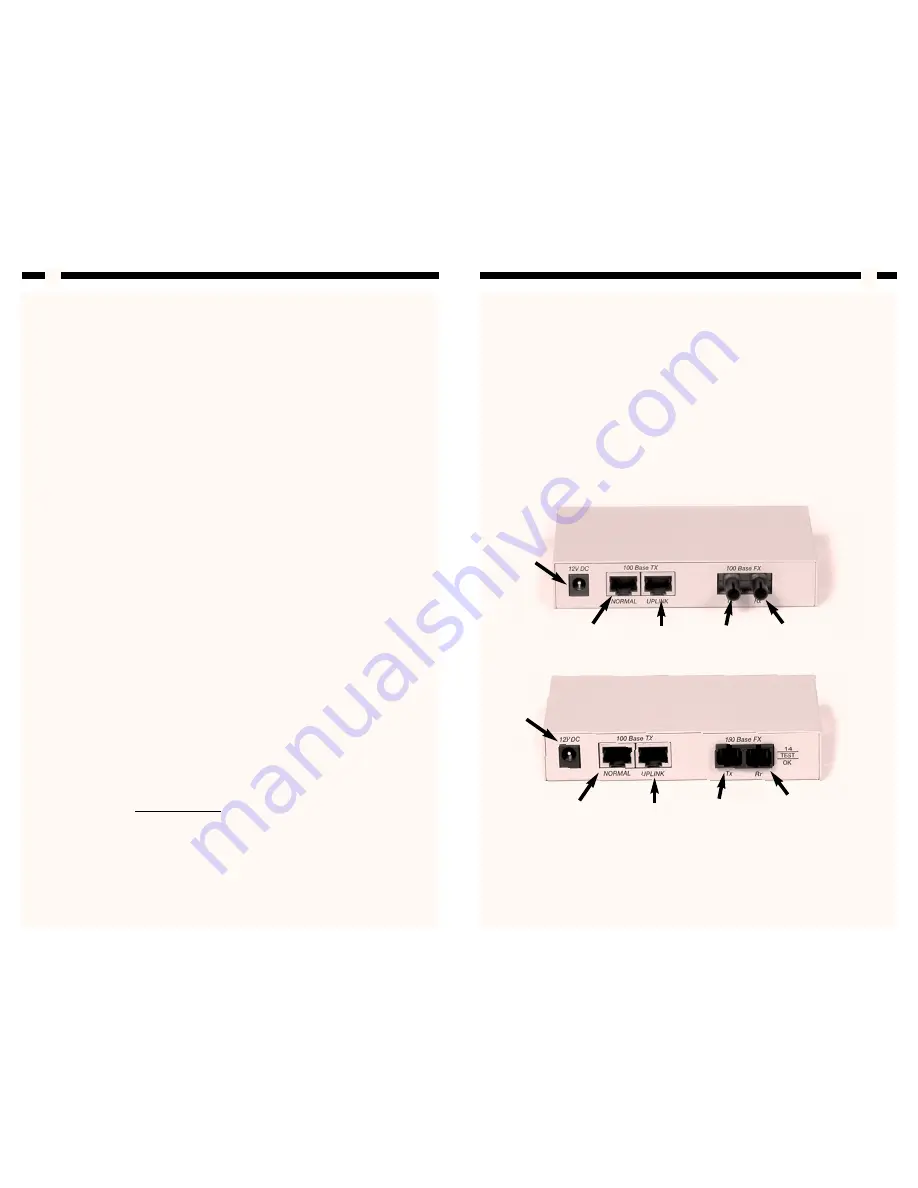
1. Plug your Category 5 or above UTP cable into one of the RJ-45 ports on the back of
the device.
NOTE:
If the other end of the cable is connected to a PC or adapter, you should use a
straight-through cable and the converter’s Normal port. If the other end of the cable is
attached to a hub or switch, you should use a crossover cable and the Uplink port.
2. Remove the rubber dust caps from the 100BaseFX ports. Plug your ST or SC fiber
optic transmission cable into the Tx port. Plug your receiving cable into the Rx port.
You should re-install the dust caps when the device is not in use.
3. Plug one end of the power supply into the 12V DC port on the converter. Plug the
other end into an available electric socket. The green Power LED should now be lit.
3
ET9003ST
Power
Connector
Connects to
PC or adapter
Connects to
hub or switch
Connects to
ST fiber optic
transmission
cable
Connects to
ST fiber optic
receiving
cable
Power
Connector
Connects to
PC or adapter
Connects to
hub or switch
Connects to
SC fiber optic
transmission
cable
Connects to
SC fiber optic
receiving cable
ET9003SC


