background image

46

To view manuals, videos, drivers, downloads, technical drawings, and more visit www.startech.com/support

Tightening the VESA Mount

11. 

Repeat steps 8 - 10 to mount the second 

Monitor

.

12. 

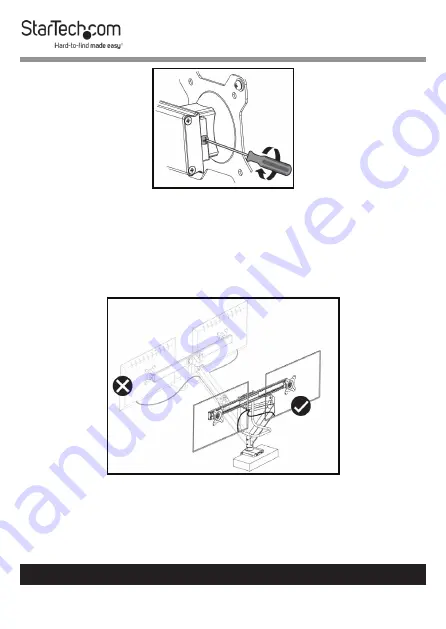
Do not rotate the 

Monitors

 over the rear edge of the 

Mounting Surface

 as this will create a tipping hazard with 

potential for equipment or personal damage.

Do Not Rotate Monitors Over Rear Edge

Содержание ARMSLIMDUAL2USB3

Страница 1: ...ision 04 27 2020 User Manual For the latest information and specifications visit www startech com ARMSLIMDUAL2USB3 Slim Dual Monitor Mount with USB Ports SKU ARMSLIMDUAL2USB3 Actual product may vary f...

Страница 2: ...Where they occur these references are for illustrative purposes only and do not represent an endorsement of a product or service by StarTech com or an endorsement of the product s to which this manua...

Страница 3: ...omhus Avertissements Assemblez ce produit conform ment aux instructions Ne d passez pas la capacit pond rale du produit Une surcharge du produit peut entra ner des blessures ou des dommages mat riels...

Страница 4: ...do no exterior Advertencias de uso Aseg rese de ensamblar este producto seg n las instrucciones Aseg rese de no exceder la capacidad de peso de este producto La sobrecarga de este producto puede causa...

Страница 5: ...is les c bles d alimentation et de chargement doivent tre plac s et achemin s de fa on viter tout risque lectrique de chute ou de s curit Misure di sicurezza I terminiali dei fili elettrici non devono...

Страница 6: ...View 6 Product Dimensions 7 Product Rotation 8 Product Information 9 Package Contents 9 Technical Specifications 13 Requirements 15 Assembling the Monitor Mount Using the C Clamp 15 Using the Grommet...

Страница 7: ...vers downloads technical drawings and more visit www startech com support Product Diagram Front View 1 VESA Mount x 2 5 3 0 USB Ports x 2 2 Upper Arm 6 Grommet Clamp 3 Lower Arm 7 Grab Handle 4 C Clam...

Страница 8: ...7 To view manuals videos drivers downloads technical drawings and more visit www startech com support Product Dimensions Actual product may vary from image...

Страница 9: ...8 To view manuals videos drivers downloads technical drawings and more visit www startech com support Product Rotation...

Страница 10: ...9 To view manuals videos drivers downloads technical drawings and more visit www startech com support Product Information Package Contents Base Qty 1 Lower Arm Qty 1 Upper Arm Qty 1 Crossbar Qty 1...

Страница 11: ...ls videos drivers downloads technical drawings and more visit www startech com support VESA Mounts Qty 2 Grab Handle Qty 1 Grommet Plate Qty 1 Base Plate Qty 1 Adhesive Foam Pad Qty 1 Base Cable Manag...

Страница 12: ...als videos drivers downloads technical drawings and more visit www startech com support Countersunk Hex Screws Qty 4 Flat Head Hex Screws Qty 2 3 mm Hex Key Qty 1 4 mm Hex Key Qty 1 6 mm Hex Key Qty 1...

Страница 13: ...ideos drivers downloads technical drawings and more visit www startech com support M4 x 12 mm Screws Qty 8 M5 x 12 mm Screws Qty 8 Upper C Clamp Qty 1 Lower C Clamp Qty 1 Button Head Hex Screws Qty 4...

Страница 14: ...manuals videos drivers downloads technical drawings and more visit www startech com support Technical Specifications VESA 75 x 75 100 x 100 LB kg Weight 17 6 lb 2 x 8 kg Screen Size Max 32 Rotation 18...

Страница 15: ...14 To view manuals videos drivers downloads technical drawings and more visit www startech com support Tilt 100 to 100 Swivel 100 to 100...

Страница 16: ...2 Optional USB 3 0 Cables x 2 Assembling the Monitor Mount Using the C Clamp 1 Align the Screw Holes x 4 on the top of the Upper C Clamp with the Screw Holes on the bottom of the Base Aligning the Upp...

Страница 17: ...stalling the Button Head Screws 3 Using the 4 mm Hex Key tighten the Countersunk Hex Screws being careful not to over tighten 4 Remove the backing from the Adhesive Foam Pad Removing the Adhesive Back...

Страница 18: ...ivers downloads technical drawings and more visit www startech com support Applying the Adhesive Foam Pad 6 Using the 4 mm Hex Key loosen the four Screws on the back of the Lower C Clamp Loosening the...

Страница 19: ...t the four Screws on the back of the Lower C Clamp through the large portion of the Screw Holes on the back of the Upper C Clamp Slide the Screws down into the small portion of the Screw Holes Attachi...

Страница 20: ...www startech com support Tightening the Screws 9 Depending on the thickness of the Mounting Surface position the Screws in either the top four Screw Holes on the C Clamp Assembly for a thickness range...

Страница 21: ...lamp Assembly with the edge of the Mounting Surface 11 Slide the C Clamp Assembly over the edge of the Mounting Surface 12 From underneath the Mounting Surface tighten the two Thumb Screws at the bott...

Страница 22: ...isit www startech com support Securing the C Clamp to the Mounting Surface 13 Run the two Cables one at a time coming out of the Base through the center of the Cable Management Clip on the Base Cable...

Страница 23: ...ables Through Base Cable Management Clip 15 Gently push the Base Cable Management Clip into the back of the C Clamp Assembly securing the Base Cable Management Clip in place Note Once you are finished...

Страница 24: ...the Mounting Peg on the Base 17 Insert the bottom of the Lower Arm onto the Mounting Peg Installing the Lower Arm onto the Base 18 Use the Flat Head Screwdriver End on the 3 mm Hex Key to tighten the...

Страница 25: ...re visit www startech com support Setting the Arm Rotation 19 When the Lower Arm is attached to the Base Align the Mounting Peg on the Upper Arm with the Mounting Hole on the Lower Arm 20 Insert the M...

Страница 26: ...deos drivers downloads technical drawings and more visit www startech com support Installing the Upper Arm onto the Lower Arm 21 Use the Flat Head Screwdriver End on the 3 mm Hex Key to tighten the Sc...

Страница 27: ...manuals videos drivers downloads technical drawings and more visit www startech com support Securing the Upper Arm 22 Align the Screw Holes on the Crossbar x 4 with the Screw Holes on the Mount on the...

Страница 28: ...www startech com support Aligning the Crossbar With the Upper Arm 23 Insert the Button Head Hex Screws through the Screw Holes on the Crossbar and into the Screw Holes on the Mount 24 Using the 4 mm...

Страница 29: ...artech com support Securing the Crossbar to the Mount 25 Align one of the Screw Holes on the Grab Handle with the top or bottom Screw Hole on the Crossbar The Grab Handle can be mounted at three diffe...

Страница 30: ...b Handle Mounting Heights 26 Insert a Flat Head Hex Screw through one of the two Screw Holes on the Grab Handle and into one of the two Screw Holes on the Crossbar The Flat Head Hex Screw location wil...

Страница 31: ...visit www startech com support 28 Using the 4 mm Hex Key tighten the two Flat Head Hex Screws being careful not to over tighten Installing the Grab Handle Using the Grommet Mount 1 Align the Screw Hol...

Страница 32: ...l drawings and more visit www startech com support Aligning the Base Plate with the Base 2 Insert the Countersunk Hex Screws through the Screw Holes on the Base Plate and into the Screw Holes on the b...

Страница 33: ...n the Countersunk Hex Screws being careful not to over tighten 4 Remove the backing from the Adhesive Foam Pad Removing the Adhesive Backing 5 Carefully apply the Adhesive Foam Pad to the bottom side...

Страница 34: ...rface 7 From underneath the Mounting Surface align the center hole on the Grommet Plate with the Grommet Hole on the Base Aligning the Grommet Plate 8 Insert the Grommet Screw through the Grommet Plat...

Страница 35: ...rs downloads technical drawings and more visit www startech com support Tightening the Grommet Screw 10 Align the bottom of the Lower Arm with the Mounting Peg on the Base 11 Insert the bottom of the...

Страница 36: ...www startech com support Installing the Lower Arm onto the Base 12 Use the Flat Head Screwdriver End on the 3 mm Hex Key to tighten the Screws on the Lower Arm Tighten only the bottom Screw to allow t...

Страница 37: ...re visit www startech com support Setting the Arm Rotation 13 When the Lower Arm is attached to the Base Align the Mounting Peg on the Upper Arm with the Mounting Hole on the Lower Arm 14 Insert the M...

Страница 38: ...deos drivers downloads technical drawings and more visit www startech com support Installing the Upper Arm onto the Lower Arm 15 Use the Flat Head Screwdriver End on the 3 mm Hex Key to tighten the Sc...

Страница 39: ...manuals videos drivers downloads technical drawings and more visit www startech com support Securing the Upper Arm 16 Align the Screw Holes on the Crossbar x 4 with the Screw Holes on the Mount on the...

Страница 40: ...www startech com support Aligning the Crossbar With the Upper Arm 17 Insert the Button Head Hex Screws through the Screw Holes on the Crossbar and into the Screw Holes on the Mount 18 Using the 4 mm...

Страница 41: ...artech com support Securing the Crossbar to the Mount 19 Align one of the Screw Holes on the Grab Handle with the top or bottom Screw Hole on the Crossbar The Grab Handle can be mounted at three diffe...

Страница 42: ...b Handle Mounting Heights 20 Insert a Flat Head Hex Screw through one of the two Screw Holes on the Grab Handle and into one of the two Screw Holes on the Crossbar The Flat Head Hex Screw Location wil...

Страница 43: ...de down on a flat clean surface 2 Optional Remove any Screws or Place Holders from the VESA Mounting Holes on the back of the Monitor Note Be careful not to remove any of the Screws holding the Monito...

Страница 44: ...M4 x 12 mm M5 x 12 mm or customer sourced screws 5 Insert the appropriate Screws through the Screw Holes on the VESA Mount and into the VESA Mounting Holes on the back of the Monitor 6 Using a Philli...

Страница 45: ...t Installing the VESA Mount 7 Repeat steps 1 6 to install the VESA Mount on the second Monitor Note It is recommended that two people mount the Moni tors onto the Crossbar 8 While supporting the weigh...

Страница 46: ...visit www startech com support Sliding the Monitor Over the VESA Holder 9 Slide the VESA Mount down overtop of the VESA Holder 10 While holding the Monitor in place use a Phillips Head Screwdriver to...

Страница 47: ...ech com support Tightening the VESA Mount 11 Repeat steps 8 10 to mount the second Monitor 12 Do not rotate the Monitors over the rear edge of the Mounting Surface as this will create a tipping hazard...

Страница 48: ...1 Using your hand push downward on the Upper Arm holding it in place 2 Using the 6 mm Hex Key rotate the Adjustment Screw located at the base of the Upper Arm clockwise decreasing tension or counter...

Страница 49: ...d more visit www startech com support Correct Upper Arm Position Adjusting the Rotation 1 Using the 4 mm Hex Key loosen the four Screws on the back of the VESA Mount 2 Adjust the rotation of the Cross...

Страница 50: ...support Adjusting the Tilt Making Micro Adjustments 1 While holding the Monitor in place use a Phillips Head Screwdriver to loosen the VESA Mount Adjustment Screw on the side of the VESA Mount 2 Using...

Страница 51: ...Monitor is in the desired position tighten the VESA Mount Adjustment Screw on the side of the VESA Mount Routing the Cables 1 Using a Phillips Head Screwdriver remove the Screw from the Cable Cover lo...

Страница 52: ...moving the Cable Covers 3 Route the Monitor Cables down the inside of the Upper Arm on either side of the Screw Holes on the Cable Cover 4 Replace the Screw removed in step 1 and hook the Retention Ho...

Страница 53: ...Cable Covers 6 Slide the Cable Cover down the inside of the Lower Arm to secure it Using the 3 0 USB Passthough Ports 1 Plug the two USB Cables on the back of the Base into USB Ports on the Host Compu...

Страница 54: ...damages whether direct or indirect special punitive incidental consequential or otherwise loss of profits loss of business or any pecuniary loss arising out of or related to the use of the product exc...

Страница 55: ...tools StarTech com is an ISO 9001 Registered manufacturer of connectivity and technology parts StarTech com was founded in 1985 and has operations in the United States Canada the United Kingdom and Ta...

Отзывы: