
Safety Measures
• Wiring terminations should not be made with the product and/or electric lines under power.
• Product installation and/or mounting should be completed by a certified professional.
Mesures de sécurité
• Les terminaisons de câblâge ne doivent pas être effectuées lorsque le produit et/ou les câbles
électriques sont sous tension.
• L’installation et/ou le montage du produit doit être réalisé par un professionnel certifié et
dans le respect des normes locales et du code de construction local.
安全対策
•
電源が入っている状態の製品または電線の終端処理を行わないでください。
•
製品の設置やマウントは、使用地域の安全ガイドラインおよび建築基準に従い、有資格の専門業者が行うようにしてください。
Misure di sicurezza
• I terminiali dei fili elettrici non devono essere realizzate con il prodotto e/o le linee elettriche
sotto tensione.
• L’installazione e/o il montaggio dei prodotti devono essere eseguiti da un tecnico
professionale certificato che conosca le linee guida locali sulle norme edilizie e sulla sicurezza.
Säkerhetsåtgärder
• Montering av kabelavslutningar får inte göras när produkten och/eller elledningarna är
strömförda.
• Installation och/eller montering får endast göras av behöriga yrkespersoner och enligt
gällande lokala förordningar för säkerhet och byggnormer.
FCC Compliance Statement
This equipment has been tested and found to comply with the limits for a Class B digital device,
pursuant to part 15 of the FCC Rules. These limits are designed to provide reasonable protection
against harmful interference in a residential installation. This equipment generates, uses and can
radiate radio frequency energy and, if not installed and used in accordance with the instructions,
may cause harmful interference to radio communications. However, there is no guarantee that
interference will not occur in a particular installation. If this equipment does cause harmful
interference to radio or television reception, which can be determined by turning the equipment
off and
on, the user is encouraged to try to correct the interference by one or more of the following
measures:
• Reorient or relocate the receiving antenna.
• Increase the separation between the equipment and receiver.
• Connect the equipment into an outlet on a circuit different from that to which the receiver is
connected.
• Consult the dealer or an experienced radio/TV technician for help
For manuals, FAQs, videos, drivers, downloads, technical drawings, and more, visit www.startech.com/support.
Quick Start Guide
This device complies with part 15 of the FCC Rules. Operation is subject to the following two
conditions:
(1) This device may not cause harmful interference, and (2) this device must accept any
interference received, including interference that may cause undesired operation. Changes or
modifications not expressly approved by StarTech.com could void the user’s authority to operate
the equipment.
For the State of California
WARNING:
Cancer and Reproductive Harm -
www.P65Warnings.ca.gov
Industry Canada Statement
This Class B digital apparatus complies with Canadian ICES-003.
Cet appareil numérique de la classe [B] est conforme à la norme NMB-003 du Canada.
CAN ICES-3 (B)/NMB-3(B)
This device complies with Industry Canada licence-exempt RSS standard(s). Operation is subject to
the following two conditions:
(1) This device may not cause interference, and (2) This device must accept any interference,
including interference that may cause undesired operation of the device.
Use of Trademarks, Registered Trademarks, and other Protected Names and Symbols
This manual may make reference to trademarks, registered trademarks, and other protected
names and/or symbols of third-party companies not related in any way to StarTech.com.
Where they occur these references are for illustrative purposes only and do not represent an
endorsement of a product or service by StarTech.com, or an endorsement of the product(s)
to which this manual applies by the third-party company in question. StarTech.com hereby
acknowledges that all trademarks, registered trademarks, service marks, and other protected
names and/or symbols contained in this manual and related documents are the property of their
respective holders.
Warranty Information
This product is backed by a two-year warranty. StarTech.com warrants its products against defects
in materials and workmanship for the periods noted, following the initial date of purchase. During
this period, the products may be returned for repair, or replacement with equivalent products at
our discretion. The warranty covers parts and labor costs only. StarTech.com does not warrant its
products from defects or damages arising from misuse, abuse, alteration, or normal wear and tear.
Limitation of Liability
In no event shall the liability of StarTech.com Ltd. and StarTech.com USA LLP (or their officers,
directors, employees or agents) for any damages (whether direct or indirect, special, punitive,
incidental, consequential, or otherwise), loss of profits, loss of business, or any pecuniary loss,
arising out of or related to the use of the product exceed the actual price paid for the product.
Some states do not allow the exclusion or limitation of incidental or consequential damages. If
such laws apply, the limitations or exclusions contained in this statement may not apply to you.
StarTech.com Ltd.
45 Artisans Cres.
London, Ontario
N5V 5E9
Canada
StarTech.com LLP
2500 Creekside Pkwy.
Lockbourne, Ohio
43137
U.S.A.
StarTech.com Ltd.
Unit B, Pinnacle 15
Gowerton Rd., Brackmills
Northampton
NN4 7BW
United Kingdom
FR: fr.startech.com
DE: de.startech.com
ES: es.startech.com
IT: it.startech.com
JP: jp.startech.com
NL: nl.startech.com
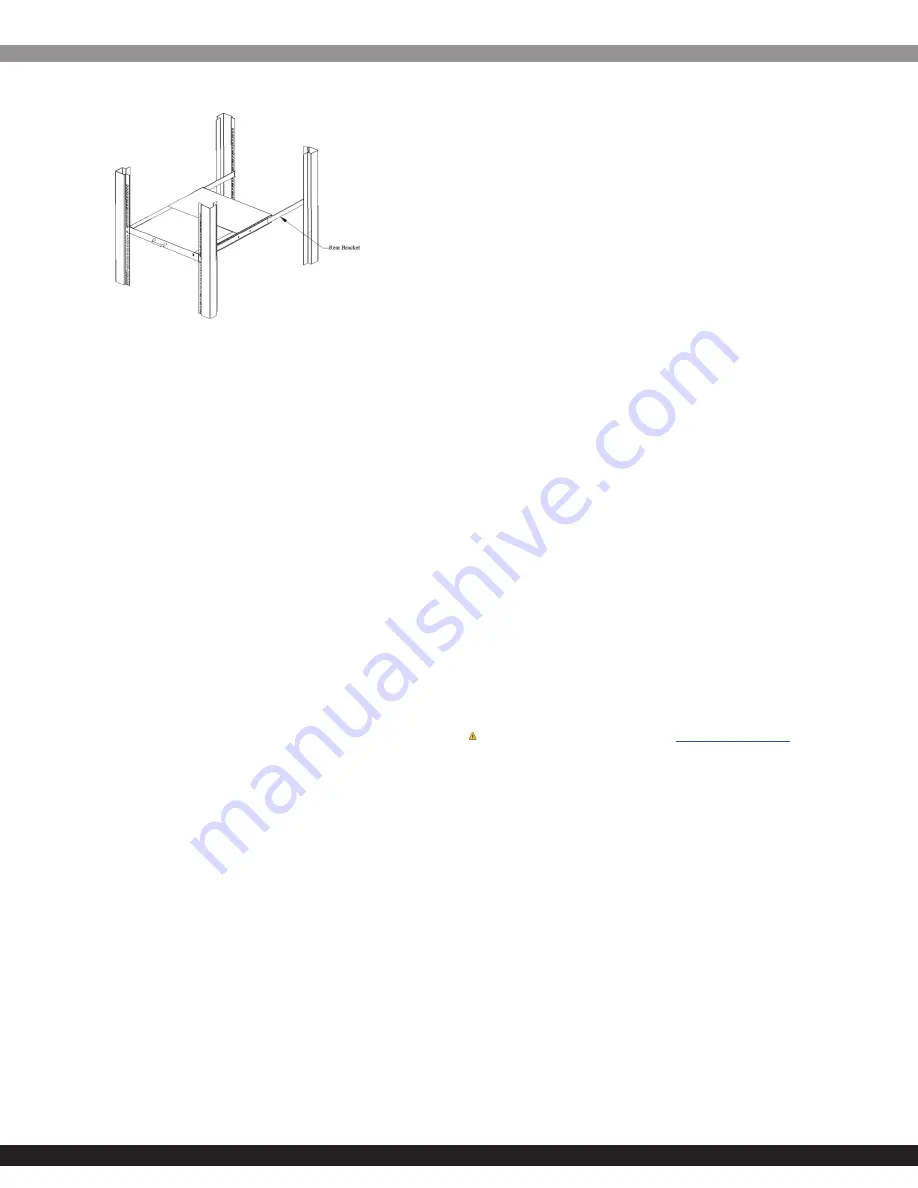
Installation Depth
Connect the Console
1. Connect a
Grounding Wire
to the
Ground Connection Screw
on the
LCD Rackmount Console
and to the earth-ground
connection.
2. Connect one of the
KVM Cables
to a
Computer
or
Server
and the other one to the
Host Ports
on the
LCD Rackmount
Console
. You can connect up to 8 computers or servers.
3. Connect the appropriate
Power Cord
for your region to the
Power Connection Port
on the
LCD Rackmount Console
and to
a
Power Source
.
4. Open the
LCD Rackmount Console
. For more information about
how to do this, see the “
Open the Console
” topic.
5. Use the
Power Switch
to turn on the
LCD Rackmount Console
.
Note:
The
LCD Rackmount Console
makes two beeping sounds
and the LED flashes three times when turned on.
6. Turn on the connected
Computers
or
Servers
.
7. On the
Login
screen on the
LCD Rackmount Console
, do one of
the following:
• If you’re using the console for the first time or you haven’t
set a username and password, leave the text fields blank and
press
Enter
.
• If you have set a username and password, enter the
information in the corresponding text fields and press
Enter
.
8. Connect an optional monitor, keyboard, or mouse, connect the
peripherals to the corresponding ports on the console.
9. To daisy chain additional KVM switches, connect the switches to
the
Daisy Chain Port
on the
LCD Rackmount Console
.
Important Considerations
• If you’re installing the
Console
in a closed or multi-unit rack
assembly, ensure that the environmental conditions are within
the unit’s maximum and minimum specifications.
• Consider your airflow requirement when selecting a location for
installation.
• The
Console
should be installed with a balanced mechanical
load.
• It’s recommended that the
Console
be connected to a power
source with overcurrent protection and supply wiring.
• The
Console
should be grounded appropriately.
Open the Console
1. Move the
Release Switch
to the unlocked position.
2. Use the
Handle
to pull the
LCD Rackmount Console
out
towards you until you hear the
LCD Rackmount Console
click
into place.
3. Pull the
Display
up and position it at the desired angle.
Select Ports
To quickly select a port, press the
Port Selection Button
that
corresponds to the port that you want to select.
Close the Console
1. Lower the
Display
until it’s flush against the
Keyboard
.
2. Slide the
Release Switches
on the
LCD Rackmount Console
forward and push the
LCD Rackmount Console
in towards the
rear of the rack.
3. Release the
Switches
and continue pushing the
LCD Rackmount
Console
the rest of the way into the rack.