Starbridge Networks Lynx 524 Скачать руководство пользователя страница 10

Wireless ADSL Router 


USER MANUAL 

3 Hardware Installation 

This chapter shows user how to connect Router. Meanwhile, it introduces the 

appropriate environment for the Router and installation instructions.   

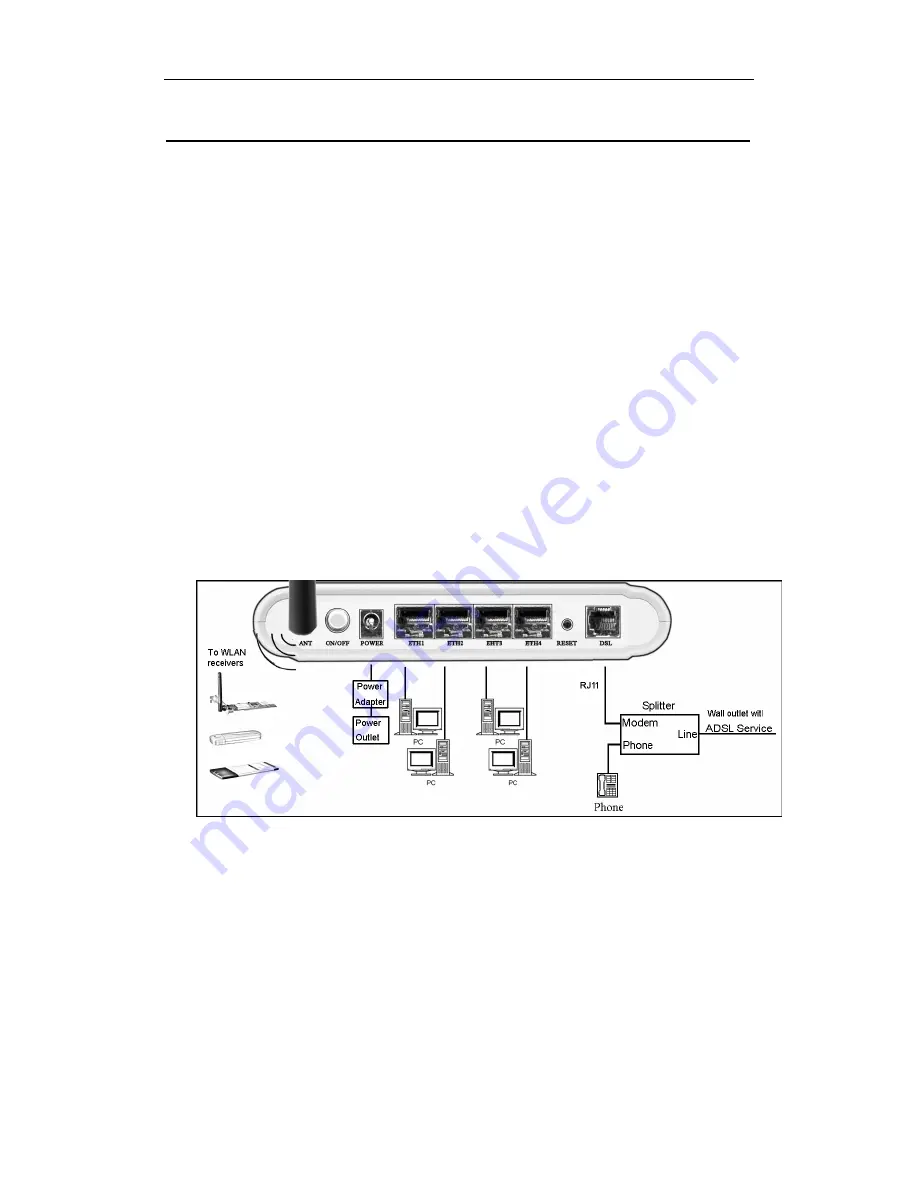
1.  Using a telephone line to connect the 

DSL 

port of ROUTER to the 

Modem 

port of the splitter, and using a other telephone line connect user’s 

telephone to the 

PHONE 

port of the splitter, then connect the wall phone 

jack to the 

LINE

 port of the splitter. 

The splitter comes with three connectors as below: 

LINE

: Connects to a wall phone jack (RJ-11 jack) 

ROUTER

: Connects to the DSL jack of ROUTER 

PHONE

: Connects to a telephone set 

2.  Using an Ethernet Cable to connect the LAN port of the ROUTER to user’s 

LAN or a PC with network card installed. Or using an USB cables to connect 

the USB port of the ROUTER to user’s PC. 


3.  Connect the power cable to the PWR connector on ROUTER, then plug in 

the AC power adapter to the AC power outlet, and then press the on-off   

button. 

Notes: Without the splitter and certain situation, transient noise from 

telephone can interfere with the operation of the Router, and the 

Router may introduce noise to the telephone line. To prevent this 

from happening, a small external splitter must be connected to 

each telephone.


Содержание Lynx 524

Страница 1: ...Starbridge Lynx 524 Wireless ADSL Router User Manual...

Страница 2: ...warrant that the hardware will work properly in all environments and applications and makes no warranty or representation either expressed or implied with respect to the quality performance merchanta...

Страница 3: ...HARDWARE DESCRIPTION 5 3 HARDWARE INSTALLATION 7 4 PC CONFIGURATION GUIDE 8 4 1 LOCAL PC CONFIGURATION IN WINDOWS 95 98 ME XP 8 4 2 LOCAL PC CONFIGURATION IN WINDOWS 2000 8 5 WEB BASED MANAGEMENT GUID...

Страница 4: ...liance z ITU G 992 1 G DMT z ITU G 992 2 G Lite z ITU G 992 3 G DMT BIS z ITU G 992 4 G lite bis z ITU G 992 5 z ITU G 994 1 G hs z Compatible with all T1 413 issue 2 full rate DMT over analog POTS an...

Страница 5: ...ec PPTP L2TP z Parent control 1 1 5 ATM Capabilities z RFC 1483 Multi protocol over ATM Bridged Ethernet compliant z RFC 2364 PPP over ATM compliant z RFC 2516 PPP over Ethernet compliant z ATM Forum...

Страница 6: ...age humidity 5 95 non condensing 1 2 Packet Contents The packet contents are as the following z ADSL ROUTER x 1 z External Splitter x 1 z Power Adapter x 1 z Telephone Line x 1 z Ethernet Cable x 1 z...

Страница 7: ...hock from lightening z Do not install telephone jacks in wet locations and never use the product near water z To prevent dangerous overloading of the power circuit be careful about the designed maximu...

Страница 8: ...tivity occurs Off No LAN link via LAN port WLAN Green On The wireless module is ready and idle Blinking Data transmitting or receiving over WLAN Off The wireless module is not installed DSL Green On A...

Страница 9: ...jack or splitter using a RJ 11 telephone cable RESET System reset or reset to factory defaults LAN Connect the device to user s PC s Ethernet port or to the uplink port on user s hub switch using a R...

Страница 10: ...o a wall phone jack RJ 11 jack ROUTER Connects to the DSL jack of ROUTER PHONE Connects to a telephone set 2 Using an Ethernet Cable to connect the LAN port of the ROUTER to user s LAN or a PC with ne...

Страница 11: ...please consult with user s ISP 7 Click OK twice to confirm and save user s changes 8 User will be prompted to restart Windows Click Yes 4 2 Local PC Configuration in Windows 2000 1 In the Windows tas...

Страница 12: ...er such as Internet Explorer and then use http 192 168 1 1 to log on to the setting pages After user log in to the modem the general status page appears 5 2 Internet Access Configuration The setup wiz...

Страница 13: ...er Ethernet PPPoE 1 Select PPP over Ethernet PPPoE as connection type and select LLC SNAP BRIDGING as encapsulation mode 2 Input PPP Username PPP Password and then click Next The user interface allows...

Страница 14: ...PPPoA and 1492 for PPPoE Do not change these values unless your ISP asks you to The gateway can be configured to disconnect if there is no activity for a specific period of time by selecting the Dial...

Страница 15: ...gateway becomes the default gateway and DNS server to the computer through DHCP using the LAN interface IP address The gateway extends the IP subnet at the remote service provider to the LAN computer...

Страница 16: ...ter Do not disable the DHCP server unless you wish to let another device handle IP address issuance on the local network Start end IP address This is the beginning and ending range for the DHCP server...

Страница 17: ...ork if user enabled the wireless function 6 Make sure that the settings below match the settings provided by your ISP 7 Click on the Save Reboot button to save your configurations b PPP over ATM PPPoA...

Страница 18: ...ers in the user name and a maximum of 32 characters in the password Please remember to enable NAT and Firewall as below Authentication method is default to Autoc It is recommended that you leave the A...

Страница 19: ...d by the remote using the PPP IPCP protocol is actually not used on the WAN PPP interface Instead it is forwarded to the computer s LAN interface through DHCP Only one system on the LAN can be connect...

Страница 20: ...use to connect to the modem Subnet mask This defines the size of your network The default is 255 255 255 0 Disable Enable DHCP server The DHCP server assigns an IP addresses from a pre set pool of add...

Страница 21: ...he LAN clients are accessible from the public network e g FTP or HTTP servers 5 Set SSID for wireless network if user enabled the wireless 6 Make sure that the settings below match the settings provid...

Страница 22: ...dge service and enter a bridge service name Click Next Configure the DSL Router IP Address and Subnet Mask for your Local Area Network LAN 4 Set SSID for wireless network if user enabled the wireless...

Страница 23: ...factory default settings 5 3 Wireless setting 5 3 1 Basic Enable Wireless Click this check box to enable the wireless network function Hide Access Point Checking this box can hide the SSID of this ac...

Страница 24: ...SID with the router or access point Country For product available in the USA Canada market only channel 1 11 can be operated Selection of other channels is not possible 5 3 2 Security To configure sec...

Страница 25: ...optionally enable WEP encryption with this option Because it requires a separate machine acting as the authentication server 802 1x is most often used in business environments WPA WPA is a more recen...

Страница 26: ...Wireless ADSL Router USER MANUAL 23 WPA2 AND WPA PSK this has WPA2 or WPA encryption based on client abilities as well as a pre shared key After making changes click Apply to save...

Страница 27: ...o connect PC If connect normal port of hub not UpLink port user must use cross cable Please make sure that user s network cables meet the networking requirements above Q PC cannot access the Router A...

Страница 28: ...connected properly from the DSL port to the wall jack The DSL LED on the front panel of the ADSL router should be on Check that user s VPI VCI type of encapsulation and type of multiplexing setting ar...

Страница 29: ...mits set forth for an uncontrolled environment This device and its antenna must not be co located or operating in conjunction with any other antenna or transmitter To comply with FCC RF exposure compl...

Отзывы: