background image

Page 37 of 40

Connecting to the PC

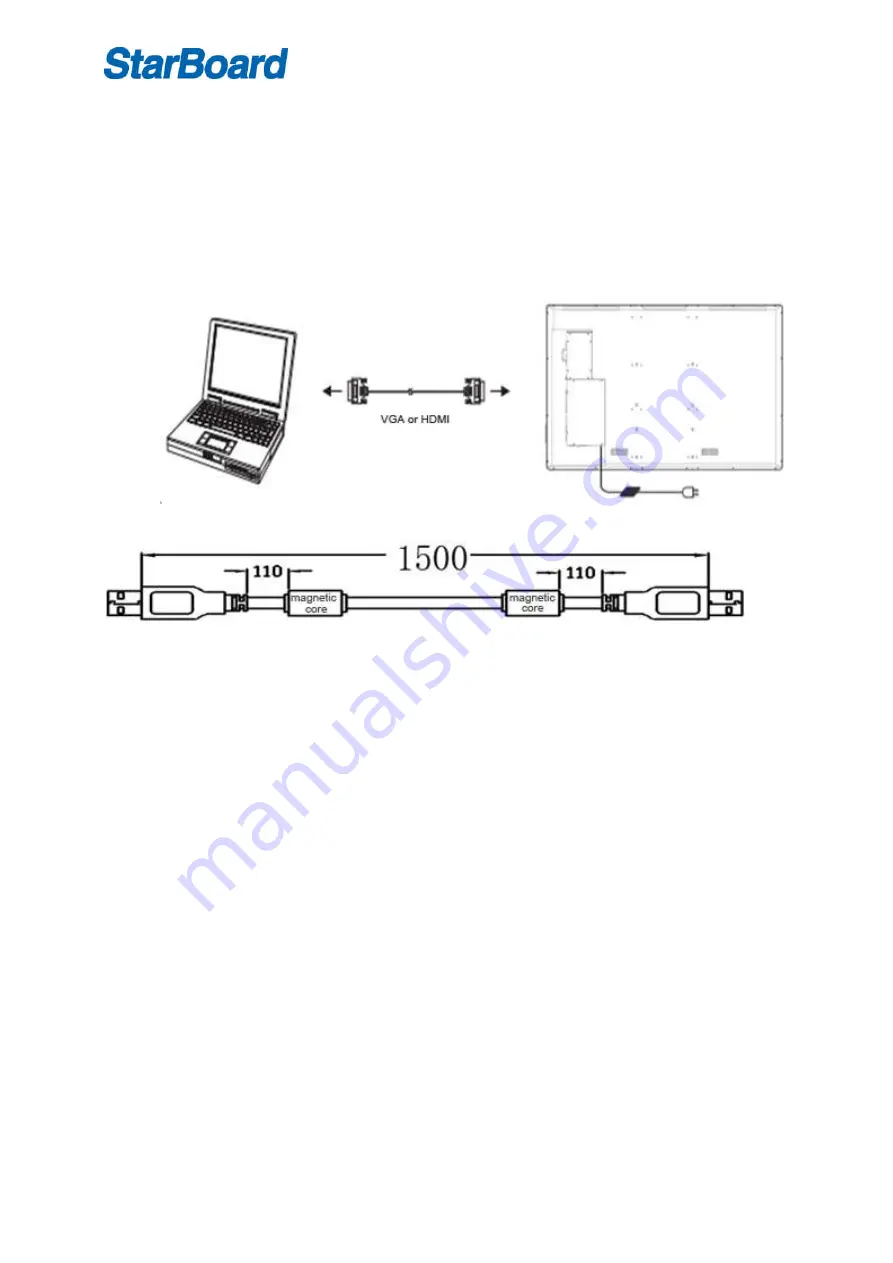
Connecting to a PC

Leave the StarBoard iFPD unit powered off

Using the VGA cable connect the StarBoard iFPD unit VGA port with that of the PC

Connect USB cable to the PC and to the the StarBoard iFPD unit.


Power up the StarBoard iFPD unit and use the remote control unit (RCU) to select input source (VGA Source)

Use cables supplied together with this StarBoard iFPD unit.

The StarBoard iFPD unit has a driver-less touch frame.
Connect the USB cable to
Once the USB cable is connected, the unit is touch-ready.
Allow a few seconds for the StarBoard iFPD to register the connected PC.

Maintenance of touch frame

The IR technology is sensitive to excessive dust

Keep the screen surface free from dust

Clean with a soft dry cloth

Trouble Shooting

No Signal

Possible Causes: Connecting ports damage, VGA or HDMI line failure, Source input selection error, VGA or HDMI line not fixed
connected
Corrective actions: Re-connect VGA or HDMI line and check if it is fixed firmly
Select the right input source

No Audio

Possible causes

audio line not connected, check audio output from PC (eg volume, mute etc)

Corrective actions

Ensure audio cable is connected if using VGA, check volume and mute output in PC

Touch frame issues

Off calibration.
Corrective action

Re-do the calibration, using Windows or IR frame calibration software included with the StarBoard iFPD

unit, Check display resolution of your PC

Touch point drift

Содержание iFPD Series

Страница 1: ...tice The actual product may differ Before using our product please read this manual carefully and keep for future reference if required This manual should not be copied fully or partially in any kind...

Страница 2: ...s device If you have further queries please do not hesitate to contact our support team StarBoard is dedicated to developing and improving the performance and reliability of our products We have desig...

Страница 3: ...r cord tangle free 11 Use a properly functioning power point at all times 12 Disconnect the power plug during storm or if you intend not to use for a long period of time 13 The device is a heavy produ...

Страница 4: ...tion 19 RCU Remote Control Unit 21 Menu Operation 23 Source selection 23 Picture 23 Picture Mode 24 Color Temperature 24 Aspect Ratio 25 Noise Reduction 25 Screen Only works under the PC mode 26 Sound...

Страница 5: ...Page 5 of 40 Document 35 Connecting to the PC 37 Product Warranty Policy 39...

Страница 6: ...eating the interactive Flat Panel iFPD This combination provides the user the ability to interact with an flat panel using a finger or any solid object Main functions Acute touch The StarBoard iFPD is...

Страница 7: ...1024x768 1280x720 1280 x 960 1280 x 1024 1360 x 768 1440 x 900 1600 x 1200 1920 x 1080 3480 x 2160 Responding time 17ms 17ms 17ms 19ms 19ms 19ms 20ms Power Consumption Standby 1W 1W 1W 1W 1W 1W 1W Rat...

Страница 8: ...1145 1285 1455 200 200 200 200 200 210 307 Gross Weight KG 67 2KG 83 2KG 77 2KG 108 2KG 104 2kg 108 2KG net weight weight of flight case Gross Weight LBS 151 8 187 173 8 200 2 180 4 200 2 Net Weight...

Страница 9: ...r any non transparent object Positioning technology IR technology Positioning accuracy 3mm Positioning resolution 4096 4096 16384 16384 32768 32768 Writing response time 8ms Cursor speed 180 dot sec C...

Страница 10: ...Page 10 of 40 55 Technical Drawing...

Страница 11: ...Page 11 of 40 65 Technical Drawing...

Страница 12: ...Page 12 of 40 70 Technical Drawing...

Страница 13: ...Page 13 of 40 75 Technical Drawing...

Страница 14: ...Page 14 of 40 80 Technical Drawing...

Страница 15: ...Page 15 of 40 84 Technical Drawing...

Страница 16: ...Page 16 of 40 98 Technical Drawing...

Страница 17: ...d iFPD A Multimedia USB B Extension USB from OPS C Turn On Off D Source Input E Menu F Volume G Volume H Menu item I Menu item J OPS Switch Remark Front Panel Picture for reference only may differ fro...

Страница 18: ...Page 18 of 40 Rear View StarBoard iFPD Remark Reference only 1 USB 8 VGA OUT 2 TOUCH PORT 9 AUDIO OUT 3 AV IN 10 VGA IN2 4 YPbPr IN 11 AUDIO IN2 5 RS232 12 VGA IN1 6 HDMI1 13 AUDIO IN1 7 HDMI2...

Страница 19: ...Remark For reference only Video Input Connect VGA cable with StarBoard iFPD and chose the source Audio Input When using VGA input an audio cable is needed to connect PC and StarBoard iFPD Touch Input...

Страница 20: ...Writing Pen 2 pieces with different color 1 5 Accessory Box 1 6 Back LOGO 1 7 Mark of High Voltage Warning 1 8 CD for Touch frame 1 9 User Manual 1 10 Wall Mount Brackets 1 11 Wall Mount Screws 4 12 P...

Страница 21: ...L Press to increase decrease volume P MODE Press to cycle through the available picture modes Standard Dynamic Movie and User A MODE Press to cycle through the different Press to select favorite chann...

Страница 22: ...to the last channel viewed List Brings out the LIST pattern Will return to the Home page when exit from LIST allowing browsing USB Function Fast back Fast front Play or pause Previous Next Stop REC N...

Страница 23: ...te 4KX2K only available for panel support 4KX2K Picture 1 Press to enter the Picture menu 2 Press to up and down 3 Press OK to modify the value of the options 4 Press OK to enter sub menu 5 Press menu...

Страница 24: ...modify the value of the options 3 Press menu to get back last menu 4 Press exit to exit menu Note Tint 50 function is not available for TE SN 65 Color Temperature Enter Color Temperature menu with th...

Страница 25: ...hange the options 1 Press to up and down 2 Press OK to ensure the mode we select 3 Press menu to get back last menu 4 Press exit to exit menu Noise Reduction Enter the sub menu of Noise Reduction with...

Страница 26: ...accuracy of the auto adjust 4 Press menu to get back last menu 5 Press exit to exit menu Note Enter the Backlight menu with the options of Backlight with value 60 Press to modify the value of the opti...

Страница 27: ...2 Press to modify the value of the options 3 Press menu to get back last menu 4 Press exit to exit menu Surround Sound Enter the sub menu of Surround Sound with the options of Off and Surround Press...

Страница 28: ...e options 3 Press menu to get back last menu 4 Press exit to exit menu Time Enter the Time menu with the options of Clock Off Time On Time Sleep Timer Auto Sleep Press to change the options 1 Press to...

Страница 29: ...ss menu to get back last menu 4 Press exit to exit menu Off Time Enter the sub menu of Off Time with the options of Hour and Minute The Mode of the Off Time have one time everyday Monday to Sunday Mon...

Страница 30: ...to change the options 1 Press to up and down 2 Press to modify the value of the options 3 Press menu to get back last menu 4 Press exit to exit menu Sleep Timer Enter the sub menu of Sleep Timer with...

Страница 31: ...to up and down 3 Press OK to enter sub menu 4 Press to modify the value of the options 5 Press menu to get back last menu 6 Press exit to exit menu Language Menu Enter the sub menu of Language with t...

Страница 32: ...four options 15Sec 10Sec 5Sec Off Enter the 120HZ menu there are five options Off High Middle Low PASS Multi media Enter the multimedia source with options of pictures music movies document recognitio...

Страница 33: ...key selection content 4 press OK key enter relevant content 5 Press exit to return to main menu Page 1 Page 2 Music enter the music option press key Choose picture to play Press the OK button to choo...

Страница 34: ...tton to choose the play or cancel press the play button to play Relevant operation according to the remote shortcut keys press info to enter the menu 1 Press to exit this menu 2 press key selection co...

Страница 35: ...to choose the play or cancel press the play button to play Relevant operation according to the remote shortcut keys 1 Press info to enter the menu 2 Press to exit this menu 3 press key selection conte...

Страница 36: ...MPEG 2 rm rmvb Rv30 Rv40 Max Solution 1920 1080 Max Data Rate 40 Mbps Music mp3 MP3 Sample Rate 8K 48KHz Bit Rate 32K 320Kbps Channel Mono Stereo wma WMA m4a aac AAC Sample Rate 16K 48KHz Bit Rate 32...

Страница 37: ...enance of touch frame The IR technology is sensitive to excessive dust Keep the screen surface free from dust Clean with a soft dry cloth Trouble Shooting No Signal Possible Causes Connecting ports da...

Страница 38: ...Check if you have turned the power button on rendering the unit on standby Check brightness and contrast setting Check volume Check the Source selection is appropriate Picture but no audio Check volu...

Страница 39: ...purchasers It does not apply to a third party to whom the customer resold this product 5 In the event of a malfunction or damage resulting from the customer s improper handling e g a fall impact etc...

Страница 40: ...d provisions define this warranty and they supersede those of all express or implied warranties that include legal defect liability 10 No warranty if customer fixed the product in a method other than...

Отзывы: