background image

15 


Charging the Battery group


In order to guarantee battery life, please use the recommended charger to charge the cart. 

 Keep the key switch on OFF position during charging. 

Keep the battery in cool, dry location. Don’t use the charger in rain or hot weather.  

Don’t overcharge the battery, or it the electrolyte will expel from the battery which can damage the 
vehicle and the storage performance of the battery.  

Ensure that the AC power is consistent with the input power. After connected,  the green light 
indicates the vehicle is charging. The red light indicates that charging is complete. At this time the 
power will be cut off automatically to avoid overcharging. 

Charging should be monitored. 

NOTE:

  Don’t remove the plug connected to the vehicle prior to disconnecting from the AC 

power source. 


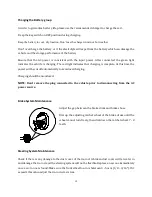
Brake System Maintenance 

Adjust the gap between the brake drum and brake shoes. 

Dial up the adjusting ratchet wheel of the brake drum until the 
wheel cannot turn freely, then dial down the ratchet wheel 7 - 8 
teeth. 


Steering System Maintenance


Check if there is any damage to the dust cover of the tie-rod. A broken dust cover will let water in 
and damage the tie-rod, and the steering system will not be flexible. Replace a new one immediately 
once a worn one is found. Make sure the front wheel toe-in is between 3 - 5 mm (1/8 – 3/16”). If it 
exceeds this value, adjust the tie-rod screw stem. 

Содержание ACcel-2-AC

Страница 1: ...Owner s Manual and Service Guide ACcel 2 DC and ACcel 2 AC May 2014...

Страница 2: ...parking pedal at the same time or it will damage the controller system and motor Release the parking pedal before starting the vehicle or it will damage the brake system as well as other parts Don t...

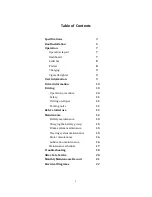
Страница 3: ...iving 10 Operation procedure 10 Safety 11 Driving on slopes 11 Parking notes 11 Before initial use 12 Maintenance 12 Battery maintenance 13 Charging the battery group 15 Brake system maintenance 15 St...

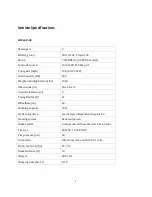
Страница 4: ...1360 Dimensions in 96 x 48 x 73 Ground clearance in 5 Turing Radius ft 11 Wheelbase in 66 Climbing capacity 30 Front suspension A arm style independent suspension Steering system Rack and pinion Brak...

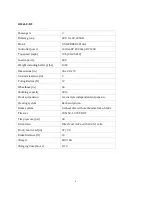
Страница 5: ...in 96 x 48 x 73 Ground clearance in 5 Turing Radius ft 12 Wheelbase in 65 Climbing capacity 30 Front suspension A arm style independent suspension Steering system Rack and pinion Brake system 4 wheel...

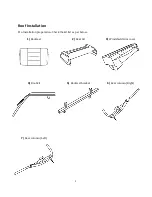
Страница 6: ...5 Roof Installation Pre Installation preparation Check the kit list as per below 1 Backrest 2 Rear lid 3 Windshield trim cover 4 Roof kit 5 Backrest bracket 6 Rear column Right 7 Rear column Left...

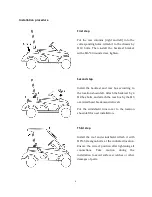
Страница 7: ...the location shown left Attach the backrest by 4 M8 hex bolts and attach the rear box by the M5 oversized head break mandrel rivets Put the windshield trim cover to the location shown left for next in...

Страница 8: ...4 Steering wheel 5 Glove Box 6 Cigarette lighter 7 High Low speed switch 8 Light switch 9 Accelerator pedal 10 Brake pedal 11 Parking brake pedal 12 F R Switch Dashboard 1 High Beam 2 Left turn signa...

Страница 9: ...WARNING Strictly prohibit shifting forward and backward directly when the system is running or it will damage the transmission system Combination switch Turn the bar on the end of combination switch t...

Страница 10: ...and plug the other terminal into main power when recharging the batteries Cigarette lighter The ignition power is DC12V User Information Read the specification of vehicles and use vehicles according...

Страница 11: ...ny accidents occur The driver should not modify add or remove any parts of the vehicle Do not add or install any additional handlebar on steering wheel if they are not original design The driver shoul...

Страница 12: ...serve and obey all traffic regulations including the carry capacity requirement authorized speed limits and other marks Keep a clear view of the path of travel Observe other traffic and pedestrians an...

Страница 13: ...he battery 4 Check if tire inflation is correct Low pressure will lead to difficulty turning and bumpy riding 5 Check if there is any damage between the wiring and other locations where pieces rub aga...

Страница 14: ...attery plate If is too low please add the recommended distilled water or liquid Keep the wiring well connected After using the vehicle initially for 2 3 days the completed inspection for all connector...

Страница 15: ...with a corrosion resistant paint The batteries should be placed into the battery racks and the battery hold downs tightened to 45 55 in lbs 5 6 Nm torque to prevent movement but not tight enough to ca...

Страница 16: ...At this time the power will be cut off automatically to avoid overcharging Charging should be monitored NOTE Don t remove the plug connected to the vehicle prior to disconnecting from the AC power sou...

Страница 17: ...the oil is low The gear oil should be changed once a year User can choose gear oil according to the climate Summer GL 4 90 Winter GL 80W 90 Replace the grease for the rear axle once a year using recom...

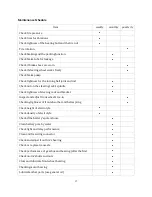
Страница 18: ...g rack s spindle Check tightness of steering rack and bracket Inspect and adjust front wheel s toe in Checking tightness of front absorber and helix spring Check height of electrolyte Check density of...

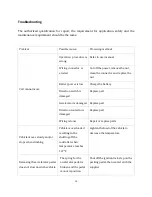
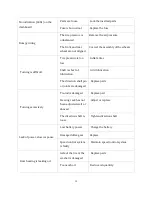
Страница 19: ...ry Direction switch is damaged Replace part Accelerator is damaged Replace part Direction contactor is damaged Replace part Wiring is loose Repair or replace parts Vehicle moves slowly and or stops wh...

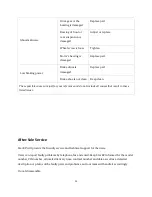
Страница 20: ...of lubrication Add lubrication The direction shaft pin or joints are damaged Replace parts Turning excessively Tie rod is damaged Replace part Steering rack has not been adjusted well or abased Adjus...

Страница 21: ...ible causes are just for your reference and do not include all causes that result in these listed issues After Sale Service Star EV will provide the friendly service and technical support for the user...

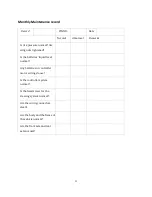
Страница 22: ...g nuts tightened Is the batteries liquid level normal Any batteries or controller motor wirings loose Is the controller system normal Is the fixed screw for the steering system normal Are the wiring c...

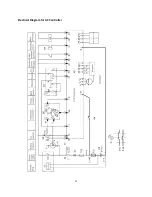
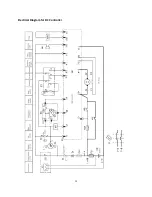
Страница 23: ...22 Electrical Diagram for AC Controller...

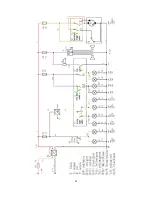
Страница 24: ...23 Electrical Diagram for DC Controller...

Страница 25: ...24...

Отзывы: