background image

– 14 –

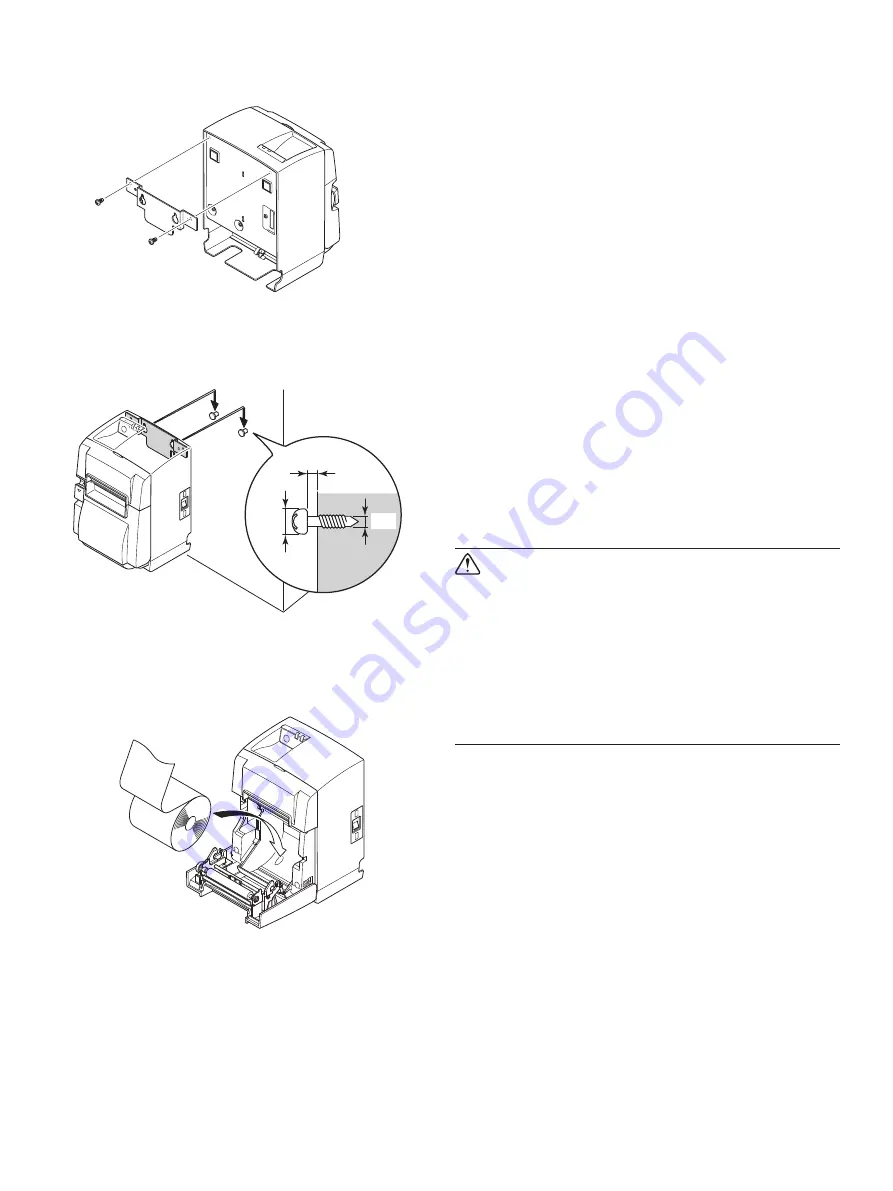
(1)  Attach the holding plate to the printer. 

Then tighten the two screws that were 

supplied to secure it in place.

(2)  Position the printer over the screws, etc., 

on the wall and then slide it downward to 

set it in place.


After setting the printer in place, check 

the screws on the wall again to make sure 

that they are able to support the printer’s 

weight.

CAUTION

•   The  printer’s  weight  is  approximately 

2.4  kg when the largest diameter roll pa-

per is loaded.

•   Use  screws  on  the  wall  that  have  both 

shear strength and pulling-out strength 

to withstand a force of at least 12 kgf 

(118  N).

(3)  Push the cover open lever, and open the 

printer cover.

(4)  Insert the roll paper as shown.

ø4

2 to 3 mm

ø7 or 

more

Содержание TSP100LAN

Страница 1: ...TSP100LAN Hardware Manual ...

Страница 2: ...FCC Rules These limits are designed to provide reasonable protection against harmful interference when the equipment is operated in a commercial environment This equipment generates uses and can radiate radio frequency energy and if not installed and used in accordance with the instruction manual may cause harmful interference to radio communications Operation of this equipment in a residential ar...

Страница 3: ...3 Switch Cover Installation 16 5 Thermal Roll Paper Specification 17 5 1 Roll paper specification 17 5 2 Recommended paper 17 6 Control Panel and Other Functions 18 6 1 Control Panel 18 6 2 Errors 18 6 3 Self Printing 20 7 Preventing and Clearing Paper Jams 21 7 1 Preventing Paper Jams 21 7 2 Removing Paper Jam 21 7 3 Releasing a Locked Cutter Auto Cutter Mode only 22 8 Periodical Cleaning 24 8 1 ...

Страница 4: ...tact the dealer where you bought the printer and ask them to supply the missing part Note that it is a good idea to keep the original box and all the packing mate rials just in case you need to pack the printer up again and send it somewhere at a later date Printer Paper roll holder Holder plate Switch cover LAN cable Power cord Rubber feet Installation sheet Roll paper Screws CD ROM ...

Страница 5: ...rounding area is clean dry and free of dust Make sure that the printer is connected to a reliable power outlet It should not be on the same electric circuit as copiers refrigerators or other appliances that cause power spikes Make sure that the room where you are using the printer is not too humid This device employs a DC motor and switches that have an electrical contact point Avoid using the dev...

Страница 6: ...tatus and switches to oper ate the printer Power switch Used to turn on off power to the printer Power connector For connection of the power cord Peripheral drive connector Connects to peripheral units such as cash draw ers etc Do not connect this to a telephone Ethernet connector For connection to a host computer using a Ethernet cable Printer cover Open this cover to load or replace paper ...

Страница 7: ... 4 3 Setup 3 1 Connecting the Ethernet Cable to the Printer 1 Make sure the printer is turned off 2 Connect the ethernet cable to the connector on the rear panel of the printer ...

Страница 8: ...o it is up to you to obtain one that suits your needs CAUTION Make sure that the printer is turned off and unplugged from the AC outlet and that the computer is turned off before making connections 1 Connect the peripheral drive cable to the connector on the rear panel of the printer CAUTION Do not connect a telephone line into the peripheral drive connector Failure to observe this may result in d...

Страница 9: ...n both sides of the printer cover to close Note Make sure that the printer cover is securely closed 4 Tear Bar Model Tear off the paper as shown Auto Cutter Model If the printer cover is closed after turning on the power the cutter operates automatically and the front end of the paper is cut 3 3 Loading the Paper Roll 3 3 1 Using 79 5 mm Width Paper Roll Be sure to use roll paper that matches the ...

Страница 10: ...Width refer to the software manual located in the Documents folders on the CD ROM 1 Insert the paper guide along the groove in the unit as shown 2 Insert the paper guide by pushing the area marked A down until it clicks into place Note After using a paper roll with a width of 57 5 mm do not change to a paper roll with a width of 79 5 mm This is because the printer head has deteriorated as a result...

Страница 11: ...burned Caution Symbol These labels are located near the thermal print head Because the thermal print head is hot immediately after printing do not touch it Static electricity can damage the thermal print head To protect the thermal print head from static electricity do not touch it This symbol is placed near the cutter Never touch the cutter blade as you could injure your fingers This symbol is pl...

Страница 12: ... sandpaper etc 5 Printing quality may suffer if the thermal head heating element becomes soiled by being touched with your hands Do not touch the thermal head heating element 6 There is a risk of damage to the driver IC of the thermal head from static electricity Never directly touch the IC 7 The printing quality and working life of the thermal head cannot be guaranteed if any paper other than tha...

Страница 13: ... 10 3 4 Connecting the Ethernet Cable to the PC Connect the ethernet cable to a Ethernet port of your router or hub or switch ...

Страница 14: ...the back or bottom of the printer to make sure its voltage matches that of the AC outlet Also make sure the plug on the power cord matches the AC outlet 2 If the power cord is not attached to the printer plug the appropriate end into the AC inlet on the back of the printer 3 Plug the power cord into a properly grounded AC outlet CAUTION If the voltage shown on the label on the bottom of your print...

Страница 15: ...e recommend that you unplug the printer from the power outlet whenever you do not plan to use it for long periods Because of this you should locate the printer so that the power outlet it is plugged into is nearby and easy to access When an Switch cover is affixed to the printer above the power switch the ON OFF marks of the power switch may be hidden If this occurs remove the power cord from the ...

Страница 16: ...8 N Precautions regarding installation CAUTION This caution indicates information that if ignored could lead to personal injury or property damage Be sure to have qualified personnel install the specified screws and printer to the wall Star is not responsible for any accidents or injuries that occur as a result of improper installa tion misuse or modifications Especially when installing the printe...

Страница 17: ...in place check the screws on the wall again to make sure that they are able to support the printer s weight CAUTION The printer s weight is approximately 2 4 kg when the largest diameter roll pa per is loaded Use screws on the wall that have both shear strength and pulling out strength to withstand a force of at least 12 kgf 118 N 3 Push the cover open lever and open the printer cover 4 Insert the...

Страница 18: ...tach the four rubber feet in the posi tions shown in the figure Ensure that any soiling has been com pletely wiped off before attaching the rubber feet 2 Push the cover open lever and open the printer cover 3 Insert the roll paper as shown ...

Страница 19: ... people can not easily operate the power switch Install the switch cover as shown in the diagram below The power switch can be turned ON and OFF O by inserting a narrow instrument ball pen etc in the holes in the switch cover CAUTION We recommend that you unplug the printer from the power outlet whenever you do not plan to use it for long periods Because of this you should locate the printer so th...

Страница 20: ... may not be able to scan a printed bar code or characters depending on the print density Make sure that your reader or scanner is able to scan correctly beforehand Manufacturer Product name Quality characteristics Use Paper thickness µm Mitsubishi Paper Mills Limited P220AG normal type paper 65 thickness HP220A high image stability paper 65 thickness HP220AB 1 high image stability paper 75 thickne...

Страница 21: ...tically recovered after the printer cover is closed 2 Non recoverable errors Error Description READY Lamp ERROR Lamp Recovery Conditions Head thermistor error Flashes at 0 5 second intervals Flashes at 0 5 second intervals Non recoverable Board thermistor error Flashes at 2 second intervals Flashes at 2 second intervals Non recoverable VM voltage error Off Flashes at 1 second intervals Non recover...

Страница 22: ...0 5 second intervals Automatically recovered by loading a new paper roll then closing the printer cover 5 Network errors Error Description READY Lamp ERROR Lamp Status Recovery Conditions Network Connection Normal On TCP IP Communications Possible Network Not Connected Physically Disconnected Two flashes at 0 125 second intervals repeated every two seconds Physically disconnected The Ethernet link...

Страница 23: ...ED button depressed Test printing is performed The version number the switch settings and the network informations are printed After the printer starts printing release your hand from the FEED button After self printing is com pleted the printer will start in the normal mode ...

Страница 24: ...t try to close it by pressing down on the centre The cover may not lock properly 5 Set the power switch to on to turn on power to the printer Make sure that the ERROR LED is not lit Note While the ERROR LED is lit the printer will not accept any commands such as the print command so make sure that the printer cover is locked properly Caution Symbol These labels are located near the thermal print h...

Страница 25: ...g the printer does not release the locked cutter follow the steps below WARNING Since working on the cutter may be dangerous be sure to turn off the printer first 1 Set the power switch to OFF to turn off the printer 2 Remove the front cover to reveal the auto cutter 3 Remove any jammed paper Note Be careful not to damage the printer while removing any jammed paper Since the thermal print head is ...

Страница 26: ...le on the side of the cutter and turn it in the direction of the arrow shown on the right until the rear cover is opened 5 Open the printer cover remove any jammed paper and then reinstall the paper roll 6 Install the front cover and then set the power switch to ON ...

Страница 27: ...cohol ethanol methanol or isopropyl alco hol Note 1 The thermal head is easily damaged so clean it with a soft cloth taking care not to scratch it Note 2 Do not attempt to clean the thermal head immediately after printing when the thermal head is hot Note 3 Beware of the risk of damaging the thermal head as a result of static electricity that may be created during cleaning Note 4 Turn the power ON...

Страница 28: ...it to a telephone Use cables which meet the following specifications Peripheral Drive Connector 1 6 Modular plug MOLEX 90075 0007 AMP641337 or BURNDY B 66 4 Wire lead Shield Drive circuit The recommended drive unit is shown below 6 1 6 P Modular jack connector 7824 F G TR1 M GND TR2 M GND TR3 5 V 24 V R1 R2 6 5 4 3 2 1 L1 L2 Frame ground Printer side User side D1 D2 Peripheral unit 1 With shield P...

Страница 29: ...simultaneously 3 The peripheral drive duty must satisfy the following ON time ON time OFF time 0 2 4 Minimum resistance for coils L1 and L2 is 24 Ω 5 Absolute maximum ratings for diodes D1 and D2 Ta 25 C are Average Rectified Current Io 1 A 6 Absolute maximum rating for transistors TR1 and TR2 Ta 25 C are Collector current Ic 2 A ...

Страница 30: ...when the paper roll holder is used Roll diameter ø83 mm or less 6 Overall dimension 142 W 204 D 132 H mm 7 Weight Auto cutter model 1 74 kg without roll paper Tear bar model 1 58 kg without roll paper 8 Noise Approx 49 dB Auto cutter model 48 dB Tear bar model Note The noise measurements listed above were obtained ac cording to conditions established by this company The noise measurements may vary...

Страница 31: ...TX 3 Communication Speed 10 100 Mbps 4 Protocol TCP IP v4 5 TCP IP detail ARP IP ICMP TCP UDP DHCP BOOTP 9100 SDP TELNET 6 Connector RJ 45 8 pin modular Pin No Signal name Function 1 TX Transmit Data 2 TX Transmit Data 3 RX Receive Data 4 5 6 RX Receive Data 7 8 7 LED Display Green Lights when other party connection is recognized as 100BASE TX Red Lights when packets are received 1 8 LED 10 2 Auto...

Страница 32: ...ment range Relati ve humidity Operating temperature and humidity range 30 40 50 10 5 Environmental Requirements 1 Operating Temperature 5 C to 45 C Humidity 10 to 90 RH without condensation 2 Transport storage except for paper Temperature 20 C to 60 C Humidity 10 to 90 RH without condensation ...

Страница 33: ... million lines The Mean Cycle Between Failure MCBF is defined to be the overall failure cycle which includes random or wear failures that occur until the printer reaches its mechanical life of 20 million lines As the mechanical remains at 20 million lines the MCBF of 60 million lines does not indicate its useful life 3 Auto Cutter Life 1 million cuttings provided the paper thickness is between 65 ...

Страница 34: ...e screw Note The new settings will take effect after the printer is turned on DIP Switch 1 Switch Function ON OFF 1 1 Reserved Fixed 1 2 Reserved Fixed 1 3 IP address acquisition time out setting 2 20 seconds No time out 1 4 Initialize network settings 1 Valid Invalid The factory settings of DIP Switch are all on 1 Initialize network settings procedure 1 Turn the printer off 2 Set DIPSW1 4 to OFF ...

Страница 35: ...rectly to an intelligent switch or intelligent hub the physi cal link may take some time to become established As a result a timeout will occur while waiting to get the DHCP address and it will fail to get the IP address In such cases set DIPSW1 3 OFF to have no IP address acquisition timeout Note This feature is supported from firmware version 3 0 For the printer s firmware contact your dealer ...

Страница 36: ...URL http www starmicronics com support ...

Отзывы: