background image

- 16 -

3.1.1 Button

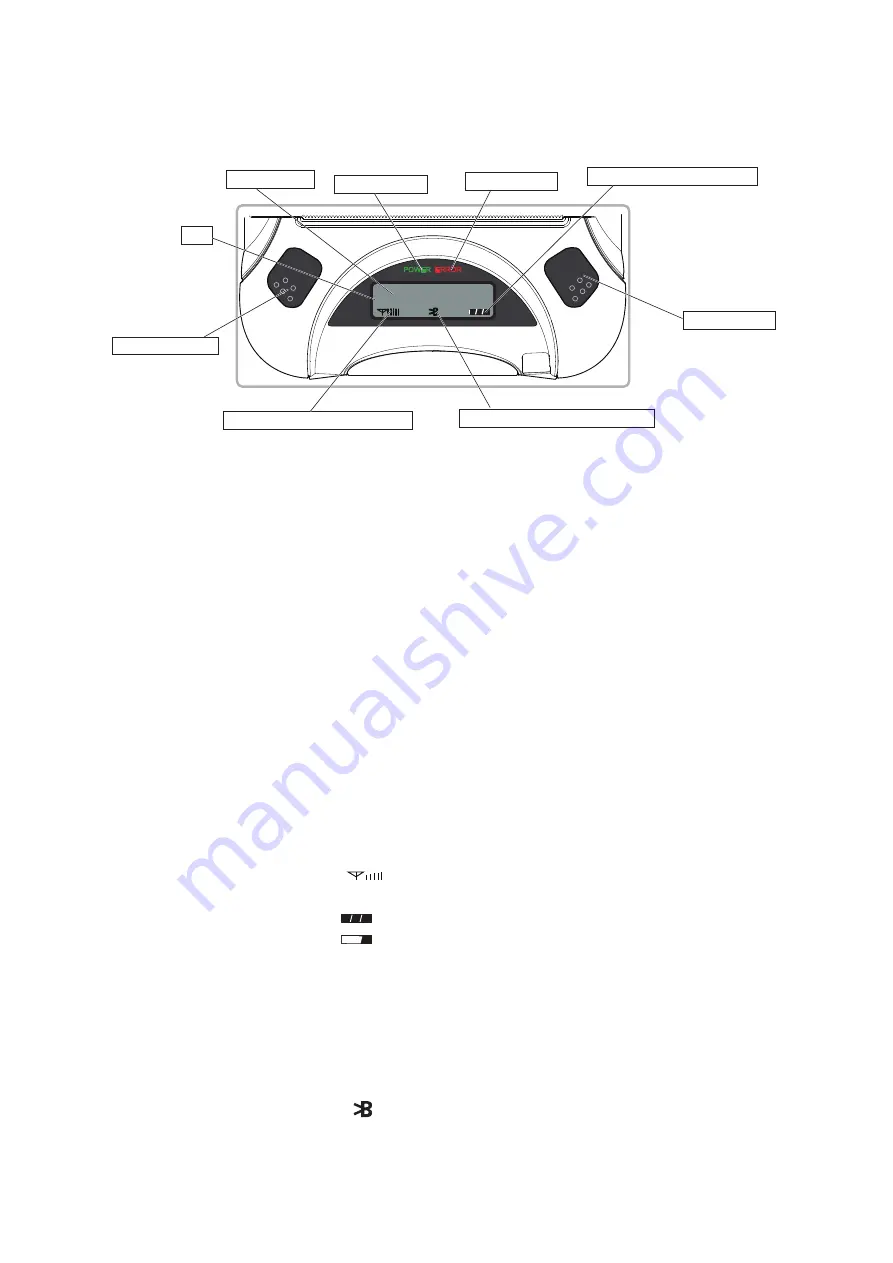
1) POWER Button :

1

  Pressing and holding the POWER button for 3 seconds or more will turn the power on or off.

2

  Pressing both the POWER and FEED buttons simultaneously will cause the ERROR lamp to 

flash 5 times and put the printer into Memory Switch Setting mode. The POWER button can 
now be used to change Printer MODE status visible on the LCD screen for fast configuration.


(Refer to 

2.4 Memory Switch Settings

 for details about mode conversion)

2) FEED Button : 

When the printer is on, paper can be fed manually by pressing and holding the-
FEED button for more than one second.

3.1.2  Panel Lamp

1) POWER (Green) : 

Printer is ON and ready to receive data.

2) ERROR (Red) : 

Indicates an error has occurred. (Ex: Paper Out, Cover Open, etc)

3.1.3 LCD

3. Printer Features

3.1  Control Panel

LCD will display most of the printer status.

1)  The 128 × 32 dot display shows alphanumeric characters.

2) Content

Mode/Status :  Indicates the currently specified printer mode or error status.

Data communication status : 

... The image shown on the left indicates that the data 

communication status is good.

Remaining battery power : 

... There is sufficient remaining battery power.


... The remaining battery power is low. Please charge 

the battery pack. (*)


Flashing

 ... The remaining battery power is extremely low.


 Stop using the printer immediately, and charge the 

battery pack. (*)

Note*):  If you continue printing at the low remaining battery 

power status, the printer cannot feed paper properly and 

may print with condensed (narrow) line spacing.

Bluetooth connection status : 

... The mark on the left indicates that there is a Blue-

tooth connection.


  When there is no Bluetooth connection, the mark is 

not displayed.

POWER


ERROR

Bluetooth Mode

Mode Status

Remaining battery power

Data Communication Status

  Bluetooth Connection Status          

  FEED Button          

POWER Button          

  ERROR Lamp

 POWER Lamp          

LCD          

Содержание SM-T300I SERIES

Страница 1: ...Mobile Printer SM T300I SERIES Hardware Manual...

Страница 2: ...TD declares that this Wireless Device is in compliance with the essential requirements and other relevant provisions of Directive 1999 5 EC Deutsch Hiermit erkl rt STAR MICRONICS CO LTD dass sich das...

Страница 3: ...k STAR MICRONICS CO LTD erkl rer herved at utstyret Wireless Device er i samsvar med de grunnleggende krav og vrige Norwegian relevante krav i direktiv 1999 5 EF slenska H r me l sir STAR MICRONICS CO...

Страница 4: ...r battery pack Then contact your dealer for advice Continued use of the printer could result in a fire P Never attempt to repair the printer yourself Also do not disassemble or modify the product Doin...

Страница 5: ...ged Do not touch them with metal objects sandpaper etc P Printing quality may suffer if the thermal head heating element becomes soiled by being touched with your hands Do not touch the thermal head h...

Страница 6: ...it for long periods Because of this you should locate the printer so that the power outlet it is plugged into is nearby and easy to access n Printer Maintenance Please perform the following maintenan...

Страница 7: ...ures 16 3 1 Control Panel 16 3 1 1 Button 16 3 1 2 Panel Lamp 16 3 1 3 LCD 16 3 2 Self Test 17 3 2 1 Self Test Procedure 17 3 2 2 Printing the Bluetooth Device Name and MAC Address 17 3 3 Instruction...

Страница 8: ...thru direct thermal printing method High speed 75 mm sec max Standard equipped dual interface RS 232C serial interface and BluetoothVer 2 1 EDR interface Support for secure Bluetooth communications S...

Страница 9: ...sing please contact the dealer that you bought the product u The optional items for this printer are listed below Battery Pack Serial Communication Cable Printer paper sample Printer Battery Charger S...

Страница 10: ...you do not need them Platen Gear Platen Printer Cover Cover Open Switch Thermal Head Mechanism Feed Button LCD Magnetic Stripe Reader Error Lamp Power Lamp Power Button Battery Pack Belt Clip Charge C...

Страница 11: ...he back of the printer as in the figure shown below following the di rection of the arrow 3 To remove the battery back pull back the hook and use the opposite procedure from the one you used to insert...

Страница 12: ...arging the Battery Pack The battery pack can be charged at ambient temperatures between 0 and 40 C The time required to charge the battery pack varies depending on the voltage and the ambient temperat...

Страница 13: ...ttery pack Do not short the terminals of the battery pack or get it wet Do not place the battery pack in a bag with a small metal object such as a key If any battery fluid gets on your skin or clothin...

Страница 14: ...en it is ready to pair with another Bluetooth device 2 If necessary enter the following information into the terminal that you are using PIN 1234 default Device name Star Micronics default For securit...

Страница 15: ...ter powered on the printer automatically connects to the Host that it previously connected How to change the Host Turn the printer on and tap the printer name on the Bluetooth setting screen of the iO...

Страница 16: ...er and then open and raise the printer cover 3 Load the roll paper in the orientation shown in the figure below and then pull the end of the roll straight toward you 4 Press down on both sides of the...

Страница 17: ...ot do not touch it because static electricity can damage the devices inside the thermal head WARNING 1 Do not touch the tear bar There is a tear bar inside the paper outlet slot Not only should you no...

Страница 18: ...mode press and hold both the POWER FEED buttons for 3 seconds After the ERROR LED flashes five 5 times you can configure the settings Release the buttons after you surely confirm the LED flashes five...

Страница 19: ...in and you can change the data bit setting Press the POWER button once and the data bit will change to 7 bit Display 8 DATA BIT g 7 DATA BIT 4 Press the FEED button once and then you can change the ba...

Страница 20: ...DENSITY MEDIUM Density High DENSITY HIGH 7 Print Quality Low 75mm s LOW QUALITY High 50mm s HIGH QUALITY 8 Black Mark Sensor No use MARK NO USE Use MARK USE 9 Black Mark Sensor Sensitivity Low SENSOR...

Страница 21: ...r Bluetooth RS 232C The display shows UART Mode At the RS 232C mode the printer can communicate with a device using the serial communication cable supplied with the printer When you connect the serial...

Страница 22: ...e belt clip into the designated screw hole to attach the belt clip to the printer 2 Use a coin to firmly screw in the screw 2 5 2 Using the Belt Clip When the printer is attached to your belt you can...

Страница 23: ...e printer status 1 The 128 32 dot display shows alphanumeric characters 2 Content Mode Status Indicates the currently specified printer mode or error status Data communication status The image shown o...

Страница 24: ...tings 3 The self test will finish automatically The printer will be ready to receive data after the self test finishes 3 2 2 Printing the Bluetooth Device Name and MAC Address 1 Follow the procedure i...

Страница 25: ...value is not returned in the above 1 method it is possible that the printer is turned off by the Power OFF mode In this case turn the printer on manually 3 4 Magnetic Card Reader Please keep the foll...

Страница 26: ...80 mm Paper Width CAUTION 1 Do not use roll paper whose end is glued to its core because the printer will be unable to prop erly detect the end of the paper Also we recommend that you use roll paper t...

Страница 27: ...ze 1M bytes 1 MSR SM T300i Not Supported MSR SM T301i ISO 7810 7811 7812 1st and 2nd Track Reading LCD 128 32 Dots FSTN Blue LED Backlight Battery pack Rechargeable 7 4V DC Battery operating time Appr...

Страница 28: ...nsions 120 mm W 130 5 mm D 58 3 mm H Model without Card Reader 120 mm W 132 2 mm D 58 3 mm H Model with Card Reader Weight 442 g Including Battery Pack Body Color Gray and Black 120 0 58 3 21 4 43 6 5...

Страница 29: ...ipment Thermal Printer Model Name WSP i350 Ref R TTE Radio Report No ETLE121213 1451 01 Ref R TTE EMC Report No ETLE121213 1448 ETLE121213 1449 Ref Safety Report No ETLS121213 0175 ETLE121213 1451 01...

Страница 30: ...URL http www starmicronics com support Rev 1 2...

Отзывы: