background image

Warranty 
Through Stanton’s authorized dealers around the World, Stanton, or one of Stanton’s authorized distributors outside the U.S., will, without charge, repair or 

replace, at the sole discretion of the entity responsible for making the repair or providing the replacement, any Stanton merchandise proved defective in 

material or workmanship for a period of one year following the date of original purchase. Exceptions to this warranty are as noted below: 
The warranty for mechanical parts which are subject to wear and tear are limited to the earlier of either thirty (30) days following the date of original purchase 

or the following number of cycles: Faders - 15,000; Rotary potentiometers - 10,000; and Switches - 10,000. 
Stanton will warrant all replacement parts and repairs for ninety (90) days from the date of original shipment. Repairs made necessary by reason of misuse, 

alteration, normal wear, or accident are not covered under this warranty. 

Returns 
Authorized Stanton dealers are only authorized to sell and distribute merchandise within a specific country. All goods requiring warranty repair or replacement 

must be returned (freight prepaid if not hand-delivered) to the authorized Stanton dealer from whom the merchandise was purchased and in the same country 

where the merchandise was purchased. For purposes of purchases made via the Internet, the merchandise must be returned to the authorized Stanton 

dealer in the country where the authorized Stanton dealer which sold the merchandise to purchaser is located and not the authorized Stanton dealer in the 

country where the purchaser is located or the country in which the merchandise was received. Any returns to a non-authorized dealer or to an authorized 

Stanton dealer not in the same country as the merchandise was intended to be sold or as set forth above will void this warranty.
To initiate a warranty repair, you must contact the authorized Stanton dealer from whom you purchased the merchandise, and follow such authorized Stanton 

dealer’s return policy. 
Stanton assumes no risk and shall be subject to no liability for damages or loss resulting from the specific use or application made of the merchandise. 

Stanton’s liability for any claim, whether based on breach of contract, negligence, infringement of any rights of any party, or product liability, and relating to the 

merchandise shall not exceed the price received by Stanton from your purchase of such merchandise. In no event will Stanton be liable for any special, incidental or 

consequential damages (including loss of use, loss of profit and claims of third parties) however caused, whether by the negligence of Stanton or otherwise. 

To the extent permitted by law and except as otherwise provided above, Stanton disclaims any express or implied warranties of merchantability or fitness 

for a particular purpose. 
The above warranty provides you with specific legal rights. You may also have additional rights, which are subject to variation from state to state and country to 

country. 
If there is a dispute regarding the warranty of merchandise that does not fall under the warranty conditions stated above, please include a written explanation 

with the merchandise when returned pursuant to the terms and conditions set forth herein. 

Please register your product online at www.stantondj.com 

Stanton Magnetics • 3000 SW 42nd Street • Hollywood FL 33312

Phone: +1 954.316.1500

Technical Support:

[email protected]


WARRANTY & RETURN POLICY 

Copyright © 2009 Stanton Magnetics, Inc.

T.55 USB is a trademarks of the Stanton Group.

All other trademarks are property of their respective owners, who are not affiliated with Stanton DJ.

All information included in this User Manual is subject to change without notice.

www.stantondj.com - +1.877.578.6866

LITS00029 REV-B  2/5/2009

Содержание T.55 USB

Страница 1: ...5 0 3 0 5...

Страница 2: ...All other servicing should be referred to qualified service personnel 16 Ventilation Slots and openings in the cabinet are provided for ventilation and to ensure reliable operation of the product and...

Страница 3: ...s protective wrapping and place on the platter 4 Place the counter weight on the back of the tonearm assembly 5 If desired place the 45rpm adaptor in its allocated holder on the main unit Do not place...

Страница 4: ...op onto the mat or the turntable platter during this adjustment You might damage the needle tip Now carefully hold the tone arm in one hand while rotating the numbered ring on the front of the counter...

Страница 5: ...tone arm then turn the locking nut clockwise with the head shell firmly held horizontally 10 Tonearm 11 Tonearm clamp and rest Use this rest for the tone arm and clamp it in position during transporta...

Страница 6: ...e track crossfading to another To take full advantage of these features be sure to read the User Manual or Help files in the software Audacity is free software licensed under the General Public Licens...

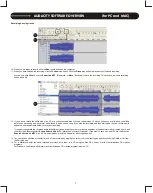
Страница 7: ...ng and then start again the new recording will appear as new audio tracks below the previous recording If you want to separate the recorded audio into different tracks drag the cursor over a song segm...

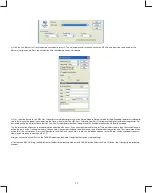
Страница 8: ...for your soundcard for the T 55 USB MME 32 Bit is suggested Latency refers to how fast the software responds to commands Higher latency values are safer when recording and playing back audio Iif audio...

Страница 9: ...This will also light up the 5 Pause button Play a record on your turntable and you will see the meters at the right of window show you the recording level Now you are ready to record your record album...

Страница 10: ...ll also separate the songs to create new Clips It is easy to see the separation between songs This is where the volume of the waveform is at a low level If there is only a short space between songs th...

Страница 11: ...of each Clip and press the 8 Insert Marker button You can also automatically create Markers at the start of each Clip Under the Edit Menu select the Insert Markers at Clip Start This will create marke...

Страница 12: ...CLIPS Audio Creator LE allows you to process your audio clips The two most common processing functions are Normalizing and Audio Restore Normalizing raises the level of your audio clip to a maximum us...

Страница 13: ...rst press the 9 Clip Select button Then place the cursor over a Clip and click to select it 10 Next press the 10 Normalize button This brings up the Normalize window as shown below Clip before normal...

Страница 14: ...tor LE includes an audio plug in that helps eliminate noise clicks and pops from a record The plug in is called Audio Restore by iZotope To select the Audio Restore Plug in from Cakewalk right click o...

Страница 15: ...try different settings In the example below there was a click in the audio from the record Audio Restore removed the click Before Audio Restore After Audio Restore Creating Audio CD s Creating an Audi...

Страница 16: ...on the BURNER button This brings up the window below 7 The CD tracks will already be in the list You can add more tracks by pressing the Add Tracks button Press the OPTIONS button to set the speed fo...

Страница 17: ...pth the MP3 encoder examines the file prior to encoding The ID3 Info section allows you to write information about the MP3 tracks If you have selected the Markers as Track Indicators feature then the...

Страница 18: ...ton and the CD will be created Congratulations You have successfully digitized your 1st vinyl record Feel free to experiment with the other features of Pyro Audio Creator LE The online Help screens of...

Страница 19: ...me Less than 1 sec with 331 3rpm Braking Time Less than 1 sec with 331 3rpm Time for Speed Change Less than 1 sec from 331 3 to 45 rpm Less than 1 sec from 45 to 331 3 rpm USB Function USB Rec Play Fu...

Страница 20: ...old or as set forth above will void this warranty To initiate a warranty repair you must contact the authorized Stanton dealer from whom you purchased the merchandise and follow such authorized Stanto...

Отзывы: