background image

12

13

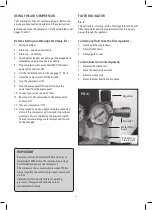
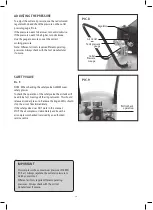
PIC. 7

The configuration of tools and accessories can be varied to 
suit your particular requirements. A basic recommended set 
up is shown in Pic. 7.

When you have finished using your air compressor 
follow these simple steps;

1.   Turn your air compressor OFF, using the ON/OFF 

switch.

2.   Turn the power point OFF and disconnect the  

power lead.

3.   Disconnect your air tools and air hose.
4.   Clean your air hose and air tools.
5.   Store your air hose and air tools in a secure  

well ventilated cabinet.

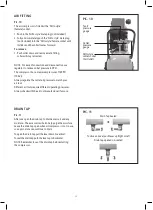
6.   Slowly open the tank drain tap, see page 16.  

This allows excess air and moisture, water, to vent.

7.   Leave the tank drain tap open. This allows any 

moisture to drain while the air compressor is stored.

NOTE: Use of a water trap may be of benefit to ensure no 
water or moisture reaches your air tool.

Not supplied, purchased separately.

IMPORTANT

Pumping starts at (minimum) 115PSI and stops at 
(maximum) 145PSI. Once the initial pump up stage 
has finished you can use the compressor. 
This compressor has a maximum pressure of 10 bar.  
Always regulate the outlet air pressure to match your 
air tool.
Different air tools require different operating 
pressures.  Always check with the air tool 
manufacturer if unsure.

Содержание SXAC1521121

Страница 1: ...3616 10 18 MODEL NO SXAC1521121 AIR COMPRESSOR 1 5HP 21L For service spare parts or product information please contact Smart Marketing Group Pty Ltd AUST 1300 660 457 N Z 0800 474 876...

Страница 2: ...tool wishing to be used to ensure that it is within this air compressor s air output Section Page Contents 2 Suggested Applications 2 Introduction 3 Guarantee 3 4 General Safety Instructions 5 7 Elec...

Страница 3: ...h parts and components of similar quality grade and composition where an identical part or component is not available Products presented for repair may be replaced by refurbished products of the same...

Страница 4: ...rts of the product with parts and components of similar quality grade and composition where an identical part or component is not available Products presented for repair may be replaced by refurbished...

Страница 5: ...or wax Always leave sufficient distance at least 5 metres between the air compressor and the work area especially when using tools designed for sanding or spraying liquids If needed use a longer air h...

Страница 6: ...authorised service facility Keep handles clean dry and free from oil and grease Ensure that ventilation slots are kept clean and free from dust at all times Blocked ventilation slots can cause overhe...

Страница 7: ...ards and safety requirements Repairs should only be carried out by qualified persons using original spare parts Failure to do so may result in considerable danger to the operator PERSONAL SAFETY Cloth...

Страница 8: ...changes and when changing attachments such as air hoses tools Always use the correct type of tool for the operation to be carried out Never use the air compressor if any part of the unit is damaged A...

Страница 9: ...5 Rubber stopper 6 Safety Valve 7 Tank pressure gauge 8 Front handle 9 Pressure switch 10 On Off button red colour 11 Outlet pressure gauge 12 Air outlet nitto style socket 13 Outlet pressure regulato...

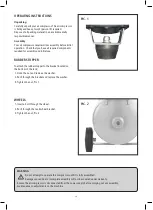
Страница 10: ...TOPPER To attach the rubber stopper to the bracket located on the bottom of the tank 1 Undo the nut and remove the washer 2 Push through the bracket and replace the washer 3 Tighten the nut Pic 1 WHEE...

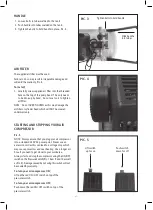
Страница 11: ...essure switch To turn your air compressor OFF Push down the red ON OFF switch on top of the pressure switch AIR FILTER The supplied air filter must be used Failure to do so may result in irreparable d...

Страница 12: ...e connected air tools the compressor will start and stop without warning This is controlled by the pressure switch These pressure settings are factory set and should not be changed IMPORTANT Pumping s...

Страница 13: ...owly open the tank drain tap see page 16 This allows excess air and moisture water to vent 7 Leave the tank drain tap open This allows any moisture to drain while the air compressor is stored NOTE Use...

Страница 14: ...To check the operation of the safety valve the air tank will need to be full Gently pull the ring outwards This should release air under pressure Release the ring and this should stop the air out flow...

Страница 15: ...ressor is fitted with a Nitto style female socket 1 Push in the Nitto style male plug not included 2 Fully and completely push the Nitto style male plug not included into the Nitto style female socket...

Страница 16: ...e pressure decreases to 115PSI If these tips do not work please have your unit checked by an authorised service centre Call Smart Marketing Group for your closest centre Australia 1300 660 457 N Z 080...

Страница 17: ...9 Drain Tap 1 95 BRC95DT 10 Cushion Foot Set 1 95 BRC95RS 11 Unloading Tube Set 1 95 STDDUT Part Description Qty SMG Part No 14 Filter Regulator 1 95 STREGWT 15 Outlet Nitto Style Socket Female 1 95...

Страница 18: ...145PSI Number of Outlets 1 For any queries or assistance call Customer Service AUST 1300 660 457 NZ 0800 474 876 Hours of operation Monday to Friday 8 00am 5 00pm AEST Do not return to place of purcha...

Отзывы: