background image

15

FUEL INSTALLATION

OIL STORAGE TANKS

Oil  storage  tanks  made  of  steel  and  all  connecting
equipment (e.g. filling pipes, and vent pipes) should
comply with B.S. 799 Part 5.  Galvanised steel must
not  be  used.    Polyethylene  (Plastic)  tanks  should
comply  with  OFTEC  standard  OFS T100  and  or
equivalent.  Oil should never be stored in transulent
plastic containers.

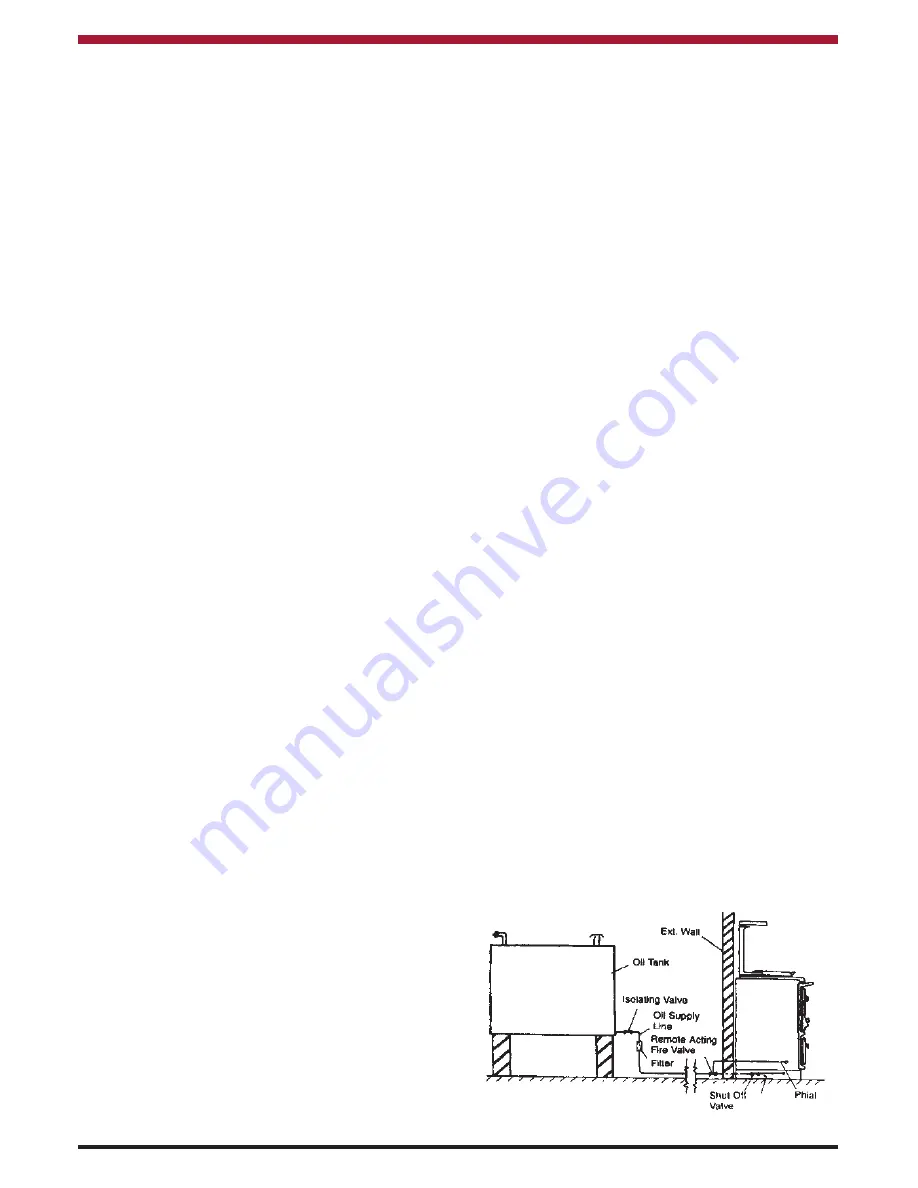
An isolating valve should be fitted at the tank outlet,
in an accessible position so that the oil supply to the
appliance can be shut off if required.  This isolating
valve  must  be  of  a  type  suitable  for  use  with  oil.
(See Fig. 20, 21, 22 & 23).

Oil  storage  tanks  support  must  be  carried  out  in
accordance  with  the  tank  manufacture  recommen-
dations.  Tanks should be located in the most unob-
structive  position  possible  having  taken  safety,  fill-
ing, maintenance and the need, if any, to provide a
head of oil for the burner into consideration.

FUELS

THE  RECOMMENDED  FUEL  FOR  THE  COOKER
BURNER  IS  KEROSENE  28  (CLASS 2)  SECOND
VISCOSITY FUEL OIL.

FUEL SUPPLY LINE

The  oil  supply  line  from  the  oil  storage  tank  to  the
appliance  should  be  of  an  approved  and  suitable
pipe  with  a  minimum  internal  diameter  of  9mm
(3/8”), using the flexible oil line supplied, as the final
connection to the pump.

Oil  supply  pipes  are  normally  run  in  annealed  cop-
per tube complying to E.N. 1057.  It can be obtained
in  coil  or  half  hard  form  for  use  with  bending
machines.  This pipe can also be obtained with pro-
tective plastic sheathing applied.  Fittings for copper
pipe  should  be  of  the  flared  manipulative  type  to
B.S.  864:  Part  2.    Steel  pipes  complying  with  B.S.
1387,  if  used,  must  be  protected  from  corrosion.
Galvanised pipe and fittings must not be used.

Screwed  joints  must  only  be  made  with  taper
threads complying to B.S. 1740:  Part 1.

Jointing materials must be of types intended for use
with  oil  fuel.    Special  petroleum  -  resisting    com-
pounds and PTFE tape are suitable.  External pipes
should  preferably  be  run  with  a  continuous  rise
towards the direction of flow, so that air can be vent-
ed  off.    It  is  important  to  avoid  high  points  which
could cause air locks.

Exposed lengths of oil supply pipe must be properly
supported  by  purpose  made  clips  securely  fixed  in
place.  Metal clips formed so as to hold the pipe on
to a saddle are preferred.  Consideration should be
given  to  avoiding  routes  which  expose  the  pipe  to
severe chilling which could cause freezing of the oil.
Where pipes are buried, they must be protected from
accidental damage.  The use of joints underground
should be avoided if at all possible.  If joints have to
be fitted in pipes laid below ground, access to them
must be provided.

An oil filter (5 -10 micron) and stop valve must be fit-
ted to the fuel feed line and located near the supply
tank and facilities should be provided to enable it to
be serviced without draining down the oil supply sys-
tem.  (See Figs. 20, 21, 22 & 23).

At the point where the oil line enters the building, the
oil line must be fitted with an approved remote act-
ing fire valve e.g. Teddington KBB, which meets the
requirements  of  B.S.  5410  :  Part  1,  fitted  with  the
appropriate  length  of  capillary.   The  heat  sensoring
phial of the fire valve must be fitted to the clip provid-
ed  in  the  burner  compartment.    It  is  absolutely
essential that the fire valve is located externally and
is as close as possible to the appliance.  For existing
installations  where  the  oil  supply  is  built  into  the
structure  internally,  the  remote  acting  fire  valve
should  be  fitted  where  the  oil  supply  line  is  first
exposed internally.  This type of layout is not recom-
mended for new installations.

When  gravity  feed  is  used  (the  most  common)  the
minimum  head  should  not  be  below  1m  (3’3”)  and
the maximum head should not exceed 6.5m (21’ 3”).

NOTE:   

The  pump  is  factory  set  for  a  single  pipe

installation.

Single  pipe  supply  system:    Tanks  servicing  this
appliance by means of a single pipe need to be posi-
itioned  so  that  they  will  apply  the  minimum  head
required 1 meter (3’ 3”) of oil to the burner when the
fuel level is at its lowest point.

Fig.20

Содержание COMERAGH - 50

Страница 1: ...vice this Cooker should be installed by a suitably qualified and competent person The provision of a Central Heating facility requires that the hot water systems involved conform fully to good plumbing practice and established standards INSTALLATION AND OPERATING INSTRUCTIONS ...

Страница 2: ...0 19 Ventilation Combustion Air Requirements 10 20 Clearances to Combustibles 10 21 Heating 11 22 Exploded View 12 23 By Pass Loop 14 24 Safety Valve 14 25 Water Circuit Temperature 14 26 Pipe Thermostat 14 27 Care for your Central Heating System 14 28 Indirect Domestic Cylinder 14 29 General Maintenance 14 30 Fuel Installation 15 31 Oil Storage Tank 15 32 Fuels 15 33 Fuel Supply Line 15 34 Operat...

Страница 3: ...45 External Automatic Timeswitch 19 46 Condensation 20 47 Ovens 20 48 Hot Plate 20 49 Servicing 20 50 Chimney Cleaning 20 51 Flue Cleaning 20 52 Baffle Removal 21 53 Burner Removal 21 54 General Construction 22 55 Wiring Diagram 22 56 Fault Finding 23 57 Installation Check List 24 3 ...

Страница 4: ...Door 8 Control Panel 9 Main Oven 10 Oven Thermometer 11 Warming Oven 12 Side Flue Cleaning Plate 13 Bottom Flue Cleaning Plate 14 Burner Compartment 15 Boiler Thermostat 16 Oven Thermostat 17 Pilot Light 18 Re set Button Central Heating Boiler Capacity 9 litres Gallons Cooker Weight 274Kg 604lbs IMPORTANT CONTROL OF SUBSTANCES HARMFUL TO HEALTH It is the Users Installers responsibility to ensure t...

Страница 5: ...ON FEATURE METRIC mm HOTPLATE 1 7 sq meters MAIN OVEN 400W x 324H x 396D WARMING OVEN 390W x 290H x 440D 5 Note Dimensions stated are in millimetres unless otherwise stated and may be subject to a slight variation ...

Страница 6: ...is not avail able then we recommend that the cooker be placed on a slab of formed concrete 40mm 1 1 2 deep or a slab of other insulating material This hearth must extend 225mm 9 to the front and 150mm 6 to either side of the appliance ELECTRICAL SUPPLY All wiring external to the appliance must conform to the current B S 7671 B S 7462 Safety Document 635 ETC Part 1 section 5 4 6 and the Electricity...

Страница 7: ... a positive pressure it is essential that all flue joints are tightly sealed against flue gas leakage If connecting to an existing chimney with a flue diameter of more than 6 it is necessary to line the flue using either 5 rigid or flexible stainless steel flue liner 7 ...

Страница 8: ... the same size Chimneys wholly con structed of single skin pipe are not recommended under any circumstances Due to their inability to retain heat such chimneys will inevitably give rise to the formation of condensation SUITABLE MATERIAL Mineral Fibre cement pipes conforming to B S 567 Insulated metal chimneys conforming to B S 4543 a galvanised finish is not suit able Clay flue linings conforming ...

Страница 9: ...flue pipe which has previously been used with another fuel the chimney or flue pipe should be thoroughly swept All register plates restricter plates damper etc which could obstruct the flue at a future date should be removed before connecting this appliance Where a chimney is not to be lined a suitable void should be provided at the base to contain any debris which might fall from the inside wall ...

Страница 10: ... should be ascertained before installation The effect of any gauze or screen should be allowed for when determining the effective free area of any vent 8 Air vents to be outside of the building should be located so that any air current produced will not pass through normally occupied areas of the room An air vent outside the building should not be located less than the dimensions specified within ...

Страница 11: ...he cooker d Are any modifications necessary to make the heating system more efficient NOTE We strongly advise the use of pipe lagging and also the use of a frost thermostat if the installa tion is likely to be exposed to situations where the temperature will dip to a level consistent with frost The use of motorised valves room thermostats radiator thermostatic valves domestic hot water controllers...

Страница 12: ...LE LINKAGE PIECE LH 51 BAFFLE AXLE LINKAGE PIECE RH 52 SWING BAFFLE 53 BURNER DOOR INSULATION 54 COMBUSTION CHAMBER BACK BAFFLE 55 BAFFLE BRACKET 56 HOB PROTECTING PLATE SMALL 57 OVEN PROTECTING PLATE 58 TOP OVEN SIDE LH 59 OVEN BASE PLATE 60 OVEN SHELF 61 OVEN BAKING TIN 62 OVEN RH SIDE 63 BOTTOM FLUE WAY 64 TOP FLUE WAY 65 SIDE PANEL 66 OVEN TOP 67 DAMPER GUIDE LH 68 HOB PROTECTING PLATE LARGE 6...

Страница 13: ...ral heating systems to which this appliance can be connected but are not to be used as working draw ings Fig 14 Fig 15 Fig 16 2 STORY HOUSE FULLY PUMPED INTERLINK SYSTEM BUNGALOW FULLY PUMPED SEALED SYSTEM 2 STORY HOUSE FULLY PUMPED SEALED SYSTEM Fig 17 13 ...

Страница 14: ...sipated to prevent possi ble overheating When the flow temperature falls below 60 C the pipe thermostat will de activate the circulating pump and allow the cooker to operate See Fig 19 CARE FOR YOUR CENTRAL HEATING SYSTEM We strongly recommend the use suitable corrosion inhibitors and anti freeze solution in your heating system in an effort to minimise black oxide sludge and scale build up which e...

Страница 15: ...ould preferably be run with a continuous rise towards the direction of flow so that air can be vent ed off It is important to avoid high points which could cause air locks Exposed lengths of oil supply pipe must be properly supported by purpose made clips securely fixed in place Metal clips formed so as to hold the pipe on to a saddle are preferred Consideration should be given to avoiding routes ...

Страница 16: ...il firing installations up to 45 kW output capac ity for space heating and hot water supply purposes OFTEC Technical Information Boot Three Installation requirements for oil fired boilers and oil storage tanks The Building Regulations Part J England Ireland Wales Part F Section III Scotland and Part L Northern Ireland Single pipe system with de aeration device fitted This system can be used where ...

Страница 17: ...rol knob clockwise until it engages in the Up position 3 Set the oven thermostat to the required cooking temperature There are three main heating modes as follows determined by the position of the Boiler Baffles which are located by rotating the control knobs See Figs 24 25 Setting A High Boiler Output with Hot Plate and Oven 1 Set the oven thermostat to idle 2 Turn the left hand boiler baffle con...

Страница 18: ...eating plates and keeping food warm BURNER DOES NOT IGNITE Check a That electricity is switched on Check b That oil supply valve is open Check c That the thermostat reset button is pressed in Check d That the burner lockout button is pressed in If the Lockout button located inside the burner compartment glows red press to reset Fig 24 Fig 25 Fig 26 Fig 27 CENTRAL HEATING The boiler output is deter...

Страница 19: ... cloth followed by a polish with a clean dry duster 2 If milk fruit juice or anything containing acid is spilt on the hob or down the cooker be sure to wipe it immediately or the vitreous enamel may be permanently discoloured Jam and preservatives containing sugar can permanently damage the vitreous enamel 3 Keep a damp cloth to hand while cooking to wipe up any spills as they occur so they do not...

Страница 20: ...LEXIBLE OIL LINE MUST BE CHANGED CHIMNEY CLEANING Whichever type of flue is chosen there must be cleaning access to the whole of the flue system The flue of the chimney will need to be cleaned regular ly The combustion products of any burning appli ance will have a descaling effect on hardened soot deposits left from burning solid fuels Although the chimney may have been cleaned of loose soot prio...

Страница 21: ...order 1 Open the burner compartment door and the warming oven door 2 Remove the Oven side panel by taking out the back screws and the front screw 3 Slacken the two Burner retaining screws and lower the Burner gently until it is clear of the collar 4 Tilt the Burner blast tube towards the right making sure that the oil line and electrical leads are free of obstructions 5 Remove the Burner through t...

Страница 22: ...COMERAGH 50 OIL FIRED COOKER GENERAL CONSTRUCTION WIRING DIAGRAM Fig 32 Fig 33 22 ...

Страница 23: ...Defective c Pipe thermostat set too high c Reduce thermostat settings d Air in System e Pipe System faulty e Check pipe sizes and circuit f Excessive no of radiators f Turn off unneeded radiators g Radiator valves not balanced g Adjust valves to give even flow 8 Domestic Hot Water a Cylinder too Large a Use 135 180L Cylinder Cylinder not Heating b Flow Pipe too Small b Use 25 mm Bore Pipe c Check ...

Страница 24: ...6 w g Location 1 The cooker should be installed on a non combustible material capable of supporting the weight of the unit 2 The cooker should be positioned so as to maintain a 10mm gap between the cooker and the adjacent kitchen units Plumbing 1 A three bar safety valve must be fitted tot he primary flow pipe adjacent to the boiler connection on the stove 2 The cooker must be connected to a fully...

Отзывы: