


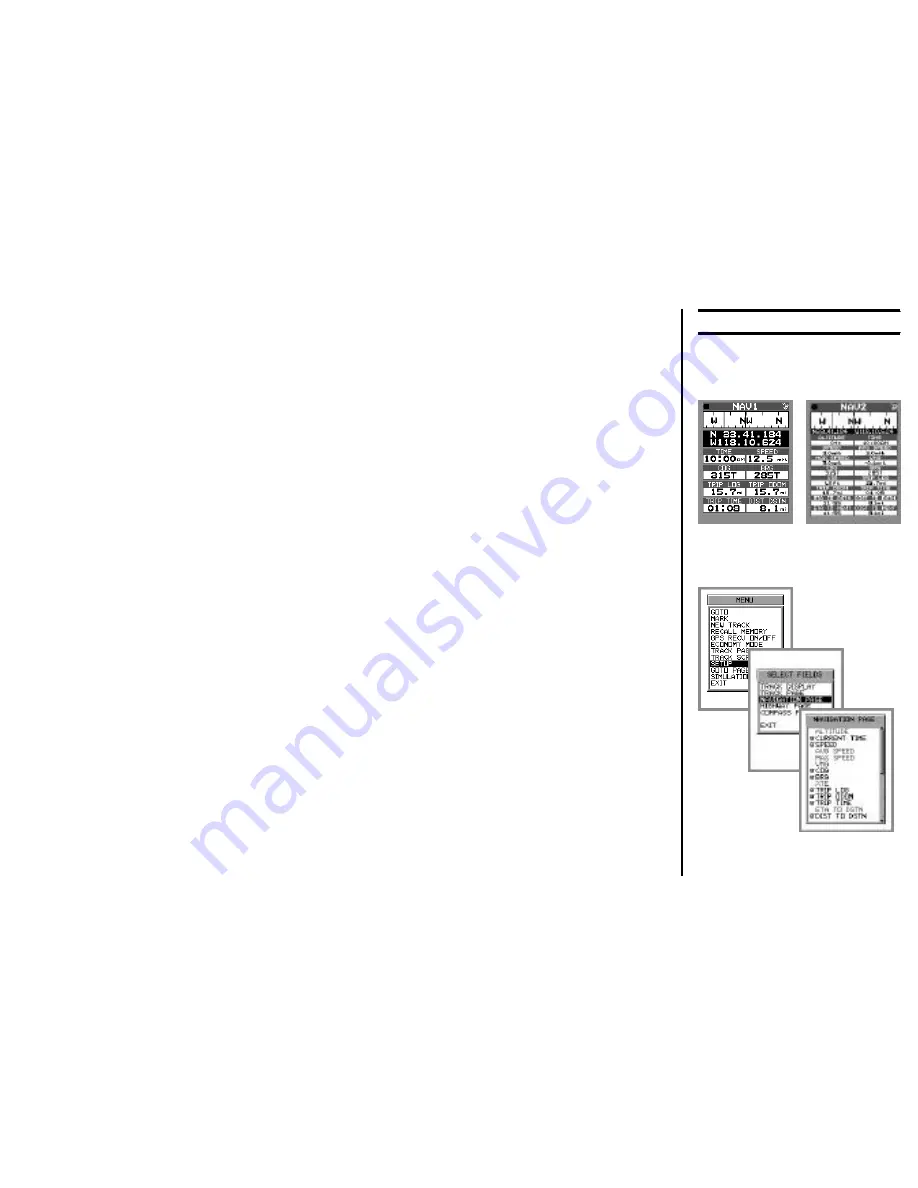
45
to see 8 of the above 16 data fields, in a larger font for easier viewing. The fields
to be displayed in the
NAV1
screen may be selected by you to provide the most
useful data, and since
NAV1
is the default Navigation page, the ability to select
these data fields is a tremendous convenience feature.
Here’s how to select the displayed fields for the
NAV1
page:
1.
Use the [(
q
)
PAGE
]/[(
p
)
PAGE
] keys to select
NAV1
, then press the
[
MENU
] key once to enter the Menu.
2.
Push the
Joystick
knob upward to highlight “
SETUP
” and click on “
SETUP
.”
3.
Push the
Joystick
knob upward to highlight the “
SELECT FIELDS
” and click
on “
SELECT FIELDS
.”
4.
Push the
Joystick
knob upward to highlight the “
NAVIGATION PAGE
” se-
lection.
5.
Click on the
NAVIGATION PAGE
selection.
6.
You will now see a series of boxes identifying all the features described above
(except the Compass and Latitude/Longitude fields, which always appear on
both Navigation pages). The fields currently being displayed on the
NAV1
page are shown in Bold font, and the small box to the left of the description
has an “
P
” in it. If all eight fields have been selected for display on
NAV1
,
the other fields will be in a lighter font, and no boxes will appear by them;
this signifies that it is not possible to add another field without removing a
currently-selected one.
7.
Just for practice, use the
Joystick
knob to high-light “
TRIP LOG
,” then click
on this selection. You will observe that small boxes now appear by
all
the
Basic Operation
U
SING
THE
NAVIGATION P
AGES
Содержание MAGNUM NAV-40
Страница 98: ...96 Note ...
Страница 99: ......


