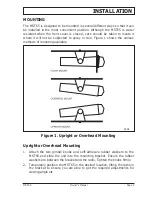
3. Roughly mark the location of the bracket edges, then separate the radio
from the bracket and reposition the bracket to mark the mounting hole
positions. A range of mounting holes is provided to suit most installations.
4. Screw or bolt the bracket into position. The mounting method will depend
on the material to which the bracket is being attached.
5. Slide the MST65 back into the bracket slots and adjust to the required
position before tightening the gimbal knobs.
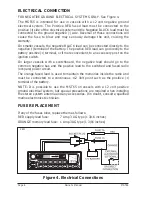
6. Connect the antenna lead and electrical wiring as described later.
Flush Mounting
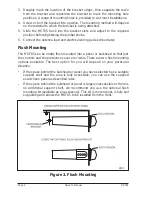
The MST65 can be neatly flush mounted into a panel or bulkhead so that just
the controls and the protective cover are visible. There are two flush mounting
options available. The best option for you will depend on your particular
situation.
●
If the space behind the bulkhead or panel you have selected has a suitable
support shelf and the area is fully accessible, you can use the supplied
escutcheon panel as described later.
●
If the space behind the bulkhead or panel is largely inaccessible or there is
no additional support shelf, we recommend you use the optional flush
mounting kit (available as an accessory). This kit is more robust, is fully self
supporting and allows the MST65 to be installed from the front.
Figure 2. Flush Mounting
Page 4 Owner’s Manual MST65
2809


