background image

0

1

User’s  manUal

User’s manUal

ssP-830

0

1

User’s  manUal

User’s manUal

memory

Memory allows you to save virtually all panel settings to a registered memory setting which can be 

instantly recalled by pressing a single button.   

bank


1.

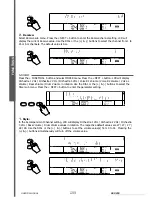
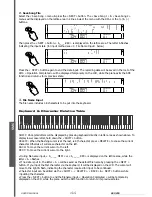
 There are 8 Memory Banks with 6 setups each, providing a total of 48 storages, any of which can be 

recalled instantly during your performance. The default value is « Memory 1 Bank 1 ».

2.

 The default value is English, though the language setting is not changed when the power is off. if 

chinese is selected before switching off the piano, the language will automatically be set to chinese 

after the piano is switched back on.

store

 & 

load


1.

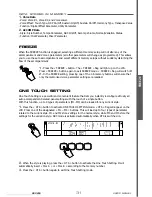
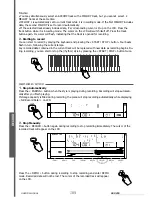
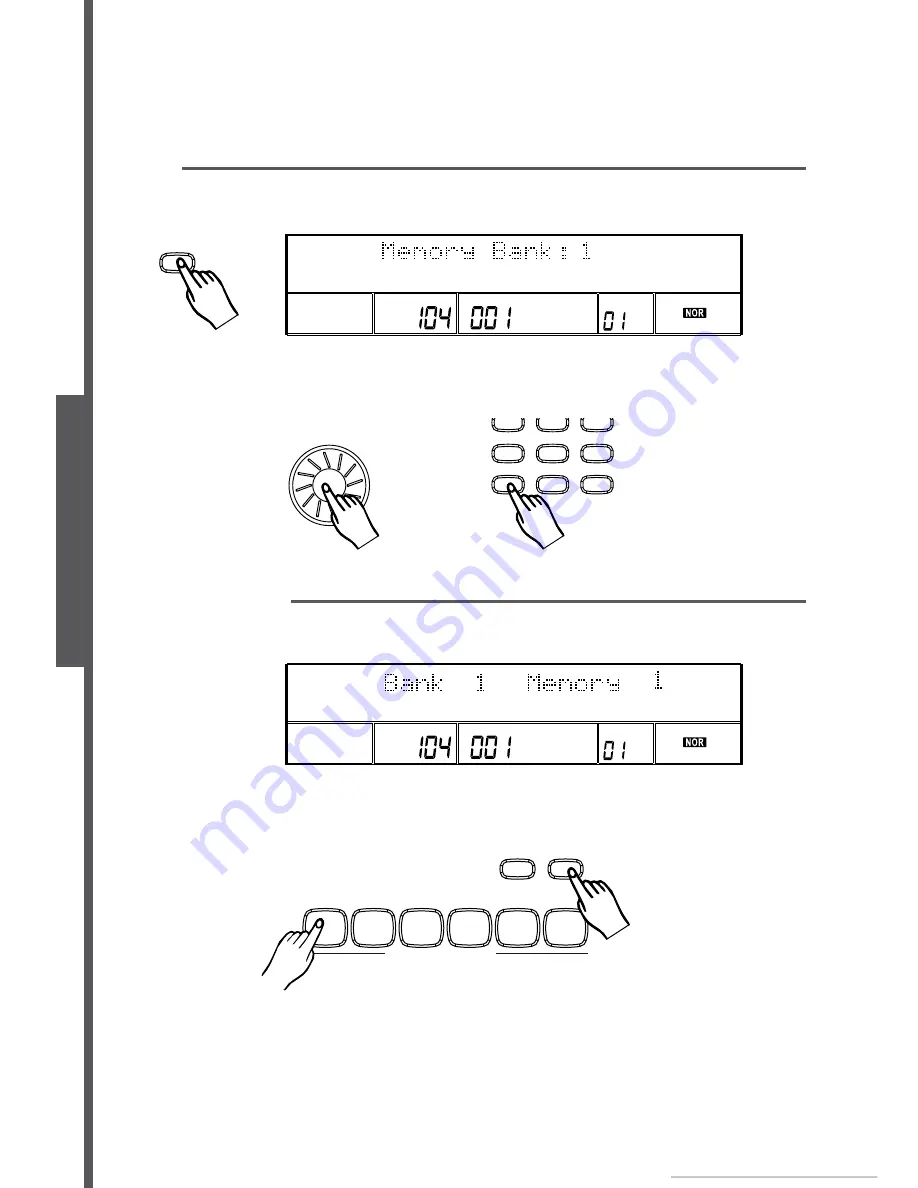
 After pressing the « BAnk » button to select a Bank, hold down the « SToRE » button and press one 

of the Memory buttons « M1 to M6 ». The data will be stored to the memory in question (M1 to M6).

2.

 if the lcd displays «Bank 1 Memory 1», the settings you save will be stored to Bank 1 Memory 1.

3.

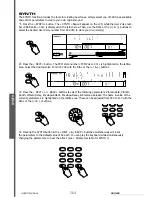
 To recall your memory, press the « BAnk » button to call up the Bank numbers 1 – 8.

note:

• Memory data are preserved even if the piano is switched off.

• To clear all memory data and restore the default setting, press « SToRE » & « M1 » simultaneously 

before turning on the piano.

• pressing the (+) & (-) buttons simultaneously will clear the memory data, but it will also clear all other 

saved settings such as recorded data.

TEMPO

VEL

MEASURE

BEAT

MEMORY

TICK

O.T.S.

BANK

1

2

3

4

5

6

7

8

9

-

0

+

1

2

3

4

5

6

7

8

9

-

0

+

TEMPO

VEL

MEASURE

BEAT

MEMORY

TICK

O.T.S.

BANK

STORE

ONE TOUCH SETTING

M

1

M

2

M

3

M

4

M

5

M

6

MEMOR

Y

Содержание SSP-830

Страница 1: ...SONG2 SONG1 RECORD HELP A B C DEMO DSP S M C LOAD UTILITY SAVE NEXT BACK HARMONY LOWER DSP A B C DUAL DUAL 1 4 7 8 0 9 5 6 2 3 FUNCTION LOWER VOICE VOICE STYLE ALBUM SUSTAIN TOUCH PLAY SYNC START SYN...

Страница 2: ...s 11 15 1 Voice select 11 2 Dual 12 3 Lower voice 12 4 Sustain effect 13 5 DSP effect 14 6 Harmony effect 14 7 Touch response 15 8 Transpose 15 9 Pitch bend Modulation joystick 15 Rhythm style 15 20 1...

Страница 3: ...3 7 Volume pedal 33 synth 34 35 Album 36 record 37 39 1 Record start 37 2 Record stop 38 3 Record play 39 SMC 40 46 1 Load file 40 2 Save file 43 3 Utility 45 MIDI 47 help 48 49 Specifications 50 Appe...

Страница 4: ...ke 4 Melody TrackS 1 4 5 Record 6 Play 7 Accomp Volume 8 Start Stop 9 Intro 10 Fill in A 11 Fill in B 12 Ending 13 Sync Start 14 Sync Stop 15 Tempo 16 Help 17 SMC Load 18 ABC 19 Back 20 Utility 21 Nex...

Страница 5: ...Pedal 6 Aux In 7 Aux Out L Mono 8 Aux Out Right 9 Phones 1 Phones 2 1 ABC 2 Harmony 3 Lower 4 DSP 5 Touch 6 Dual 7 Sustain 8 Metronome 9 Tempo Velocity 10 Measure 11 Beat 12 Memory OTS Tick 13 Step Re...

Страница 6: ...lug periodically To avoid damaging the piano or other devices to which it may be connected turn the power switches of any related devices off prior to connecting or disconnecting cables Remove any sur...

Страница 7: ...Digital Signal Processor OTS One Touch Setting among others MIDI In Out This piano can be connected to other MIDI instruments via these MIDI ports Online HELP button Provides help whenever you need i...

Страница 8: ...minimum level before connecting to the power supply the aux out jack Should you wish to play this piano through an external amplifier these may be connected via the AUX OUT L MONO and R jacks on the l...

Страница 9: ...ME jack for adjusting the volume of sound the midi in out ports MIDI stands for Musical Instrument Digital Interface MIDI is a worldwide standard communications protocol that makes it possible for var...

Страница 10: ...d by turning the VOLUME knob brillance To brighten the sound of the piano push the BRILLIANCE handspike to the right To darken the sound push the BRILLIANCE handspike to the left demo 1 There are thre...

Страница 11: ...Chinese voices 13 percussion voices and 9 user voices see Appendix 1 VOICE LIST 2 When the piano is powered on the VOICE R1 flag lights up on the LCD while the current voice mode appears on the upper...

Страница 12: ...are off the whole keyboard will be set as per VOICE R2 Otherwise only the right hand part of the keyboard will be set as VOICE R2 When numeric keypad is used to select the voice the keyboard will che...

Страница 13: ...ffect is always off when you switch the power on Press the button marked SUSTAIN to activate the SUSTAIN effect The SUSTAIN flag will light up on the LCD This effect will apply added sustain to the to...

Страница 14: ...t REVERB type level is HALL2 and 92 The default CHORUS TYPE and LEVEL is CHORUS3 and 0 Note Switching the DSP on off while playing will interfere with the signal harmony effect 1 There are 8 HARMONY t...

Страница 15: ...This will cause the octave to be changed 2 In TRANSPOSE mode pressing the buttons simultaneously will reset the Transpose value to 0 pitch bend modulation joystick 1 Turn the JOYSTICK left right to a...

Страница 16: ...s Chinese the STYLE flag on the LCD is displayed in Chinese ideographs see Appendix 2 RHYTHM STYLE LIST style start 1 Start directly Press the START STOP button to start playing the RHYTHM STYLE 2 Sta...

Страница 17: ...ABC mode is on you will activate the STYLE by playing the keys on chord area only fill in a b 1 When in NORMAL mode press the FILL IN A button to insert a single measure fill LCD will flash the NOR fl...

Страница 18: ...utton when style is playing the rhythm will stop after the ENDING plays unless you press the FILL IN A or the FILL IN B button before it finishes style stop 1 Stop directly Press the START STOP button...

Страница 19: ...accomp volume 1 Press the ACCOMP VOLUME or the ACCOMP VOLUME button LCD will display Accomp Volume 021 The Accompaniment volume can be adjusted from 0 to 31 using the DIAL the buttons or the ACCOMP V...

Страница 20: ...es To play a major chord press the root note of the chord To play a seventh chord simultaneously press the root key the white key to it s left To play a minor chord simultaneously press the root key t...

Страница 21: ...already playing 4 When pedal is assigned as TEMPO TAP see FUNCTION menu for details tempo can be adjusted by stepping on the pedal see Pedal for details Functions 1 Press the FUNCTION button to enter...

Страница 22: ...2 4 Open Utility Tune Value 50 50 0 Touch Type Soft Medium Hard Medium Voice R1 Octave 1 0 1 0 Voice R2 Octave 1 0 1 0 Voice L Octave 1 0 1 0 Pitch Bend Range 0 12 2 Split Point 1 88 34 Pedal Assign S...

Страница 23: ...ter its sub menu LCD will highlight Reverb Type and display Reverb Level You may select between Reverb Type Reverb Level Chorus Type Chorus Level Harmony Type by rotating the DIAL or via the buttons P...

Страница 24: ...s Level ranges from 1 to 127 Use the DIAL the numerical keypad buttons 0 9 the button or the button to adjust the level value The LCD will display the current value The default value is 0 5 Harmony Ty...

Страница 25: ...from 50 to 50 Pressing the buttons simultaneously will automatically set the Tune Value to the default value which is 000 Note When the Tune Value is 50 the note has increased by 100 cents of a semit...

Страница 26: ...e L Octave When in Voice L Octave setting use the DIAL or the buttons to adjust the Voice L Octave value The LCD will display the current value This function applies to the right hand side of the keyb...

Страница 27: ...ut of a choice of 5 possibilities available In this setting the LCD will display the current Pedal Assign value Use the DIAL or the buttons to select between Sustain Pedal Soft Pedal Start Stop Pedal...

Страница 28: ...um Volume in rotation Use the DIAL or the buttons to select the Mixer sub menu Press the NEXT button to enter the parameter setting 1 Style In the Accompaniment Channel setting LCD will display Orches...

Страница 29: ...UNCTION menu Press the NEXT button to enter Language setting mode Use the DIAL or the buttons to select between English and Chinese 2 The default value is English though the language setting is not ch...

Страница 30: ...essing the BANK button to select a Bank hold down the STORE button and press one of the Memory buttons M1 to M6 The data will be stored to the memory in question M1 to M6 2 If the LCD displays Bank 1...

Страница 31: ...switch off 2 In the FREEZE setting pressing one of the 1 6 memory buttons will ensure that only the memorised voice parameter settings are recalled One Touch Setting One Touch Setting is a powerful an...

Страница 32: ...e polarity of the footswitch can also be selected foot switch Press the FUNCTION button to enter the Utility menu Press the NEXT button to select the Pedal Assign menu Press the NEXT button LCD will d...

Страница 33: ...ally set as per the last two beats before the footswitch is pressed The Tempo Tap Pedal allows you to alter the tempo by tapping on the footswitch Note If you step on the footswitch successively when...

Страница 34: ...ghted on the lattice area Select the desired voice from 001 328 with the DIAL or the buttons 3 Press the NEXT or BACK buttons to select the following parameters Vibrato Rate Vibrato Depth Vibrato Dela...

Страница 35: ...t value press the STORE SYNTH buttons simultaneously while powering on the unit Note To edit other parameters press the NEXT or BACK button in edit mode ABC mode will be exited automatically as soon a...

Страница 36: ...en you hit any key on the chord area of the keyboard 2 The tempo can be altered while the album style is playing Press the TEMPO the TEMPO buttons simultaneously to set the tempo to the default value...

Страница 37: ...d while recording or playing a song Pressing the DEMO button during recording will exit the RECORD mode enter DEMO mode Recorded data will not be lost record start 1 Preparing to record Selecting the...

Страница 38: ...STOP button Four beats flash in turn following the current tempo Any recorded data contained in the current track will be replaced with new data as recording begins Du ring recording you can start or...

Страница 39: ...MP button The highlighted cursor indicates the track that is about to be played If the cursor does not light up it indicates that the track in question is empty 3 Song Play Press the PLAY button to pl...

Страница 40: ...e can be selected via the DIAL or the buttons If the file name includes Chinese characters the file will be displayed on the lattice area in Chinese mode without highlight If the SMC contains no file...

Страница 41: ...URE and the BEAT areas display nothing To stop playing the files press the START STOP button When file is playing you may select other files with the DIAL or the buttons Then press the START STOP butt...

Страница 42: ...file highlighted The name of the file will include 8 characters The postfix name is MEM Files can be selected with the DIAL or with the buttons Press the NEXT button to load the file The data will the...

Страница 43: ...Press the SAVE button The SMC flag will be highlighted on the LCD Two saveable file types are displayed on the lattice area in two lines with the current file type highlighted The file types can be se...

Страница 44: ...ctly in letter area as shown above To display lower case letter hold down the SHIFT button DELETE When the flashing cursor is at the last ie 8th character press DELETE to erase the current character O...

Страница 45: ...LITY button SMC flag will appear on the LCD Two tools are displayed in two lines on the lattice area with the current type highlighted The tool can be selected with the DIAL or the buttons 1 Delete On...

Страница 46: ...on 2 Format Select the Format menu press the NEXT button Are You Sure will be displayed on the lattice area Press the NEXT or button to confirm The card will be formatted Operation Completed will be d...

Страница 47: ...details on MIDI messages that can be sent from the piano see Appendix 6 MIDI IMPLEMENTA TION CHART With the piano as the slave Connect the MIDI IN port of the piano with the MIDI OUT port of outer eq...

Страница 48: ...ss ALBUM button Press Y N or the DIAL to select a song then start the style by hitting any key Synth Press SYNTH button Press Y N or the DIAL to select user voice to enter SYNTH mode Then press NEXT b...

Страница 49: ...o select current menu level Press NEXT to turn to current option Press BACK to return to higher level menu Press NEXT BACK buttons simultaneously to exit the SMC menu To input file name Press keypad t...

Страница 50: ...MC LOAD ABC NEXT BACK UTI LITY SAVE VOICE LOWER VOICE STYLE ALBUM DEMO DSP DUAL FUNCTION OTS FREEZE SUSTAIN TRANSPOSE HARMONY SYNTH TOUCH BANK STORE M1 M6 Accompaniment Control START STOP INTRO FILL I...

Страница 51: ...h Strings 6 157 Synth Strings 7 158 Synth Strings 8 159 Aahs 160 Oohs 161 Voices 162 Choir 163 Poem Dream 164 Ohhhh 165 Electric Voice 166 Dooooo 167 Dream Voice 168 Hummmm 169 Vintage Vox 1 170 Vinta...

Страница 52: ...Shuffle 057 Bluegrass Latin 058 Bossanova 1 059 Pop Bossa 060 Guitar Bossa 061 Rhumba 1 062 Tango 1 063 Cha Cha 1 064 Guitar Rhumba 065 Samba 1 066 Mambo 1 067 Salsa 068 Jazz Samba 069 Pop Cha Cha 07...

Страница 53: ...r Eleventh m11 1 2 b3 4 5 b7 Cm11 Cm7 11 15 Minor Major Seventh mM7 1 b3 5 7 CmM7 CmM7 16 Minor Major Ninth mM9 1 2 b3 5 7 CmM9 CmM7 9 17 Diminished dim 1 b3 b5 Cdim Cdim 18 Diminished Seventh dim7 1...

Страница 54: ...2 Forest Polka 043 Annen Polka 044 Wave Waltz Of The Danube 045 Mandarin Duck s Tea 046 The Entertainer 047 The Heart Is Too Soft 048 Emperor s Waltz 049 Brahms Waltz 050 The Sleeping Beauty 051 Livin...

Страница 55: ...F 66 X O Sostenuto Pedal 67 O O Soft Pedal 80 O O Reverb Program 81 O O Chorus Program 91 O O Reverb Level 93 O O Chorus Level 120 X O All Sound Off 121 X O Reset All Controllers 123 O O All Notes Off...

Страница 56: ...staggmusic com EMD GROUP 03 2006...

Отзывы: