background image

LOCKING THE SAFE

To lock the safe, close the door and rotate the handle 

counter clockwise until it stops.  If the handle is not 

turned until it stops, the locking mechanism will 

not lock.

NOTE ON LOCKING THE SAFE:


Because the 

locking mechanism is deactivated for approximately 3 

to 6 seconds after the fingerprint is entered, wait a 

minimum of 6 seconds from the time your fingerprint 

has been accepted to lock the safe.

SECURING THE SAFE

SELECTING A LOCATION

1

Secure the safe with the fasteners and replace the 

carpeting.

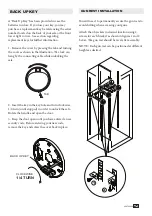
Use these holes to fasten the safe to the floor.  Drill 

the appropriate diameter and depth of pilot holes 

into the floor depending on the type of hardware 

being used and the type of floor surface. (Figure 2)

To secure your safe to the floor it will first be 

necessary to drill pilot holes through the fire 

insulation in the floor of the safe.  First place the safe 

in the desired location.  Lift the bottom carpeting up 

to find the two hole locations marked on the floor 

insulation.  Drill holes through the insulation using 

the same diameter drill as the  diameter of the 

mounting hardware you are using.  

IMPORTANT:  The fasteners you use must 

completely fill the hole you drilled into the 

insulation. (Figure 1)  You must use the fasteners 

after you drill the holes.  Failure to do so will void the 

fire rating.

2

The safe should be flat against the wall and floor.  

Remove the baseboard if necessary.

The safe must be mounted to the floor.  For 

optimal safety and security, the safe should be 

installed adjacent to a side wall with minimal 

space on either side of the safe, in an isolated, 

dry and secure area.

CHILDREN SHOULD NOT PLAY 

WITH OR AROUND THE SAFE AT 

ANY TIME.

NOTE:  The safe must be secured to the floor.   

Use the hardware provided or consult your 

hardware retailer for fastening hardware for your 

particular mounting surface.

NOTE:  This safe must be mounted to the floor.  

Failure to do so will compromise the safety and 

security of the safe.

40675-1605

4

16

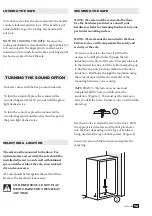
TURNING THE SOUND OFF/ON

To turn the sound off, press the scanner with a 

recorded fingerprint for 10 seconds until the green 

light flashes twice.

To turn the sound on, press the scanner with a 

recorded fingerprint until you hear two beeps and 

the green light flashes twice.

Your safe comes with the beep sound turned on.

Содержание E-69-MB-B-S

Страница 1: ...bit 3 8 drill bit 17mm socket wrench Phillips screwdriver Screw the 3 handle spokes into the hub and hand tighten These spokes are located in the front foam packaging NOTE Do not use this handle to mo...

Страница 2: ...Replace the cap securely over the reset button after setting your combination Failure to do so will compromise the safety and security of the safe You must first install the batteries which are locate...

Страница 3: ...cord a fingerprint Failure to do so will compromise the safety and security of the safe You can record up to 20 different fingerprints for opening the safe For best results each individual should use...

Страница 4: ...same diameter drill as the diameter of the mounting hardware you are using IMPORTANT The fasteners you use must completely fill the hole you drilled into the insulation Figure 1 You must use the faste...

Страница 5: ...urchase a replacement key be referencing the serial number located on the back of your safe or the front lower right corner See section regarding replacement keys for further information 1 Remove the...

Страница 6: ...ies do not interfere with items in the safe or when closing the safe door 40675 1605 6 16 STACK ON PRODUCTS CO P O BOX 489 WAUCONDA IL 60084 IMPORTANT Keep keys in a secure place away from children Ke...

Страница 7: ...ame ____________________________________ Date Purchased___ ___ ____ Owner s Address ___________________________ Unit or Apt Number _________________ City ___________________________ State ____________...

Страница 8: ...NOT COVER ANY PRODUCT OR ANY PART OF ANY PRODUCT WHICH HAS BEEN SUBJECT TO EXCESSIVE USE ACCIDENT NEGLIGENCE IMPROPER INSTALLATION INCORRECT MAINTENANCE ALTERATION OR REPAIR BY ANYONE OTHER THAN STAC...

Страница 9: ...queta en la parte inferior delantera de la caja fuerte Mantenga las llaves en un lugar seguro lejos de los ni os No guarde la llave hacia arriba o hacia este documento en la caja fuerte No mueva esta...

Страница 10: ...r al bot n Vuelva a colocar la tapa de forma segura sobre el bot n de reinicio despu s de establecer su combinaci n De no hacerlo pondr en peligro la seguridad y la seguridad de la caja fuerte Primero...

Страница 11: ...registrar una huella digital De no hacerlo pondr en peligro la seguridad y la seguridad de la caja fuerte Puede registrar hasta 20 huellas digitales diferentes para la apertura de la caja fuerte Para...

Страница 12: ...o utilizando el mismo ejercicio di metro que el di metro de las piezas de montaje que est utilizando IMPORTANTE Los elementos de sujeci n que utilice deben llenar completamente el agujero que ha perfo...

Страница 13: ...eferencia al n mero de serie ubicado en la parte posterior de su caja fuerte o en la esquina de la parte frontal inferior derecha V ase la secci n relativa a las llaves de repuesto para m s informaci...

Страница 14: ...de la puerta no interfieran con art culos en la caja fuerte o cuando se cierra la puerta de seguridad 40675 1605 14 16 STACK ON PRODUCTS CO P O BOX 489 WAUCONDA IL 60084 IMPORTANTE Mantenga las llaves...

Страница 15: ...____________________________Fecha de compra___ ___ ____ Direcci n del propietario ___________________________ Unidad o Apartamento N mero _________________ Ciudad ___________________________ Estado __...

Страница 16: ...e compra del producto ESTA GARANT A NO CUBRE NING N PRODUCTO O CUALQUIER PARTE DE CUALQUIER PRODUCTO QUE HA SIDO OBJECTO PARA USO EXCESIVO ACCIDENTE NEGLIGENCIA INSTALACI N INADECUADA UN MANTENIMIENTO...

Отзывы: