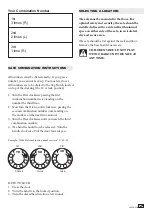
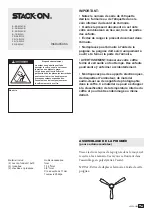
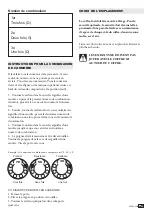
Stack-On E-16-MG-C Скачать руководство пользователя страница 3

IMPORTANT

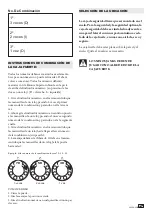
Keep your combination number in a secure place, away from 

children.  Keep this record of your serial number and 

combination number in a secure place separate from your 

safe. If you forget or lose the combination number you will 

need the serial number as a reference for obtaining a copy of 

your combination number.

The shelving can be installed by locating the shelf 

clips to the desired locations and setting the shelf 

in place.

NOTE: The scope stand-off will function properly 

for many combinations of guns with scopes.
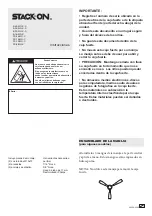
Screw the scope stand-off into the pilot hole of the 

barrel rest.

INSTALLATION OF SCOPE STAND-OFF

(Select Models only)

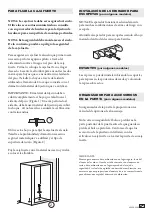
DOOR ORGANIZER ACCESSORIES

(Select Models only)

Your door organizer provides a variety of storage 

options for your supplies.

Note:  Securely attach the pistol holsters to the back 

panel before you holster your pistol.  Make sure the 

door accessories do not interfere with items in the 

safe or when closing the safe door.
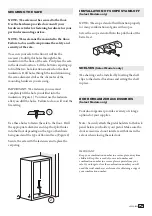
SECURING THE SAFE

1

Secure the safe with the fasteners and replace the 

carpeting.

Use these holes to fasten the safe to the floor.  Drill 

the appropriate diameter and depth of pilot holes 

into the floor depending on the type of hardware 

being used and the type of floor surface. (Figure 2)

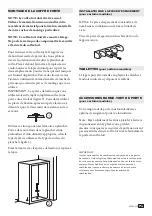
To secure your safe to the floor it will first be 

necessary to drill pilot holes through the fire 

insulation in the floor of the safe.  First place the safe 

in the desired location.  Lift the bottom carpeting up 

to find the two hole locations marked on the floor 

insulation.  Drill holes through the insulation using 

the same diameter drill as the  diameter of the 

mounting hardware you are using.  

IMPORTANT:  The fasteners you use must 

completely fill the hole you drilled into the 

insulation. (Figure 1)  You must use the fasteners 

after you drill the holes.  Failure to do so will void the 

fire rating.

2

NOTE:  The safe must be secured to the floor.   

Use the hardware provided or consult your 

hardware retailer for fastening hardware for your 

particular mounting surface.

NOTE:  This safe must be mounted to the floor.  

Failure to do so will compromise the safety and 

security of the safe.

SHELVES 

(Select Models only)

40250-2203

3 15

Содержание E-16-MG-C

Страница 1: ...stroyed Warning Keep your safe closed and locked at all times when not in use Children could accidentally be locked inside the safe Do not move this safe using its handle The handle should only be use...

Страница 2: ...released Turn the handle clockwise Pull the door towards you All numbers must be dialed exactly If you pass a number you can not back up You must start over All numbers are to be dialed to the Top Not...

Страница 3: ...Secure the safe with the fasteners and replace the carpeting Use these holes to fasten the safe to the floor Drill the appropriate diameter and depth of pilot holes into the floor depending on the typ...

Страница 4: ...tion icon 3 Follow the Instructions provided to receive your key NOTE You can store your Key Serial and Combination on Stack On s SECURE website stack on com under Customer Service Storing your Key or...

Страница 5: ...IS WARRANTY DOES NOT COVER ANY PRODUCT OR ANY PART OF ANY PRODUCT WHICH HAS BEEN SUBJECT TO EXCESSIVE USE ACCIDENT NEGLIGENCE IMPROPER INSTALLATION INCORRECT MAINTENANCE ALTERATION OR REPAIR BY ANYONE...

Страница 6: ...rra tre endommag ou m me d truit AVERTISSEMENT Conservez votre coffre ferm et verrouill en tout temps Des enfants pourraient s y enfermer accidentellement Ne d placez pas l armoire l aide de la poign...

Страница 7: ...verrouill e Tournez la poign e dans le sens des aiguilles d une montre Tirez la porte vers vous Il faut faire tous les num ros de fa on exacte Si vous sautez un num ro vous ne pouvez pas revenir en a...

Страница 8: ...les pi ces de fixation et replacez le tapis Utilisez ces trous pour fixer l armoire au plancher Percez des avant trous dans le plancher d une profondeur et d un diam tre appropri s selon le type de pi...

Страница 9: ...tructions fournies pour recevoir votre cl REMARQUE Vous pouvez stocker votre num ro de cl votre num ro de s rie et votre combinaison sur le site Web SECURE de Stack On stack on com sous Service client...

Страница 10: ...TE PARTIE D UN PRODUIT QUI A FAIT L OBJET D UNE UTILISATION EXCESSIVE D UN ACCIDENT D UNE N GLIGENCE D UNE INSTALLATION INCORRECTE D UNE MAINTENANCE INCORRECTE D UNE MODIFICATION OU D UNE R PARATION P...

Страница 11: ...ta ubicada al frente parte derecha abajo de la unidad PRECAUCI N Mantenga cerrada con llave su caja fuerte en todo momento que no se encuentre en uso Los ni os pueden quedar encerrados dentro de la ca...

Страница 12: ...o que las manecillas de un reloj Jale la puerta hacia usted Todos los n meros deben ser marcados exactamente Si se pasa un n mero no puede retroceder Deber volver a comenzar Todos los n meros deber n...

Страница 13: ...erte PARA FIJAR LA CAJA FUERTE Fije la caja fuerte con el material necesario y vuelva a colocar la alfombra Utilice estos hoyos para fijar la caja fuerte al suelo Taladre a la profundidad y di metro n...

Страница 14: ...recibir su clave NOTA Usted puede guardar su No de Llave No de Serie y Combinaci n en el sitio web SEGURO de Stack On stackon com bajo Atenci n al Cliente Customer Service Guardar su No de Llave o Co...

Страница 15: ...el producto ESTA GARANT A NO CUBRE NING N PRODUCTO O CUALQUIER PARTE DE CUALQUIER PRODUCTO QUE HAYA SIDO SUJETO A USO EXCESIVO ACCIDENTE NEGLIGENCIA INSTALACI N INCORRECTA MANTENIMIENTO INCORRECTO ALT...

Отзывы: