MAINTENANCE
Electrical shock hazard.
Before removing
fixture from pool wall, ALWAYS TURN OFF THE POWER
at the breaker. Installation and maintenance of this cir-
cuit, the light, light niche, and any other accessories
attached to this circuit must be performed by a licensed
electrician. The complete electrical system must be
installed, tested, and approved by a licensed electrician
before it is placed in operation.
Risk of cuts, burns, and electrical shock.
Avoid direct impacts on glass lens. Do not install dam-
aged or broken lens.
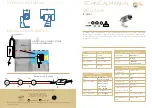
For Sunbrite
™
Lamps
See Figure 2, Page 5, for Key numbers.
1. Be sure that the power is off. Allow the lamp to cool
before re-lamping.
2. Loosen the captive leader screw (Key No. 1) from the
top of the fixture face ring (Key No. 2)
NOTICE:
The screw in the face ring may be recessed.
3. Remove the lamp housing (Key No. 6) and place on
the pool deck.
4. Using a clean soft lint free cloth, carefully wipe all
sealing surfaces on the lamp housing and lens.
Replace lamp with an equivalent to the original lamp.
5. Replace the gasket (Key No. 4).
6. To reassemble the lens assembly to the lamp housing,
reverse the disassembly process. Be sure that the lamp
housing is clean, dry, and free of all traces of mois-
ture, before sealing the fixture.
7. Wind the extra cord around the lamp housing and
place the lamp housing back in the niche. Be sure to
align the locator tab at the bottom of the lamp hous-
ing with the notch in the bottom of the niche.
8. Fasten the lamp housing into the niche using the cap-
tive leader screw (Key No. 1) at the top of the trim
ring.
4
U.S.
Canada
Cord Length
Model
Model
in Feet (m)
12 Volts -
100 Watts
05501-2204
05501-2232
15 (4.5)
05501-2205
05501-2233
30 (9.1)
05501-2206
05501-2234
50 (15.2)
05501-2207
05501-2235
75 (22.8)
05501-2208
05501-2236
100 (30.5)
05501-2209
05501-2237
125 (38.1)
05501-2210
05501-2238
150 (45.7)
12 Volts -
200 Watts
05501-2211
05501-2239
15 (4.5)
05501-2212
05501-2240
30 (9.1)
05501-2213
05501-2241
50 (15.2)
05501-2214
05501-2242
75 (22.8)
05501-2215
05501-2243
100 (30.5)
05501-2216
05501-2244
125 (38.1)
05501-2217
05501-2245
150 (45.7)
120 Volts -
300 Watts
05502-1990
05502-2218
15 (4.5)
05502-1991
05502-2219
30 (9.1)
05502-1992
05502-2220
50 (15.2)
05502-1993
05502-2221
75 (22.8)
05502-1994
05502-2222
100 (30.5)
05502-1995
05502-2223
125 (38.1)
05502-1996
05502-2224
150 (45.7)
120 Volts -
500 Watts
05502-1997
05502-2225
15 (4.5)
05502-1998
05502-2226
30 (9.1)
05502-1999
05502-2227
50 (15.2)
05502-2200
05502-2228
75 (22.8)
05502-2201
05502-2229
100 (30.5)
05502-2202
05502-2230
125 (38.1)
05502-2203
05502-2231
150 (45.7)
Sunbrite
™
Large Underwater Lights
SPECIFICATIONS