Parts List & Operating Instructions
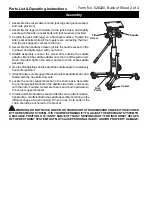
1. Assemble the swivel casters on the jack legs using lock washers
and nuts provided.
2. Assemble the legs (with casters) to the jack’s base, and slightly
secure with the Allen socket bolts and lock washers provided.
3. Position the jack (with legs) on a hard level surface. Tighten the
Allen socket bolts while all four casters are contacting the floor,
and the jack appears vertical to the floor.
4. Assemble the handle by screwing it into the handle socket on the
top base and tightening it with your hand.
5. Saddle assembly: Loosen the screw from outside the saddle
adapter. Mount the saddle adapter onto the top of the piston rod.
Once mounted, tighten the screw and secure the entire saddle
assembly.
6. Use the tilt adjusting knob to adjust the saddle angle to a relatively
horizontal position.
7. Attach the two corner support brackets onto the saddle board, and
fasten with the hex bolts and nuts.
8. Locate the corner support bracket in the chain pack. Assemble
the corner support bracket on the saddle side frame, and secure
with the nuts mounted. Assemble chains and chain hardware to
the corner support bracket.
9. Chains and chain hardware are provided to secure a transmission,
transfer box, or differential to the saddle assembly according to the
different shape of each housing. When in use, both ends of the
chain should be anchored to the bracket.
Assembly
WARNING: DO NOT RAISE, LOWER, OR TRANSPORT A TRANSMISSION UNLESS IT IS SECURED
BY THE RESTRAINT SYSTEM. IT IS YOUR RESPONSIBILITY TO ADJUST THE RESTRAINT SYSTEM TO
A SUITABLE POSITION. OTC IS NOT SUBJECT TO ANY RESPONSIBILITY FOR INCORRECT SETUPS
OF THE RESTRAINT SYSTEM THAT MAY CAUSE PERSONAL INJURY AND/OR PROPERTY DAMAGE.
Tilt
Screw
Saddle
Foot
Pedal
Caster
Form No. 528220, Back of Sheet 2 of 4


