SPRT SP-POS801 Скачать руководство пользователя страница 12

2.4.2 USB interface

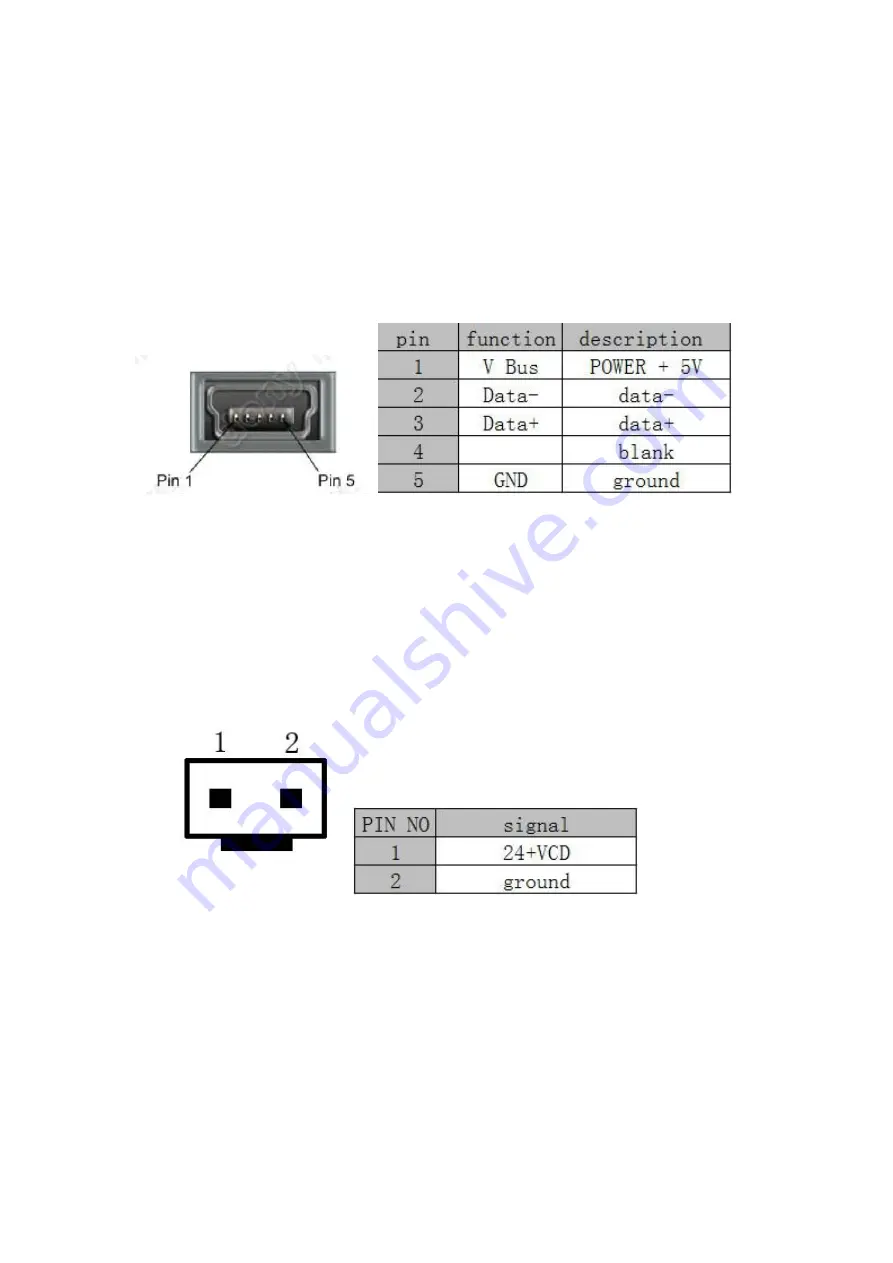
The USB interface of the POS801 printer is mini-USB interface, outer

appearance and pin assignment is shown in Figure 2-5:

Figure 2-5 Mini-USB socket and pin definitions

2.4.3 Power Connection

SP-POS801 printer uses the external power supply adopter as

24V±10

%、

2A, power socket is 2114S-02 model, as Fig. 2-6 shows:

Fig.2-6 Power Socket

2.5 Buttons and Indicators

There are two buttons, one inner buzzer and two indicators for POS801.

POWER

is power button. When printer is off, press

POWER

button

for one second, the buzzer will sound, then release

POWER

button.

Printer gets into the normal working status. When the printer is on,

Содержание SP-POS801

Страница 1: ...SPRT Thermal Receipt Printer User s Manual SP POS801 Ver 1 02 Beijing Spirit Technology Development Co Ltd www sprt printer com...

Страница 2: ...n Specification 4 2 1 Printer Appearance 4 2 2 Installation of the printer 6 2 3 Paper Installation 7 2 3 1 Paper Loading 7 2 3 2 Solution to Paper Jam 7 2 4 Interface 8 2 4 1 Serial Interface 8 2 4 2...

Страница 3: ...5 0 5mm Print density 8 dots mm 576 dots line Print speed max 170mm sec Reliability 1 Print head life 100km Using condition Print 12 24 ANK characters print 50 lines each time intermittent print repe...

Страница 4: ...ven parity optional USB Interface Mini USB interface 1 5 Print Control Commands Character print commands support double width double height print of ANK characters user defined characters and Chinese...

Страница 5: ...on humidity 10 80 Storage temperature 20 60 Storage humidity 10 90 1 8 Outline Dimension Weight and Installation Picture Weight 400g not including paper roll Outline dimension 132mmx125 5x87mm LxWxH P...

Страница 6: ...Installing hole dimension of customer s panel as picture1 2 Fig 1 2 Chapter 2 Operation Specification 2 1 Printer Appearance About the name of each part of printer pls refer to picture 2 1...

Страница 7: ...Paper cover Paper exit Door handle Feed button Power button Indicator Red Power indicator Green Serial interface Power socket USB Interface Paper ending sensor socket Fig 2 1 Printer Appearance...

Страница 8: ...mbedded printer in the installing hole of customer s panel open the printer paper cover clockwise to tighten the two screws to complete the installation of the printer Print installation shown in Figu...

Страница 9: ...nd press it downwards lightly 1 Pay attention to the direction of loading paper make the printing surface face to the print head 2 Please don t feed or draw the paper forwards or backwards with hands...

Страница 10: ...XON XOFF handshaking protocols uses IDC10 socket The pin order of the serial port is as Fig 2 3 shows Fig 2 3 Pin Order of Serial Port The pin assignment of serial interface is shown in Fig 2 3 Pin N...

Страница 11: ...assignment of serial interface Note 1 Source denotes the source that signal come from 2 Logical signal level is EIA The baud rate and data structure in serial interface mode is 9600bps 8 bit data bits...

Страница 12: ...01 printer uses the external power supply adopter as 24V 10 2A power socket is 2114S 02 model as Fig 2 6 shows Fig 2 6 Power Socket 2 5 Buttons and Indicators There are two buttons one inner buzzer an...

Страница 13: ...larm If ERROR indicator flashes and the buzzer sounds it means the printer has error According to different flashing types the different errors of printer are indicated 1 Unrecoverable error the times...

Страница 14: ...flashes continuously Error type Description Type of flash Automatic recoverable error LED continues flashing the temperature of printing head is over high and the cover is wrong 2 6 Turn on the printe...

Страница 15: ...old down POWER button to turn on the printer 3 Close the cover the printer will print out 3 lines as below Hexadecimal Dump To terminate hexadecimal dump Press FEED button three times This means the p...

Страница 16: ...e each second Notice Both serial interface and USB interface can support program upgrading online APPENDIX A Parameters Setting This appendix is the method of setting default parameters of printer by...

Страница 17: ...ont FEED FEED Density FEED FEED FEED Buzzer FEED FEED FEED FEED Print lack of paper FEED FEED Black mark FEED FEED English Traditional Chinese Chinese BIG5 12 24 9 17 Middle Low High 9600 57600 38400...

Отзывы: