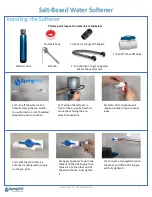
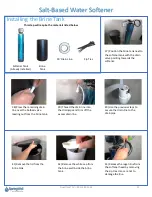
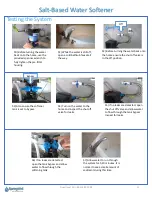
Spring Well SS+ Скачать руководство пользователя страница 9

29) 

To ensure the drain line doesn’t 

come out from the drain a pair of 
zip ties are recommended. They 
can be inserted through two pairs 
of holes drilled high up in the 
drainpipe.

30) Pushing the zip ties inwards will 
create a loop.

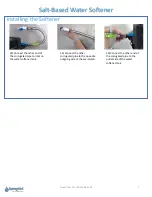
28) Before turning the water 
back on to the home, use the 
provided spanner wrench to 
fully tighten the pre-filter 
housing.

31) Insert the drain line into the 
zip tie loops and secure in pace. 
The excess can then be trimmed 
off the zip ties.

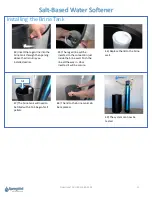
32) The power cord will be 
connected to the connection 
on the far left beneath the 
electronic tank head.

33) The power adapter will then 
be plugged into a power supply 

that isn’t controlled by a switch.

Questions? Call (800)-589-5592

9

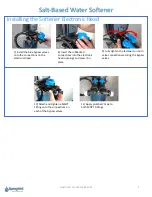
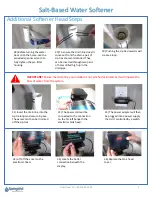
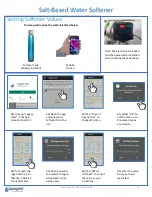
Additional Softener Head Steps

IMPORTANT! 

Ensure the drain line you installed is not pinched or kinked or it will impede the 

flow of water from the system.

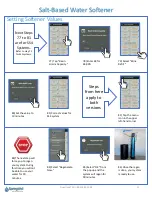
35) Locate the batter 
connection beneath the 
display.

34) Lift off the cover to the 
electronic head.

36) Replace the tank head 
cover.

Salt-Based Water Softener

Содержание SS+

Страница 1: ...N FRI 9AM 6PM EST 800 589 5592 WWW SPRINGWELLWATER COM Our traditional salt based whole house water softeners are the most reliable ion exchange softeners on the market today Use 40 less detergent ext...

Страница 2: ...Softened Water Into Home 1 Water from your source will be softened by the ion exchange softener 2 The salt from your brine tank will regularly regenerate the media in your softening system The quanti...

Страница 3: ...on a main water supply line Caution Do not install on well water unless you have spoken to a customer service representative first SS1 Tank Width 9 Tank Height 48 57 with Head Flow Rate 11 GPM Servic...

Страница 4: ...tank 2 There is a blue cap inside that also needs to be removed Both caps can be discarded 3 Locate the opening at the bottom of the electronic head 4 Align the opening on the bottom of the tank head...

Страница 5: ...ections securing the bypass valves 7 Install the blue bypass valves onto the connections on the electronic head 10 Attach and tighten a MNPT Fitting onto the connections on each of the bypass valves 1...

Страница 6: ...will attach a 1 inch threaded adapter to each connection Questions Call 800 589 5592 6 Salt Based Water Softener 14 Note All connections will require plumbers tape to avoid leaks 16 Apply plumbers tap...

Страница 7: ...Softener 20 Connect the other end of the corrugated pipe to the outlet side of the water softener tank 19 Connect the other corrugated pipe to the opposite outgoing side of the pre plumb 18 Connect th...

Страница 8: ...pulled out of the tank head 25 Align the hoes clamp over the connection then align the screw on the hose clamp so that it runs parallel to the connection on the drain valve Tighten the clamp This ste...

Страница 9: ...secure in pace The excess can then be trimmed off the zip ties 32 The power cord will be connected to the connection on the far left beneath the electronic tank head 33 The power adapter will then be...

Страница 10: ...ious steps to secure the drain line to the drainpipe 41 Remove the lid from the brine tank This step will require the materials listed below 37 Position the brine tank next to the softener tank with t...

Страница 11: ...the brine well 44 Insert the regen line into the brine tank through the opening above the drain line you installed earlier 47 The brine tank will need to be filled with 4 to 5 bags of salt pellets 49...

Страница 12: ...e the softener tank is set to bypass 54 Turn on the water to the home and inspect the shut off valve for leaks 55 If no leaks are detected open the shut off valve and allow water to flow through the t...

Страница 13: ...lready Installed Mobile Device 59 Open the app and select your softener from the list 60 Tap Time of Day on Unit to change the time 61 Select OK to set the time on to the same time as your device 62 T...

Страница 14: ...ation Day Override 69 Change the value to 14 days 70 Tap Reserve Capacity 71 Change the value to 10 72 Tap Resin Grains Capacity 73 Change the value to 32 for 32 000 74 Select Brine Refill 75 Change t...

Страница 15: ...S4 system 82 Tap the menu icon in the upper left hand corner 83 The next step will force you to regen your system During this time you will not be able to use your water for 90 minutes 84 Select Regen...

Отзывы: