


9
9.
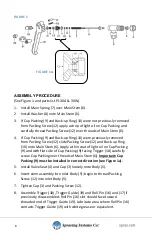
Thread flat side of hex Stem Nut (13) onto threaded end of Main Stem
(6) until approximately 3/16” of threaded stem projects from recessed
surface of Stem Nut (13).
10.
Install #6 Burr (washer) (15), Spring (14), and end of Main Stem (6)
which has hex Stem Nut (13) onto Trigger Guide (19). Do not allow hex
Stem Nut (13) to drift from preset position on Main Stem (6).
11.
Tighten hex Stem Nut (13) using a back-up wrench on the flats of
Trigger Guide (19).
12.
Place Body Trigger Assembly (3) thru (19) in Left Hand Housing (2)
making sure Roll Pin (17) is engaged in hole in Left Hand Housing (2).
13.
Install Lock Spring Ring (20) in Left Hand Housing (2).
14.
Place Trigger Lock (21) in Left Hand Housing (2).
15.
Install Right Hand Housing (2) and 7 Screws (1).
Caution:
Do not over tighten screws.
16.
Be sure Trigger Lock (21) is in locked position before attaching to
pump.
REPLACEMENT OF PACKING CUP (9)
Steps 1 through 14 of Disassembly Procedure and steps 1 through 16 of
Assembly Procedure.
TRIGGER ADJUSTMENT PROCEDURE
When correctly adjusted there should be no Stem (6) travel when Trigger Lock
(21) is in the locked position and trigger operation is attempted. A visual check
can be made by detecting no Stem Nut (13) movement. Adjust Main Stem (6)
to engage Trigger Guide (19) approximately 3/16” which should result in 1/8”
to 5/32” of stem travel when mounted in plastic housing. (See steps 9, 10, and
11 of Assembly Procedure.)
Содержание GunJet 30A
Страница 1: ...30A and 30AW GunJet Spray Gun USER GUIDE spray com MI 30A 30AW...
Страница 2: ...2 Contents CONTENTS 2 INTRODUCTION 3 WARNINGS PRECAUTIONS 4 INSTALLATION 6 MAINTENANCE 7...
Страница 10: ...10 Parts List...
Страница 11: ...11...