


8
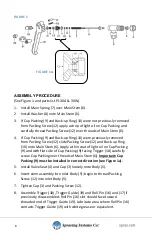
ASSEMBLY PROCEDURE
(See Figure 1 and parts list PL 30A & 30W)
1.
Install Main Spring (7) over Main Stem (6).
2.
Install Washer (8) onto Main Stem (6).
3.
If Cup Packing (9) and Back-up Ring (10) were not previously removed
from Packing Screw (12) apply a drop of light oil on Cup Packing and
carefully thread Packing Screw (12) over threads of Main Stem (6).
4.
If Cup Packing (9) and Back-up Ring (10) were previously removed
from Packing Screw (12) slide Packing Screw (12) and Back-up Ring
(10) onto Main Stem (6). Apply a thin coat of light oil on Cup Packing
(9) and with flat side of Cup Packing (9) facing Trigger (18) carefully
screw Cup Packing over threads of Main Stem (6
)
.
Important: Cup
Packing (9) must be installed in correct direction (see Figure 1a).
5.
Install Valve Seat (4) and Cap (3) loosely onto Body (5).
6.
Insert stem assembly into Inlet Body (5); begin to thread Packing
Screw (12) into Inlet Body (5).
7.
Tighten Cap (3) and Packing Screw (12).
8.
Assemble Trigger (18), Trigger Guide (19) and Roll Pin (16) and (17) if
previously disassembled. Roll Pin (16) slot should face toward
threaded end of Trigger Guide (19). Lubricate area where Roll Pin (16)
contacts Trigger Guide (19) with white grease or equivalent.
FIGURE 1
FIGURE 1A
Содержание GunJet 30A
Страница 1: ...30A and 30AW GunJet Spray Gun USER GUIDE spray com MI 30A 30AW...
Страница 2: ...2 Contents CONTENTS 2 INTRODUCTION 3 WARNINGS PRECAUTIONS 4 INSTALLATION 6 MAINTENANCE 7...
Страница 10: ...10 Parts List...
Страница 11: ...11...